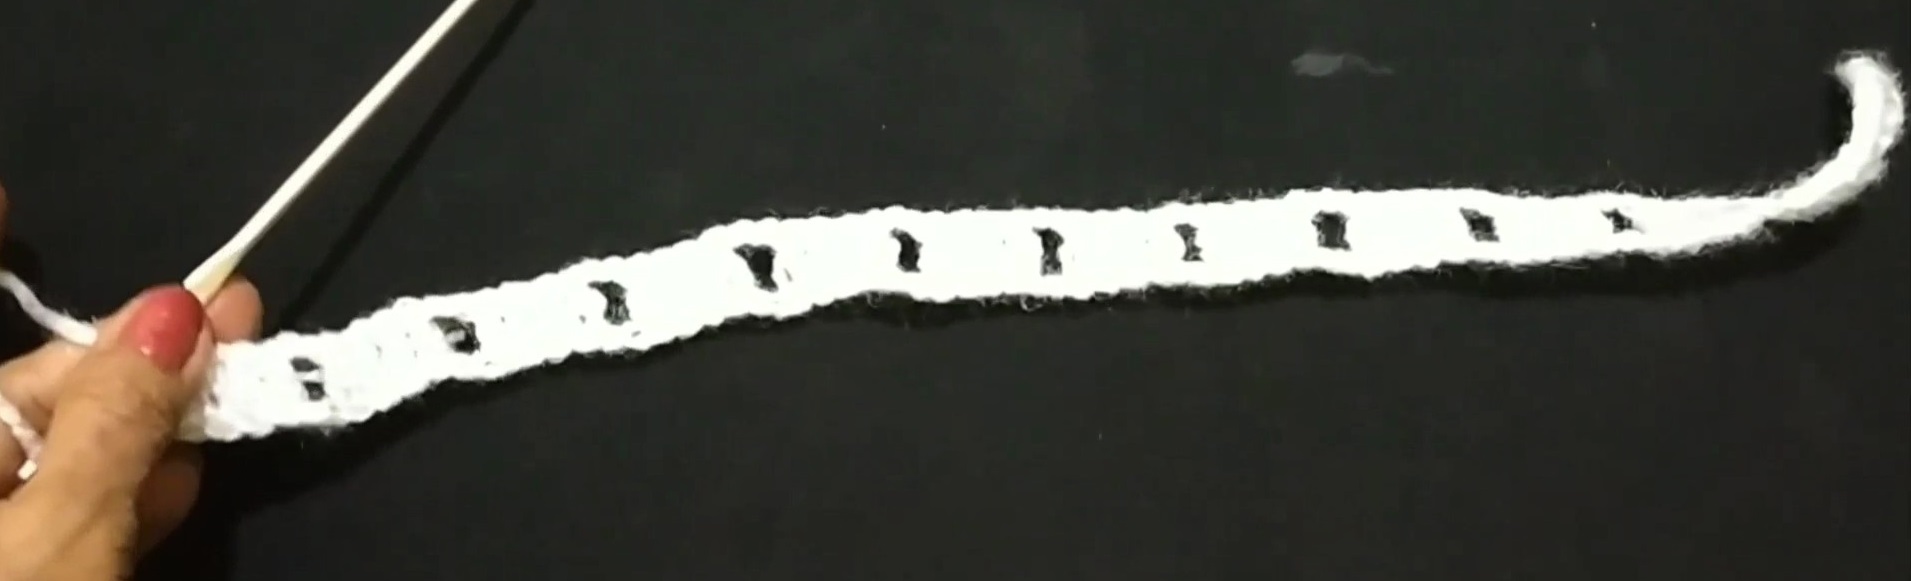
R1: ch4, tr 1 in first ch (loop made), [ch12, tr 1 in 4th
ch] repeat till the required height.
R2: sl st in last loop, ch3 (as dc), [(puff1, hdc 3 in the
gap between dc and puff) 5 times, dc 1 in same loop, dc 1 in next loop] rep for
all loops.
Puff means (YO insert into hook, YO get 2 long sts) 4 times,
YO pass through 8 sts, YO pass through2sts.
R3: In the last loop make 5 puffs more (total 10 puffs in
the last loop), dc 1 in same loop, dc 1 in next loop, [(puff1, hdc 3 in the gap
between dc and puff) 5 times, dc 1 in same loop, dc 1 in next loop] rep till
end, join by sl st.
Belt: ( ch3, dc 1 in first ch) rep till the required length.
Lastly make a puff.
Make another part of belt similarly.
Join yarn at the centre st of central flower, ch7, tr 1 in 4
th ch, sl stin the loop, ch3 (as dc), [(puff1, hdc 3 in the gap between
dc and puff) 5 times, join at the first
ch (out of 7 made just now, again 5 puffs on other side..
Sew beads if you want. Our garland will be as in photo 1.
The following video with English subtitles may help you.
This Garland for Ganesh ji on last day of Ganesh Utsav. This is made by red leaves, favorite colour of Ganeshji (as heard).
Length 9”, weight 8 gm (with beads). I used 4 ply yarn, 1.75
mm and 0.5 mm hooks. I also needed some beads.
Pattern:
Cord: Thread the bead in red yarn, make chains till the
length is 7-8 inches or as per your need.
Leaf: Make chs 6, insert hook in 2nd ch, YO get 1 st out,
(insert in next ch, YO, get 1 st out) 4 times, total 6 sts on hook, (YO pass
through 2 of them) 5 times,
ch1, TURN,
(insert hook in gap between two bump, YO get one st out) 5 times,
(6 sts on hook) (YO, pass through 2 sts) 5 times, ch1 TURN,
join with first st on opposite side by sc. Elongate the loop
on hook, thread the bead, ch 1 to fix the bead.
Then make another ch6 and new leaf.
Repeat this till the required length.
Lastly make chs for 6-7 inches as on other side, lastly
thread a bead and bind off. Make two pieces. Join centre, sew tassel at centre.
The following video with English subtitles may help you.
This is the last, out of ten Ganapati Aasans (small rug to put Ganesh idol). In all these doilies the common things are 1. they are small in size and 2. with simple central part they have beautiful borders.
Here also middle part is too simple just by seeing it you can guase the pattern.
I used 4 ply yarns and 1.75 mm crochet hook. Its diameter is 8.5" and weight is 25 gm (15 gm green yarn and 10 gm red).
R1: In a magic loop dc12, cl (12 sts)
Note: first dc means always ch3.
R2: (dc 1 in dc-st, fpdc around dc) 12 times, cl (24 sts).
R3: [dc 1 in 2 sts, (one dc-st and second fpdc-st), fpdc
around fpdc] 12 times, cl (36 sts).
R4: (dc1 in 3 sts, fpdc on fpdc) 12 times, cl (48 sts)
R5: (dc1 in 4 sts, fpdc on fpdc) 12 times, cl (60 sts)
R6: (dc1 in 5 sts, fpdc on fpdc) 12 times, cl (72 sts)
R7: (dc 1 in 6 sts, fpdc on fpdc) 12 times, cl (84 sts)
R8: (dc1 in 7 sts, fpdc on fpdc) 12 times, cl (96 sts)
R9: (dc1 in 8 sts, fpdc on fpdc) 12 times, cl (108 sts)
R10: (dc1 in 9 sts, fpdc on fpdc) 12 times, cl (120 sts).
R11: With red yarn, [V at fpdc-st {V means (dc 1, ch3, dc1)
in same st}, ch4, skip 4 sts, V on next (this V will be on the middle st out of
9 dc-sts), ch4, skip 4 sts] 12 times, cl (24 Vs made).
R12: [On right arm of V make, (dc1, ch3, sc 1 at the top on
dc) 5 times then on left arm of V make, (dc1, ch3, sc 1 at the top on dc) 5
times, ch1, sc 1 in ch3-sp of next V, ch1] 12 times, make ch3, sc 1 in the very
first dc of round 12.
R13:[ In the upper part of V, that is on ch3-sp make, (dc1,
ch3, sc 1 at the top on dc) 5 times, join by sc 1 on the st after last ch3-picot,
ch3, sc 1 on the st before picot of nest flower] 12 times, cl.
After completeing the round it will look as in fig 1.
The following video with English subtitles may help you.
As I have already written that I am going to make 10 different Aasan for Lord Ganesh ji. Since Ganesh Utsav is of 10 days, so per day new Aasan for Ganeshji. This one I made with multipurpose. As many of you may know the tradition that when Ganesh idol is brought in side home, it is covered and for that purpose I made it big so that idol is covered by that. Also it is good to cover Paat (wooden sitting tool). As in next photo, I have shown.
This rectangular mat with lacy border in pink shades look beautiful.
Length 25”, width 18”, weight 100 gm.
Make it in any size. Number of windows should be multiple of
6 plus 4.
I used Ganga’s white and pink yarn.
R1: ch3 (as first dc), dc 1 in 3 chs starting from 4th
ch, (ch2, skip 2 sts, dc 1 in each of the next 4 chs) rep till end.
R2: ch3+2, [dc 1 in forth dc st (out of 4 dcs of previous
row), dc 2 in ch2-sp, dc 1 on next st, ch2, skip 2 sts] rep till end, cl.
Repeat rows 2 and 3 till the height is 9”.
Border R1: Join pink yarn at first st on RS, ch7 ch3 for
first dc and then ch4), skip 3 sts, [sc 1 in next 2 sts (middle 2 dc-sts), ch9,
skip 7 sts, sc2 in gap, ch9, skip 7 sts] rep till end, lastly ch4, dc 1 in last
st. At corner ch4, dc 1 in same st, ch4, skip one block of dc 4 and sc 2 in
gap, (ch9, skip 2 bloks (one of dc 4 and other of ch2-sp), sc 2 in next) rep
till corner, at corner ch4, dc 1 at corner st, ch4, dc 1 in same st….
Similarly on other two sides.
R2: (sc 1 in each of 9 chs and sc 1 in 2 sc-sts) rep till
end, cl.
R3: shell at corner (dc2, ch2, dc2), [ch2, skip 2 sc sts
(out of 9 sc-sts) tr 1 in next, ch1, tr 1 in next, ch1, tr3 in next st (middle
st), ch1, tr 1 in next, ch1, tr1 in next, skip last 2 sts (out of 9), ch2,
shell in the middle st of next 9 sc-sts] rep till corner, at corner, ch2, shell
on dc-st, ch6, shell on next dc-st, then rep from [to] till other corner,
complete remaining two sides similarly.
R4: sl st and get the st into ch2-sp of shell, [ch2, (dc 1
on tr-st, dc 2 in ch1-sp) 6 times, dc 1 on last tr, ch2, join by sc 1 in shell]
rep till corner, lastly ch2, join by sc 1 in shell, dc10 in ch6-sp, join by sc 1 in shell and rep on remaining
three sides.
R5: at ch1-sp of shell sc1, [ch2, 3dctog on dc over first tr-st,( ch2, skip 2 sts, 3 dctog on next tr-st) 6 times, ch2, sc 1 in shell] rep till
corner. At corner, ch3, 3dctog on first dc-st (out of 9) ch4, skip 3 sts,
3dctog on next, ch4, skip 3 sts, 3dctog on last dc-st (out of 9), ch 3, sc 1 in
next shell,
Repeat on remaining sides.
R6: [sc 3 in ch3-sp, (ch4, sc 1 in ch2-sp in between two 3dctog) 6 times] rep, cl.
R7: Join dark pink yarn at ch4-sp of corner,[ (sc 2 in same
gap, ch4-picot, sc2 in same gap) in ch4-spaces, sc 1 at join] 3 times, then in
the middle ch4-sp make (sc2, five ch4-picots, sc2), join by sc1, then in the
remaining three ch4-sps again make (sc2,
ch4-picot, sc2), at corner sc 1 in each
st, the in ch4-sp make (sc2, five ch4-picot, sc2) again sc 1 in each st,
Complete like this. The beautiful table mat as in photo 1 is ready.
The following video with English subtitles may help you.
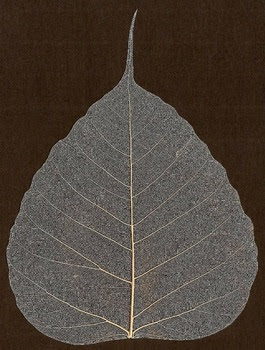
Leaf Art Painting is one of the very old and treasure art of Indian heritage. Generally Peepal leaf is used for this because of it's size and shape. This painting is made on dyed leaf and many times on dried and dyed leaf. But drawing on dried Peepal leaf that is neted peepal leaf is very special and delicate art form, it requires patience and concentration.
For such paintings green leaf is immeresed in water for 10-15 hourss then taken out and slowly cleared by water till the outer surface is washed and only veins will be seen. Another method is, it is dipped in water for 8-10 days, changing it's water after every 2-3 days till the outer suface vanishes and only skeleton is exposed as in next photo. Then beautiful paintings are worked on this dried peepal leaf.
So I thought that why not to make such Ganesh ji on Peepal leaf by crochet? Then I take Ganga Hobby India Crochet threads and make this Ganesh ji. Actually I want skin colour for face, body etc but it was not with me and I am too eager to wait, so I used white,
First I draw the picture of what I had to make.
Then started to make applique of Ganeshji and while crocheting, go on writting step by step. After the applique completed, I have to make the veins of leaf around the Ganeshji. In super excitment, I just go on making and finally it came out as the photo below. But I forgot to write the making of veins. After first green round, I had made the shape of leaf as this photo.
Then fill inside by making ch3 horizontally, vertically and go on joining so as to fill that part. Finally it comes out to be so beautiful.
But when I was making video I understand that I have not noted anywhere about, how I made veins also it is too complecated. So I simplify the veins making process and it turned out to be as on left of first photo above. Thus automatically two methods of making leaf were ready, you may use any one which you like. In pattern I have described as in video (second).
The UNIQUE and BEAUTIFUL hand made show piece.
I used 1.75 mm crochet hook.
If you want to make bigger one and put on wall then use wool instead of this thread and with the same pattern, you can make a beautiful wall frame.
Pattern:
Face:
R1: In a magic loop ch1, sc 7, cl, (place marker in
first st)
R2: sc2 in each st, (14 sts)
R3: (sc1 in one st, sc 2 in next) 7 times, (21 sts)
R4: sc1, hdc 1, (dc3), hdc 1 in 3 sts, sl st1, hdc1 in 3
sts, (dc3), hdc1, sc1. Next sc 1 in 8 sts, sl st in first st. (25 sts), ch1
turn
Row 5: sc 1 in 8 sts, ch1, turn (8sts)
R6: skip first st, sc 1in each of the 6 sts, sl st in last,
BO.
Crown:
Row 1: Join orange yarn in the first dc-st out of 3 dc in a
st, ch1, sc 1 in same st, sc 1 in 5 sts, sc 3 in the central sl st, sc 1 in 6
sts (15 sts), ch 1 turn,
R2: skip first st, 2sctog next, sc 1 in each of the middle 9
sts till last 3 sts, then 2sctog, skip last st, (11 sts), ch1 turn,
R3: skip 1 st, 2sctog next, sc 1 in 5 sts, 2sctog, skip last
st, (7 sts).
R4: sc 1 in each st.
R5: 2sctog, sc 1 in 3 sts, 2sctog (5 sts).
R6: sc 1 in each st (5 sts).
R7: 2sctog, sc1, 2sctog (3 sts) OR skip 1, sc 1 in 3 sts,
skip last st (3 sts).
R8: 3sctog, BO.
Ear (left side):
Row 1: Join white yarn on WS at the first orange st, ch1, sc
1 in next 5 sts, ch1 turn,
R2: sc2 in first st, sc 1 in each of the middle 3 sts, sc 2
in last st, ch1, turn (7 sts),
R3: sc3 in first st, sc 1 in each of the next 5 sts, sc2 in
last st, ch1 turn (10 sts),
R4: sc 1 in each st, (10 sts)
R5: skip first st, sc 1 in each of the 9 sts, (9 sts)
R6: sc 1 in each st, BO.
Ear (right side): Join white yarn at the st where the crown
ends,
R1: sc1 in 5 sts, ch1, turn
R2: sc2 in first st, sc 1 in each of the middle 3 sts, sc 2
in last st, ch1, turn (7 sts)
R3: sc 2 in first st, sc 1 in 5 sts, sc 3 in last, (10 sts),
ch1, turn,
R4: sc 1 in each st, (10 sts), ch1 turn
R5: sc1 in each st skip last st, (9 sts)
R6: sc 1 in each st. BO.
Teeth: Join white yarn in the first st out of 8 sts below
side of face.
R1:RS: ch7, sl st 6,
sl st in next st at base, ch5, skip 4 sts, sl st in next, ch5, sl st 4 on these
chs,
Trunk:
R1: sl st in ch5 space, sc 5 in ch5-sp, ch1 turn,
R2: sc 1 in each of the 5 sts, ch1 turn
R3: same as R2
R4: 2sctog, sc 1 in 3 sts, ch1 turn
R5: 2 sctog, sc 1 in 2 sts, ch1 turn (3 sts)
R6: sc 1 in 3 sts, ch1 turn (3 sts)
R7:2sctog, sc 1 in 1
sts, ch1 turn (2 sts)
R8: sc 1 in 2 sts, ch1 turn (2 sts)
R9: same as R8, BO.
Body:
R1: Join white yarn in ch5-sp, make sc9, ch1 turn.
R2: (sc2) in first and second cst, sc 1 in 5 sts, (sc2) in
each of the last 2 sts, ch1 turn, (13 sts)
R3: sc1 in each st, ch 1 turn (13 sts)
R4: (sc2) in first st, sc 1 in 11 sts, (sc2) in last st, ch1
turn, (15 sts)
R5: sc1 in each st, ch1 turn, (15 sts)
R6: (sc2) in first st, sc 1 in 13 sts, (sc2) in last st, ch1
turn, (17 sts)
R7 to R10: sc 1 in each st, ch1 turn, (17 sts)
R11: 2sctog, sc 1 in each of the middle 13 sts, 2sctog in
last 2 sts, ch 1turn, (15 sts)
R12: 2sctog, sc 1 in each of the middle 11 sts, 2sctog in
last 2 sts, ch 1turn, (13 sts)
R13: sc 1 in each st, ch1 turn, (13 sts)
R14: : 2sctog, sc 1 in each of the middle 9 sts, 2sctog in
last 2 sts, ch 1turn, (11 sts)
R15: sc 1 in each st, ch1, turn, (11 sts)
R16: : 2sctog, sc 1 in each of the middle 7 sts, 2sctog in
last 2 sts, ch 1turn, (9 sts)
R17: : 2sctog, sc 1 in each of the middle 5 sts, 2sctog in
last 2 sts, BO, (7 sts).
Right Hand:
R1: In a magic loop, ch1, sc6, cl (6 sts)
R2: sc 2 in each st, cl (12 sts)
R3: For thumb: ch4, sl st 3, join by sl st.
Sc 1 in 4 sts, ch1 turn
R4: sc 1 in 3 sts, ch1 turn
R5: sc 1 in 2 sts, BO
Join white yarn at the st where trunk starts, sc 1 in 5 sts,
BO
Join hand to the body by tapestry needle.
Left hand:
R1: In a magic loop, ch1, sc6, cl (6 sts)
R2: sc 2 in each st, cl (12 sts)
Row3: sc 1 in 4 sts, ch1 turn
R4: same as R3.
Join white yarn at the st where trunk starts, sc 1 in 5 sts,
BO
Join hand to the body by tapestry needle.
Shela:(Part of dress)
Join Maroon colour in second st at the bottom.
R1: ch1, sc 1 in 5 sts, ch1 turn
R2: (sc2) in first st, sc 1 in 3 sts, (sc2) in last st, ch1
turn (7 sts)
R3: (sc2) in first st, sc 1 in 5 sts, (sc2) in last st, ch1
turn (9 sts)
R4, R5 and R6: sc 1 in each st, BO (9 sts).
Pitambar: (Generally yellow coloured legs wear)
Right part:
R1: Join pink yarn at the lower joint of hand, make sc2 from
here to the first st of brown part, in all 16 sts. (16 sts)
R2: (sc2) in first st, sc 1 in 14 sts, (sc2) in last st, ch1
turn (18 sts)
R3: (sc2) in first st, sc 1 in 16 sts, (sc2) in last st, ch1
turn (20 sts)
R4: sc 1 in each st, ch1, turn, (20 sts)
R5: 2sctog, sc 1 in each of the middle 16 sts, 2sctog in
last 2 sts, ch 1turn, (18 sts)
R6: 2sctog, sc 1 in each of the middle 14 sts, 2sctog in
last 2 sts, ch 1turn, (16 sts)
R7: 2sctog, sc 1 in 4 sts, sl st in 4 sts, sc 1 in 4 sts,
2sctog (14 sts).BO.
Left part:
R1: Join pink yarn on
wrong side where the lower end of hand is sewed. Make 10 sts as that of right
part.
R2: (sc3) in first st, sc 1 in 8 sts, (sc3) in last st, ch1
turn, (14 sts)
R3: sc2 in first st, sc 1 in each of the middle st, sc2 in
last, ch1 turn (16 sts)
R4: sc 1 in each st, ch1 turn (16 sts)
R5: 2sctog, sc 1 in each of the middle 12 sts till last two
sts, 2sctog last, ch1 turn (14 sts)
R6: 2sctog, sc 1 in each of the middle 10 sts till last two
sts, 2sctog last, ch1 turn (12 sts)
R7: sl st 1, sc 1 in each st skip last st, ch1 turn, (10
sts). BO.
Foot: work on right
part of Pitambar.
R1: Join white yarn in a st, make sc 1 in 4 sts, ch1, turn,
R2: sc 1 on 4 sts, BO.
Kardoda: (Waist accessory)
With metallic thread make chs 10 (till the centre) then+3
chs, dc 4 in 4th ch from hook, ch3, sl st in same st, again chs till
other side.
Necklace:
Make chs 21+2.
R1: from third ch, hdc 1 in each of the 10 sts, make ring of
ch4, hdc 3 in ring, ch2-picot, hdc 3 in same ring, again hdc 1 in each of the
10 sts.
Kada (Wrist accessory):
ch4/5 and sew around the wrist. Make two.
Modak: In a magic loop makech1, sc 6, cl,
Then ch3 and sew by tapestry needle at the centre.
Leaf Part:
R1: Join green yarn at lower point, go on making sc 1 in
each st around the background, note that shape should be mentioned so if there
is corner add extra sc. Cl.
R2: Make ch8, sc 1 in each st from second, (ch5, skip 3 sts, dc 1 in next) 2 times, (ch2,
skip 2 sts, dc 1 in next) repeat all around.
This is not very well defined, only remember that we want
neted leaf. At the top (ch2, dc1) 3 times at centre, (ch2, skip a st, dc 1 in
next) along other side at last ch5 skip 3 sts, dc 1, ch5 skip 3 sts, sl st at
the starting st. Ch3, sc at the stem st
on back side, ch3, sc 1 at first st on other side,
R3: (sc7 in ch5-sp) 2 times, first and second arch made, ch2, (dc 1 in next gap, ch2 dc 1 at the same
st, ch2) 2 times, hdc 1 in next gap, one arc shape made. Ch2, dc 1 in gap, ch2,
tr 1 in next, ch2, tr 1 in same st, (ch2, dc1) 2 times, ch2, hdc 1, second arch
made, (sc7 in ch5-sp) 2 times, join by
sl st. Last 2 archs of other side made. BO.
R4: Join thread on right side after two ch5 gaps, (ch2, dc1)
6 times, ch2, sc 1, ch2, dc1, (ch2 tr1) 2 times, ch2, dc 1, ch2, sc 1 in next
gap, sc3 in each ch2 gap of arch 5 and
6, sc in ch5-sp, ch15, sl st 13 starting from third ch, join as picot, sc 6 in
ch4-sp, sc3 in each ch2-sp, for two archs, top 2 archs on both sides are
complete, then remaining 2 archs same as on other side, sl st, BO
R5: Join yarn after 2 archs, sc3 in each of ch2-sp for both
archs,BO
R6: On other side also sc 3 in each ch2-sp, BO.
Embroidery eyes, trunk,
ear and Gandh as shown in above photo. Sew all jewellery and Modak at proper places.
The beautiful Applique of Lord Ganesh on Pipal Leaf is ready.
The following video with English subtitles may help you to make this.