Blog about all crafts - knitting, crocheting, tatting etc.
Tuesday, March 17, 2020
One More Plate Decor
Fig 1
Hi,
This time I made one more plate decor. This looks beautiful as in fig 1.
I use Vardhamaan 4 ply wool and 3.5 mm crochet hook. Pattern:
Considering the circumference of plate, see fig 2, make chains so that they should be multiple of 3 plus 1. So we make 177 chains.
R1: Make ch 8 and dc 1 in ninth ch from hook, 9ch3, skip 2 sts, dc 1 in next) repeat till end ch 3 turn, fig 3
R2: ch 3, dc 3 in first window (gap), (ch 3, skip 1 window, dc4 in next window) repeat till end, ch 3 turn, (last window has 4 dcs)
Fig 2
Fig 3
R3: ch 3 more, dc 4 in next empty window, (ch3, skip one window of previous 4dcs and dc 4 in next window) repeat till end. Ch 3 turn, see fig 4.
R4: ch3, dc 3 in first window, ch 3, dc 4 in next window, ch 5, [dcs 4 in next window, (ch
Fig 4
Fig 5
3, dc 4 in open gap) 2 times, ch 5] repeat this till end. Fig 5
R5: ch 3, [(tr 1, ch 1) 9 times in ch5-gap, dc 4 in nrext gap, ch 3, dc 4 in next gap] repeat till end, fig 6.
R6: ch3, dc 3 in first gap, [ch
Fig 6
Fig 7
2, (tr 1, ch 2 in between two trebles of previous row) 8 times, ch 2, dc 4 in next gap] repeat till end, see fig 7
R7: ch 3 turn, [(sc 2 in first gap between two trebles of previous row, ch3-picot) 8 times, sc 2 in gap, ch3-picot, sc 2 on 2 dcs of previous row, ch 3 picot on last dc] repeat till end.
We finally get a beautiful plate decor as in fig 1.
The following video may help you to make this.
ETC: Enjoy the Creativity.
Saturday, March 7, 2020
Tea-coaster / Cover of Container: Rukhawat Item for Indian Wedding
Fig 1
Hello friends,
This weak I made these wedding items for wedding of my friends's daughter. These are cover of containers. In India such containers filled by jam jellies etc, are generally presented to daughter in her wedding as they are useful for their new life. This is called rukhawat. For details of rekhawat, you may read my post, https://alkaandart.blogspot.com/search?q=nostalgic+experience
Later on the daughter may use them as tea coaster by laminating them. Fig 2.
Generally tea coasters are seen to be hexagonal that's why I made them penatagonal, fig 3, because we want some thing new, different. You may made more pieces and join them to form big doily as in fig 4.
Fig 2
Fig 3
Fig 4
Pattern: R1: In a magic loop make ch 3, dc 7, close by sl st in third ch. (8 sts)
R2: ch 5, (dc 1 in next st, ch 2) repeat till end, close. (we have 8 dcs, 8 ch two gaps).
R3: ch3, (dc 4 in ch 2-gap, dc 1 on previous dc) repeat till end, close. Fig 5.
Fig 5
Fig 6
Fig 7
R4: ch 3, dc 1 on next 2 sts, (ch2, skip 1 st, dc 1 on each of the 3 dcs of previous round) repeat till end, ch 2 , close. Fig 6.
R5: Slip st 3 and shift to first gap, ch3, dc 3 in gap, ch 4, sc 1 in next gap, ch 4, (dc 4 in next gap, ch 4, sc 1 in next gap, ch 4) repeat till end, close. Fig 7.
R6: ch 3, dc 2 in each of the next 3 dcs, ch 5, sc 1 on previous sc, ch 5, (dc 1 on first dc, dc 2 on each of the next 3 dcs of previous round, ch 5, sc 1, ch 5) repeat till end, close. Fig 8.
R7: ch 1, [sc1 on next st, hdc 1 on next, dc1 on next, (tr1, ch3-picot, tr1) all in next st, dc1, hdc 1, sc1, ch 6, sc 1 on previous sc, ch 6] repeat till end, close. Fig 9.
Fig 8
Fig 9
If you are making as cover container then make cord of 75 chs to tie it to the bottle lead as shown in fig 1.
The following video may help you to make this.
ETC: Enjoy the Creativity
Wednesday, March 4, 2020
Knitted Socks with Thumb
Fig 1
Hello friends,
This time I made knitted socks with thumb because I always prefer sock with thumb so that I can wear them on slippers also.
This pattern is very old and traditional pattern. My friend Rajani shown these to me and I made it for my auti. So first of all I have to take measurements as length of foot and as shown in fig 2.
Here length is 9" and the round measurement is 8.7".
So cast on (CO) number of sts whose length will be 8" or 8.2".
I have to CO 55 sts. Fig 3.
The wool I used is 4 ply and some what thin also, needles UK 10 number or 3.25 MM.
We have to work in Stockinette st except first and last 6 sts. They would be always worked in Garter st.
Fig 2
Fig 3
R1: (WS): K6, P43, K6
R2: (RS): K all.
Repeat rows 1 and 2 till the length of the piece is length 9" - length of thumb 2"= 7".
This part you may work out in a single color or you may make strips as I have shown here. Totally I have to make 34 ridges (68 rows) For dark color strips, after 17 ridges 2 ridges (or 4 rows) of dark, 6 ridges of original colour, again 4 rows of dark, 6 rows of original colour, last dark strip and then knit till total rows are 68. Fig 4.
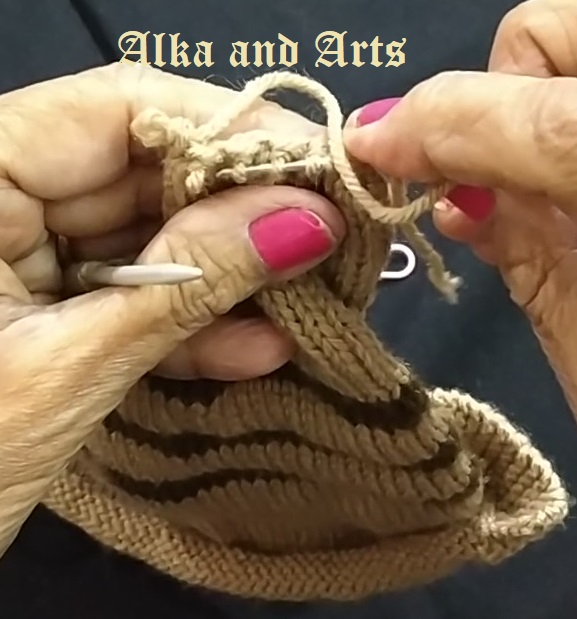
After this we have to divide these stitches in two parts. One (smaller) for thumb and other part for remaining fingers.
Fig 4
Fig 5
Fig 6
Hence after 35 sts we place a marker. Fig 5. Work only these35 sts in Stockinette st for 12 rows.
Next row (RS): K3tog 11 times, then K2tog. (12 sts)
Pass these 12 sts through tapestry needle and bind off.
Fig 7
Then join the yarn to other side for working 20 sts.
Fig 8
Work 12 rows in Stockinette st then next row:
K3tog 6 times, K2tog (7 sts).
Pass tapestry needle through these 7 sts and bind off. Fig 6.
Then sew the thumb portion and other part also for four fingers.
Fig 7. Also sew from right side till two dark strips see fig 8
Fig 9
Fig 10
Then sew the back part as in fig 9. While making other sock be careful that how to divide in two parts so that two thumbs should be close to each other. As in fig 10. We check and decide that which side is proper for thumb and then place marker. Repeat the above process. Sock on right leg as in fig 8. Two socks are ready as in fig 1.
The following video may help you to make socks.
ETC: Enjoy the Creativity.
Monday, March 2, 2020
Crochet Bird Applique, Patchwork Piece 1
Fig 1
Hello friends,
Here I made a very special item first time in my art life, APPLIQUE. We generally call it patchwork. Actually patch work is an art of forming design by joining the pieces of fabrics different in colors, different in designs. See my following post, https://alkaandart.blogspot.com/search?q=mom+creation
In India it is very usual to make applique worked baby blankets for new born. Today this art has special name Quilting.
The word APPLIQUE is from French Latin words which means to join or to apply which we do in applique or in patchwork.
I always like to make kid's favorite pictures on their sweater, jacket etc. I made them with embroidery on knitted work. See fig 2, 3. On knitted sweaters it's OK to make hand embroidery but on crochet sweater (?) there is no possibility to hand embroidery. In that case sewing APPLIQUE is the only way to decorate it or to make it kid's favorite. Hence I made this bird applique. Before that I made simple fish applique and car applique but they are actually very simple.
Fig 2
Fig 3
PATTERN:
Face: In a magic loop make ch 3, dc 11, close by sl
st in third ch. Bind off. Fig 4.
Body: R1: In a magic loop make semi circle by making
ch 1, sc 4, close loosely to form semi circle.
Fig 4
Fig 5
R2: ch 1 turn, sc 2 in each st, (8 sts). Fig 4.
R3: ch 3, dc 1 in first st, dc 2 in each st (16 sts)
R4: ch 3, dc 1 in same st, dc 1 in next st, (dc 2 in next, dc 1 in next) repeat till 2 sts remain to end, tr 2 in next, tr 1 in last st. Continue for tail, fig 6.
Fig 6
Tail: ch 10, fig 7, from second ch, 2 sl st, 2 sc, 2 hdc, 3 dc,
then dc 4 on tr, hdc 1 in next 2 sts, bind off.
Fig 7
Fig 8
Fig 9
Wing: Ch 14+1, sc 1 in next 5 sts, hdc 3, dc 2, hdc 2, sc 1, sc 4
in last corner st, fig 9, then on other side, sc 2 in each of the first 2 sts, hdc 1
in next 2 sts, dc 2 in next st, tr 2 in next st, dc 1 in next 4 sts, hdc 2, sc
2, bind off. Fig 10.
Assemble these parts by sewing with tapestry needle as shown in fig 11.
Make ch
3, dc 2 at under neck st, join third ch and last dc to the body of the bird.
Leg: Ch 5, sl st in second and third ch from hook, ch
3, sl st on second and third ch from hook, sl st in the remaining 2 sts of leg
(out of initial 5 sts)
Skip 2 sts of the body, join the red yarn and make one more leg similarly. Fig 12.
Fig 10
Fig 11
Fig 12
Beak: Join yellow yarn, ch 2, incomplete dc 1 in same st, incomplete dc 1 in next st, YO and pass through all the three sts. Bind off. Fig 13.
Fig 13
Fig 14
Sew one black bead as an eye. As black bead is not with me teperarily I put black bindi but I will replace it by bead soon.
Finally the bird will look as in fig 14.
The following video may hellp you to make this applique.