Blog about all crafts - knitting, crocheting, tatting etc.
Monday, July 27, 2020
Rakshabandhan, Rakhi: Symbol of love and faith for brother
Fig 1
Friends,
Rakshabandhan is a festival in India, having a special importance to the relation between brother and sister. The word itself means Raksha + Bandhan, Raksha means protection and Bandhan means bond. In this festival, sister ties a silky decorated band (those who don't know may imagine as a friendship band) to the wrist of her brother and request him or reminds him that it is his responsibility to protect her, to take care of her. Every sister has faith that if she is in some problem her brother is the man who will help her without fail. Hence I said that tying rakhi is a symbol of love and faith toward her brother. Brother gives some gift to his sister. Fig 2.
Fig 2
This year I made 7 rakhis video for my channel "Kalopasak". All are crochet handmade rakhis. See fig 1. Three rakhis are made specially for kids. Doraemon Rakhi, Chhota Bheem rakhi are the favorite cartoon characters of kids hence I made them and one teddy bear rakhi for toddler brothers.
Fig 3 shows the rakhis I made last year. One more was there in fig 4.
Fig 3
Fig 4
If you watch the following video, you can find links of all other videos in the description box of that video. So make the rakhi which ever you like or make them as a friendship band. I have already posted Doraemon Rakhi pattern in detail.
Square Table-Mat with Two Layers and Floweral Border:
Fig 1
Hi friends,
This doily I made for the festival Ganeshotsav.
Those who don't know about the Ganeshotsav and how it is celebrated in Maharashtra (state in India), may read this, https://en.wikipedia.org/wiki/Ganesh_Chaturthi
This doily in fig 1, is having two layers and the outer smaller square is not yet attached to the bigger one. Because on bigger square, I have made a Swastik, which is supposed to be the symbol of prosperity in Hindus.
Though I have to face many problems and answer many questions regarding that symbol when I shared a Mangal Kalasham having this symbol on Coconut, on crochet group "Free crochet patterns" on facebook. Fig 2 will show the two parts separately.
Those who have no special importance about
Fig 2
Fig 3
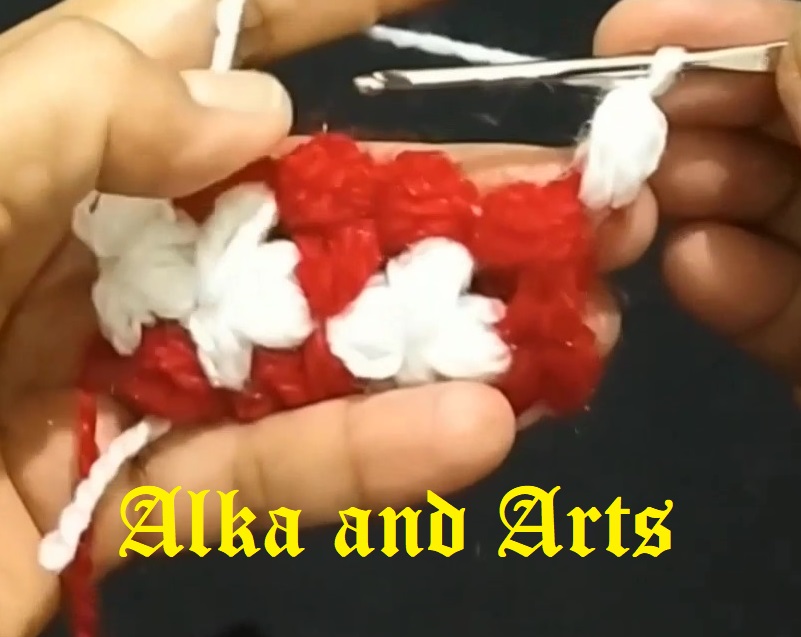
this swastik symbol, may skip this and work in the same manner as in pattern but with white yarn only. As I have given in fig 3, those shaded puffs are made in red and others white, but if you don't want that swastik you may work all puffs by white yarn.
I used Vardhamaan 4 ply yarn and 3.5 mm crochet hook.
Each puff is made by long stitch, (YO insert in to base st, YO and get two long sts) 3 times, YO and pass through all 7 sts, ch 1 and fix the puff. We call this complete puff.
Fig 4
Fig 5
Row 1: Start with red yarn, ch3 with third st long and make one puff in second ch, ch1, long st, make puff1, join white yarn, similarly make two puffs with white yarn,
Row 2: one more complete red puff. Now make two incomplete white puffs together as, Make ch 1 long st, (YO insert in to base st, YO and get two long sts) 3 times, (7 sts on hook), (YO insert in the gap between 3rd and 4th puffs made, YO get 2 long sts) 3 times. Now there are 13 sts on hook, YO and pass through all of them, ch1and fix them.
Fig 6
Fig 7
Then make 2 incomplete puffs together, one white and second red, in next st (st means gap between two puffs).
Then (2 white incomplete puffs together) 2 times, fig 4.
Row 3: one complete white puff, turn, 1red, 1 white together, 2red together, 1red, 1 white together and lastly 2 red together. Fig 5.
Row 4: One white complete puff, (2 white incomplete together in next st, 1white, 1 red together in next) twice, fig 6.
Row 5: One complete red puff, 2white incomplete together, 1white, 1 red together, (1red, 1 white together) twice. fig 7. Central swastik completed. Those who don't want to make swastik can work in the same manner but only with white yarn.
Fig 8
Fig 9
Here after we shall work around all the four sides of this 4 x 4 square formed and only with the white yarn.
Round 6: Go on working according to for 8, means 1complete puff, (2 incomplete together in next st) 5 times, here is the corner, at each corner make one complete puff and 2 in complete puffs together,
then repeat doing 2 incomplete puffs together till the corner
Fig 10
Fig 11
comes then repeat again.
Fig 8 and 9.
Work in this way till the required size of the table mat. Here I made it upto 10".
Then make last round similarly only with green yarn. Fig 10.
Lastly the roses:
Join red yarn at corner, ch 2, make (complete puff, ch 1) 3 times, join with the first puff by sl st, ch3, insert the hook at base st from back side and make a sl st, bind off.
(Skip two puffs in a last row and again join red yarn and make a rose) repeat till all sides done.
Now make another small square with white 4x4 as shown in fig 2, then green border to this small piece and rose border as above.
Once the Ganeshotsav over, you can sew it to the bigger piece at the centre.
It looks beautiful as in fig 1.
The following video may help you.
Hello friends,
Whenever I make any doily, I feel that this round perhaps I have seen some where. The different rounds always reminds me some or other doily. May not be in real but I always think like that and hence I made very less number of doilies. But again the lovely subscribers always demand that, madam please give us some new 👿doily design. So this time I made this doily.
I used two shades of green colours 4 ply yarn and 3.5 mm crochet hook. Pattern: Important note: always make first dc as ch 3 and first tr as ch 4.
R1: In a magic loop, dc 12, cl.
R2: (tr1, ch 2) rep, cl. Fig 2.
Fig 2
Fig 3
R3: ch 1, sc 1 in same st (on tr of previous round), (sc 2 in ch2-gap, ch3-picot, sc 1in same gap, sc 1 on tr st)rep, cl. Fig 3
R4: (dc1, ch4) rep, cl. Fig 4
R5: ch 3, [dc 3 in ch4-gap, ch3-picot, dc 3 in same gap), dc 1 on tr st]. Fig 5.
R6: ch 1, sc 1 in same st, sc 1 in next st, [ch 11, skip 4 sts, sc 1 in each of the next 3 sts] rep, cl. Fig 6.
Fig 4
Fig 5
R7: ch1, sc 1 in each of the
next 2 sts, [sc 11 in 11-ch space, sc 1 in next 3 sts] rep, cl.
R8: Join dark green colour yarn at 6th sc st out of 11 scs, ch 1, sc 1 in same st, [ch 3, tr 1 in first sc st of next 11 scs loop, (ch3, skip one st, tr 1 in next st) rep 6 times, ch 3, sc 1 in middle sc st of next 11 scs loop] rep, cl. Fig 7.
Fig 6
Fig 7
R9: [(ch1, sc1, hdc1, dc 1) in first ch3 gap, (dc 1 on tr st, ch3-picot, dc 3 in next gap) 5 times, after last picot, (dc1, hdc1, sc 1) in last ch3- gap, sl st at the centre of next 11 scs loop] rep, cl. Fig 8.
R10: Join original colour at the middle st after first picot, [ (ch 9, sc 1 on the middle st out of 3 dc sts) rep till last but one picot, ch5, (tr1, ch2, tr1) in the middle bottom sl st of previous round (V-formed)ch 5, sc 1] rep, cl.
Fig 8
Fig 9
R11: sl st till the centre of ch 9 sp, [(ch10 sc 1 in next sp) 3 times, ch 5, (tr1, ch1) 4 times in the V formed in previous round, tr1, ch 5] rep, cl. Fig 9.
R12: sl st till the centre of ch 10 sp, [ (ch10, sc 1 in next ch10 sp) 2 times, ch5, (tr1 on tr st, ch2) 4 times, tr 1 on last tr st, ch 5, sc 1on next ch 10 sp] rep, cl. Fig 10
Fig 10
Fig 11
R13: sl st till the centre of ch 10 sp, [ ch 12, sc 1 in next ch10 sp, ch 7, (tr1, ch 3) 4 times, tr 1, ch 7, sc 1 in next ch 10 gap] rep, cl. Fig 11.
R14:[ {dc8, (ch3, dc3, ch3) all in same st, sl st in the same (fan made), dc 8} in ch 12 gap, dc7 in ch 7-gap, (dc1 on tr st, ch3 picot, dc 3 in gap) 5 times] rep, cl.
The beautiful doily is ready as in fig 1.
I hope that the following video may help you.
ETC: Enjoy the Creativity.
Sunday, July 12, 2020
Crochet Applique Teddy Bear / Teddy Bear Rakhi
Fig 1
Hi,
As I said in my last post, I made this another Rakhi for kids and no need to say that it is Teddy Bear Rakhi. Every one knows and specially kids love this Teddy. In fig 1, it is written Rakhi type 10 because since last year till date I made 9 crochet rakhi and this is 10th. Many of them which are simple I have not posted on my blog, but if any body wants to see all of them, he/she can start the video below and in the description box of that you can find web address of all 10 rakhi, I made.
Fig 2
Fig 3
Fig 4
The height of this rakhi is 2.3". It is made in Vardhamaan 4 ply yarn and 1.75 mm crochet hook. Pattern: In a magic loop make R1: ch1, sc1, hdc 2, sc2, hdc 2, sc1, cl (8 sts)
R2: ch1, sc 2 in each st, cl (16 sts)
R3: ch 1, (sc1, sc2) rep till end, cl, (24 sts). Fig 2.
R4: ch1, (sc1, sc1, sc2) rep till end, cl (32 sts). Fig 3.
Fig 5
Dividing these 32 sts in five parts, place markers as in fig 4. In between blue markers there are 12 sts for head portion and in between yellow markers there are 6 sts for body of bear and on both sides there are 7-7 sts.
For central part of ear join dark brown colour near blue marker as in fig 5.
EAR: R1: ch1, sc 1 in 3 sts,
R2: ch1, hdc 1 in each st, bind off. Similarly make other ear before second blue marker as in fig 6.
Fig 6
Fig 7
Then attach body colour at marker stitch and make,
ch1, sc 1 in each st around the dark coloured ear made, sc 1 in between two ears and lastly sc 1 around second ear also and lastly sl st at the second marker, as in fig 7.
Now for hands we join the body colour at yellow marker.
R1: ch1, sc 1 in each of the next 7 sts including both markers sts. ch1 turn,
Fig 8
Fig 9
Fig 10
HAND: R1: sc 1 in 3 sts, R2: two sc in first st, sc 1 in remaining 2 sts, chh 1 turn (4 sts)
R3: sc 1 in each st, ch2 turn, (4 sts),
R4: incomplete dc in each st, YO and pass through all of them, BO. Fig 9.
Similarly make other hand as in fig 10.
Fig 11
Fig 12
Tummy: R1: With white yarn, in amagic loop make ch 1, sc 8, cl (8 sts)
R2: ch1, sc2 in each st, cl (16 sts)
R3: ch1, (sc1, sc2) rep, cl, (24 sts). Bind off. Fig 11.
Feet: With body colour, ch 4,
R1: sc 1 in second and third ch from hook, sc 5 at corner st, sc 1 in two sts from other side, cl by sl st. Fig 12
Fig 13
Fig 14
Fig 15
Make one more foot.
Fig 13.
Mouth: With white yarn in a magic loop make ch1, sc 3, dc 3, sc 2, cl.
Make a light embroidery on feet. Sew feet and mouth at proper places. Sew two black beads for eyes. Hide the yarn ends.
The teddy bear applique is ready. Fig 14.
Now for rakhi, we want a belt as in fig 15.
Thread a long bead, make 30 chs + 4 chc, dc 1 on 5th ch, (ch4 turn, dc 1 on 3rd ch) three times. Lastly sl st 2 and chs 30, join one long bead again.
I love this Rakhi and I hope that my grand son will also love it.
The following video may help you (it is in Marathi with English subtitles).
ETC: Enjoy the Creativity.
Thursday, July 9, 2020
Applique Doraemon / Doraemon Rakhi
Fig 1
Hello friends,
Doraemon is the Japnees cartoon which is very famous in India. It is earlees robotic cat who travels back in time.
Frankly speaking, I even didn't know the name of this cartoon until one of my friend requested me to make Rakhi of the cartoon Doraemon. When she requested then I seared and tried to make this applique.
Those who don't know what is Rakhi and Rakshabandhan, please refer my blog post on 4th Aug 2019. https://alkaandart.blogspot.com/search?q=Rakhi
So this time I made two rakhis specially for kids. One is Doraemon and other is of Teddy bear, the most famous animal among kids. I used blue and white yarn with 1.75 mm crochet hook for this.
Fig 2
Fig 3
Fig 4
Fig 5
Fig 6
Pattern:
R1: In a magic loop make ch 1and 8 sc, cl by sl st in first sc. (8 sts)
R2: ch1, sc 2 in each st, cl (16 sts).
R3: ch1, sc 1 in same st, sc 2 in next, sc1, sc2, dc1, dc 2, (sc 1, sc2,) two times, dc 2, dc 1, (sc2, sc 1) twice, cl (24 sts)
Find the central st, leaving 7 sts on both sides place markers. Fig 2.
R4: With red yarn make, sc 1 in each of the 9 sts bold in above round. Fig 3.
With blue yarn work on 15 remaining sts, ch1, sc 1 in 2 sts, hdc 2 in next, (hdc 1, dc 1) in next st, dc2, dc1, dc2, dc 1, dc2, dc1, dc2, (dc1, hdc 1) in next, hdc 2 in next, sc 1 in each of the last 2 sts. See fig 4.
Fig 7
Fig 8
Fig 9
Fig 10
Here on word we start to make the Body of Doraemon and we shall work on only 9 sts woked by red in previous round.
R1 of the body: with blue, ch1, sc 1 in 3 sts, with red, sc 1 in next 3 sts, with blue, sc 1 in each of the last 3 sts. ch 1 turn,
R2: with blue, sc 1 in 3 sts, with white, (sc2, sc1, sc2) increase 2 sts, with blue sc 1 in 3 sts, ch1 turn,
R3: with blue, (sc2, sc1, sc1) with white, (sc2, sc1, sc1, sc1, sc2), with blue, (sc1, sc1, sc2) (15 sts), ch 1 turn, Fig 5.
R4: sc 1 in each st with 4 blue, 7 white, 4 blue, ch1 turn (15 sts)
R5: with blue, sc 1 in each st (15 sts)
R6: with blue, ch2 turn, hdc 1 in 4 sts, sc 1 in 7 sts, hdc 1 in last 4 sts,
R7: same as row 6. Booties of Doraemon:
R1: with white, ch2, hdc 3 in first st, sc 1 in each of the 6 sts,
R2: ch 2 turn, hdc 2 in first st, sc 1 in each of the remaining, sl st in last, bind off.
Skip middle st and join yarn in next, fig 6.
Second boot: R1: ch1, sc 1 in each st in last st, hdc 3 in last.
R2: ch1, sc 1 in each st, hdc 2 in last. Bind off. See fig 7. Hands of Doraemon:
Join blue yarn 2 sts above the body.
R1: ch2, hdc 2 in first st, hdc 1 in next, join with the st from body part of Doraemon
R2: ch 1, turn, sc 1 in each of 3 sts,
R3: same as R2
R4: with white yarn, same as R2
R5: ch1, 3 sctog, bind off. Fig 8.
Another hand which is Raised hand:
Join blue yarn in the first st of body part
R1: ch 1, sc 1 in 3 sts (one from bady part, 2 from face part
R2: ch1 turn, sc 1 in each st
R3 and R4: same as R2.
R5: with white, ch1, sc 1 in each of 3 sts
R6: ch1, 3sctog, bind off. Fig 9.
Then I made embroidery of mouth and sew beads in place of eyes. See fig 10.
Then I also make chains with white and sew as a round border for face. Fig 1.
Finally I also make white chains and sew it as a border to it's face. Belt:
Make two pieces of 25 chains, Attach them together at ends, again make 12-15 chs. Then make puff at last. Similarly complete other part.
The following video may help you.