Monday, August 31, 2020

Beautiful Baby Dress with Sun Hat: (Any Size) Part 2

Sun Hat:
Fig 1
Hi,
 In this second part we shall see, how to make this sun hat for size 1-1.5 years. The design of the hat is choosen matching to the dress shown in part 1. That is design of shell-shell. Also the same flower is sewed to the hat also.
I used same wool as in baby dress and 3.5 mm crochet hook.
Size: Circumference 18", height 6".

Pattern: R1: In a magic loop make ch3, dc 11, close by sl st in third ch. (12 sts). Fig 1.
Here after always our first dc will be of ch3 and closing will be by sl st in third ch.
R2: On each dc make dc 1 in stitch and FPdc 1 on that dc. (24 sts). See FPdc in fig 3, 4.
Fig 2

Fig 3
Fig 4


Fig 5

Fig 6
R3: On each FPdc make FPdc 1 and on each dc make dc 2, cl (36 sts). Fig 5
R4: On each FPdc make FPdc 1, on two dcs in between 2 FPdc make 3 dc (dc on each dc st and dc 1 in between), cl, (48 sts)
R5: (FPdc on FPdc and dc1, dc2, dc 1) repeat, cl, (60 sts). Fig 6.
Measure the diameter of the piece, if it is 6" then it's OK
Fig 7

Fig 8
otherwise make one more round.
R6: (FPdc on FPdc, dc 1 on 2 sts, dc 1 in between, dc 1 on two sts) rep, cl, (72 sts) Fig 7.
R7: Sl st till we reach third dc out of middle 5 dcs. [In third st make shell 1 (means dc3, ch1, dc3, note that first dc means ch3), FPdc on FPdc] repeat till end, cl. Fig 9.
Then repeat this 7th round till the height is 6". Fig 10.
Fig 9

Fig 10
Now we make BRIM.
R1: [FPdc 1 on FPdc, ch3, sc 1 in ch1-gap of shell, ch3] repeat till end, cl.
R2: [ (After shell make first front post dc as front post sc, ch2) FPdc 1 on FPdc, hdc 3 in ch3-sp, hdc 3 in next ch3-sp] rep, cl
R3: [FPdc 1 on FPdc, in both hdc 3 place make 4 hdc, means one extra hdc in a initial gap] rep till end, cl
Fig 11

Fig 12
 Means in row 3, two hdc increased in every shell, thus 24 sts increased.
In R4: FPdc on FPdc and 5 hdcs in place of both 4 hdc gaps.
Thus go on increasing till the length of brim is 1.5".
See fig 13.
Fig 13
Here I have to make 5 increasing rounds, that is, till there are hdc7 in both gaps
If you want broad brim or if you are making sunhat for elders them make brim 2" or 2.5" as per your choice.
Also for elders instead of 6" diameter as in fig 7, make it 7". For kids 8-10 years make 6.5" to 6.7".
Border: Join white yarn and make hdc 1 in each st without making FPdc and without increasing sts.
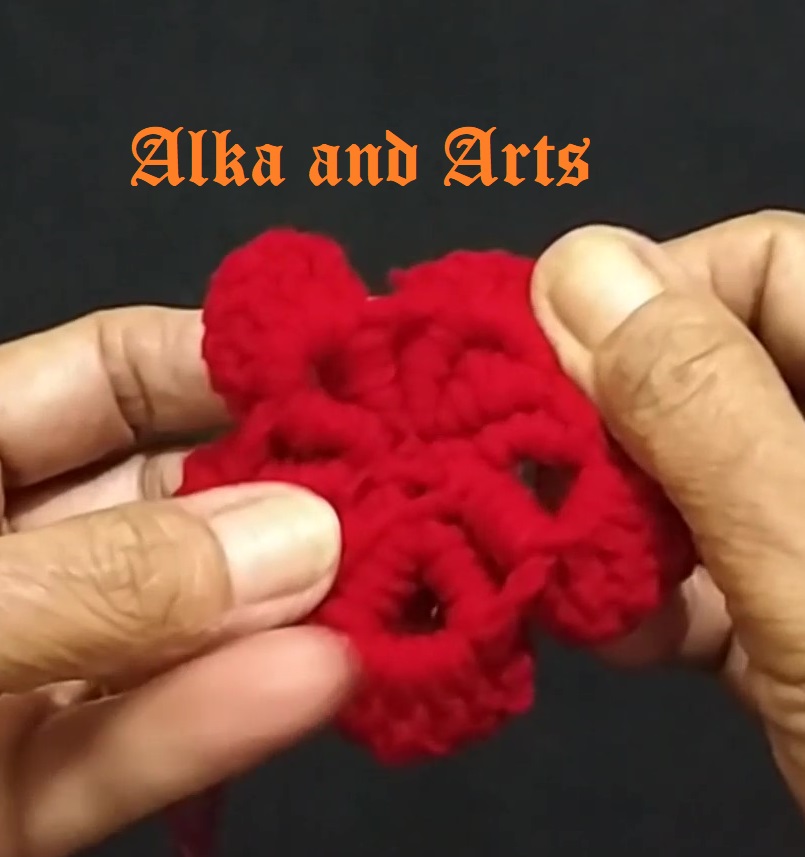
Then make flower as that of baby dress and sew it as in fig 1.
The most beautiful Sun Hat is ready.


The following video may help you to make this, it has English subtitles.

ETC: Enjoy the Creativity.


Friday, August 28, 2020

Beautiful Baby Dress 27 with Sun Hat: (Any Size) Part 1

Fig 1
Hello friends,
This Corona virus is badly affecting every once mind. People around us are in very critical situation. Some having no work so no money and hence frustrated, some has money but getting boared as they have no work, some are eager to meet some body and cannot go; so frustraed and many more reasons to increase the negetivity around us. But every one being busy in any hobby like music, reading etc or every one with creative activities never get boared.
Friends I think that we all are in this category. Though we are missing some one ( as I am missing my grand kids) we divert ourselves in some creative activity. So here I made this
Fig 2

Fig 3
beautiful baby dress for my grand daughter. But don't know when we can meet ( may be after year or may be two), even don't know that whether this dress can fit her at that time. But still I made it and it comes out to be such a beautiful!! Now she is 15 month old, I made the dress for 2 years baby.
Pattern: I choose Vardhamaan 4 ply yarn and 3.5 mm hook for that.
Make chs till the length is 30 cms. (30 cm is sufficiend as I
Fig 4

Fig 5
am going to put one button on back side). I have to make Chs 50, I add ch3 as first dc
R1: (RS) make dc 1 in each st starting from forth ch. (51 sts).
R2: ch3, turn, make V in next st means (dc1, ch1, dc 1) in same st. (25 Vs made) (76 sts)
Fig 2.
R3: ch 3, turn, [V on V, FPdc 1 on next dc] rep till end. (76
Fig 6

Fig 7
sts)R4: ch3, turn, [V on V, BPdc 1 on next FPdc of previous round] rep till end. Fig 3.
R5: ch 3, turn, [shell 1 on V (that is (dc2, ch1, dc2) in each ch1 space of V), Fpdc 1 next] rep till end. (126 sts)
R6: ch3, turn, [ shell on shell
Fig 8

Fig 9
(means shell on ch 1 space of shell  previous in previous row, BPdc 1 next] rep till end. (126 sts)
R7: ch3, turn, [(dc3, ch1, dc3) that is new shell on ch1 gap of shell in previous row, FPdc 1 next] rep till end, (176 sts)
R8: ch3 turn, [shell on shell (as in previous row), BPdc1 next] rep till end, (176 sts). See fig 4.
Fig 10

Fig 11
R9: Place 4 markers as follows. One after 4 shells, next after 5 next shells, then one after next 7 shells and last marker after 5 more shells. As in fig 5.
Work as per row 8 till first marker, ch 4, see fig 6, join at second marker and remove both markers, again as per row 8 design on back side till third marker, ch4, join at forth marker, remove these 2 markers and work as er design in last part.
R10: As per design only on back side work last shell after overlapping on the shell of other side. then again remaining as per design. It will noe look as in fig 7.
Repeat this row till the total height is 12"-13". See fig 8.
Now make white border of hdc 1 in each st, when there is ch2 gap of shell make 2 hdc. Fig 9.
Then make one 3D flower, pattern as per the post, fig 11.
https://alkaandart.blogspot.com/search?q=makhar
Sew blue button in between. Then sew it whereever you like to place.
Also sew one button on back side. See fig 10. Note that we have not made any button hole as space between the dcs in first and second row works as a button hole.
Finally it will look beautiful as in fig 1.
It you want the dress as frock look then increase the number of dcs in each shell in the design. That is after repeating row 8 3 times, you may make shell as (dc4, ch2, dc4). After 2 or 3 more rows, you may make shell as (dc5 ch2, dc5). So that the shape will be just like frock.
When you make it for kids of age 5-6 years then after row 8 increase the dcs in shell as explained above make two rows and when the yoke is of 6" then divide them in 5 parts by placing markers.
If you are making it for young girl then also decrease the shell as (dc2, ch1, dc2) near the waist portion.
So now you can make this in any size. For that the following table may be useful. Note that these are approximate measurements and specially for this pattern.
These measurements are for this sweater only because it has one button on back side.
Size in
years
Number of chs
for Neck for above yarn and needle
Yoke length
In inches
Chest
In inches
Length
In inches
0-1
50 chs
4”
18”-19”
11-12
1-2
55
4.5
19-20.5
12-13
2-3
60
5
20-22
13-14
3-5
65
5.5
22-24
14-15
5-7
70
5.5
24-26
15-16
7-10
75
6
26-28
16-20
10-13
80
6
28-30
20-23


The following video may help you in making this dress.

ETC: Enjoy the Creativity.


Tuesday, August 25, 2020

Crochet Book Cover | Pouch


Fig 1
Hello friends,
I made this book cover simply as a protection for old religeous book at my home. So it is very simple, no special crochet pattern is used, simply double crochets (dc) are used and half double crochet border (hdc).
Dimensions of the book for which I have to make cover are, 8.5"x5.5"x1.5".
First I made chs equal to the length of the book then add 3 more chs as my first dc. For 8.5", I have to make 41 chs. Fig 2.
So I started with 41+3 chs and made dc in each ch starting from 4th ch.
Fig 2

Fig 3
Hence after row 1, number of sts are 42.
R2: ch3 turn, (instead of ch 3; I made sc 1, sc on left part of first sc, ch1 as a first dc) dc 1 in each st (42 sts)
Repeat row 2 till the piece is 8.5"x 12.5" ( 12.5 = 5.5 breadth of upper part+1.5 width+5.5 breadth of lower part of book). Fig 3.
Fig 4
Fig 5
 Then place two markers at the expected width on both sides.
Fig 4.
Make dc 1 along that width portion (I have to make 8 dcs). Work those 8 sts only as follows
Row: ch3 turn, dc 1 in each st (8 sts)

Fig 6

Fig 7
Repeat this row till the breadth that is 5.5". That is the strip measures 1.5' x 5.5".
Make similar strip on other side, maintaining the line.
Fig 5.
Now sew these strips on two sides to cover the width. As in fig 6.


Front flap: Then the box type shape is formed. Now join the yarn at the first st on lower part and make,
R1: ch3, dc 1 in each st (42 sts)
R2: ch3 turn, dc 1 in each st (42 sts)
R3, R4, R5 and R6 same as R2.
R7: dc 1 in first st, (2dctog) 2 times, dc 1 in each middle sts till last 5 sts remain, (2dctog) 2 times, dc 1 in last st. (38 sts)
R8: same as R8 (34 sts). Thus if we repeat this row then 4 sts are decreased in each row.
R9: (30 sts)
R10: (26 sts)
R11: (22 sts)
R12: same as R8 only made one button hole at the centre by ch1 and skipping 1 st, (18 sts)
R13: Same as R8. Only make dc 1 in ch 1 gap. (14 sts) Fig 7.
Then made a border of 2 hdc in each dc and hdc 1 in st on all sides.
Sew one show button at centre.
The beautiful book cover is ready as in fig 1.
If you are making this cover for a holy religeous book then traditionally there is a cord to tie it as in right lower photo of fig 1.
We may make similar cover for photo albums. We can also make cover for two books together.
The following video may help you.

ETC: Enjoy the Creativity.


Wednesday, August 19, 2020

Crochet Decorative Arch, Makhar for Ganapati

Fig 1
Hello friends,
This is festival season in Maharashtra stste (India), Ganeshotsav. It starts on coming Saturday. Its the day of arrival of Lord Ganesh to earth from Kailash Parbat with his mother Parvati. Lord Ganesh is supposed to be the God of new beginning and remover of all obstacles in our good work. He is also God of intelligence and wisdom.
The festival is celebrated both personally in the family as well as commonly in every one's respected living area. Some celebrates the festival for 10 days, some for 5 days, 3 days or
Fig 2
even one and half days. On the very first day the Ganesh clay idol is installed at the decorated place in home. Then it is worshipped. Also a special sweet of Modak is made for him, called Prasad.
Last year I made this decorated place by plastic flowers but
this year I use handmade Decorated Arch for Lord Ganesh. This arch is called "Makhar". I made it simply by crochet 3D flowers and leaves.
First I cut an arch of required shape with paper then same shape on card board and then I wrapped it by two shades of green yarn. See fig 3 and 4. Then make 3D flowers and leaves and simply sew them to that wrapped arch. I don't paste them because I thought that after this festival I can reuse the flowers and make some doily.
Fig 3

Fig 4
Pattern:
Ring of ch 5.
R2: ch 5, [(dc 1, ch 2, dc 1) in next st, ch 2] rep, cl. Five Vs formed. Fig 5.
R3: ch 3, dc 4 in ch2-gap, dc 5 on right dc of V, fig 6, sc 1 in base st, [dc 5 on right part dc of V, dc 5 on ch 2 sp, dc 5 on
Fig 5

Fig 6
left part dc of V, sc 1 in base st] see fig 7, rep, lastly dc 5 on right part dc of V, sl st, cl.
Sew a big bead at the centre as in fig 8. Also sew petals as in fig 9.
From back side the flower will look as in fig 10.
I made such 8 flowers . Then sew big pearl at the centre of each joining their petals.
Sew one at each corner as shown in fig 1.
Fig 7

Fig 8
Fig 9

 Flower at the top centre:
R1: with white yarn, in a magic loop ch3, dc 2, ch1, (dc3, ch1) 5 times, cl by sl st in third ch. BO.
R2: Join pink yarn, (ch3, dc 2 ch2, dc 3) all in ch 1 gap, (dc 3, ch2, dc 3) in each ch 1 gap.cl. Bind off. See fig 11.
R3: Join red yarn. In each ch 2 sp make dc 5, ch3-picot, dc 5, join by sl st in next gap, fig 12.

Fig 10


Leaf: With green yarn, make ch 12, 
R1: sc 1 in third ch, hdc 1 in next, dc2 in next, tr 1 in next, tr2 in next, tr1 in next, dc2 in next, hdc 1 in next, sc 1 in last.
sc 1 in same st, hdc 1 in next st from other side, dc 2 in next, tr1 in next, tr2 in next, tr1 in next, dc 2 in next, hdc 1 in next, sc 1 in next, slip st in the first sc on other side.
Fig 11

Fig 12
Now make slip st in each central stitches of the leaf,
lastly make 7 chs as a stem and the sl st in each ch starting from second ch.
I made such 9 leaves.
Finally sew them as shown in fig 13 or as per your choice.
Fig 13
The following video may help you.
ETC: Enjoy the Creativity.

Monday, August 17, 2020

Crochet Sonchafa Flowers (Kanak Champaca or Golden Champaca)

Fig 1
Hello friends,
As I told in my last post, this is the second type of flowers I made. They are know as Sonchafa (Golden Champaca). As I explained in previous post, these flowers are used in religeous ceremony, hence the thumbnail of my Youtube video, is this picture in fig 1.
This Goddess is Saraswati, Goddess of knowledge, music, wisdom, learning etc. For more information, please read,
https://en.wikipedia.org/wiki/Saraswati
So I am offering these Sonchafa flowers to the Goddess and pray to the Goddess, to give relief
Fig 2

Fig 3

Fig 4
to all people in world from CORONA.
I used Vardhamaan 4 ply yarn and 1.75 mm crochet hook.
Pattern: [Make ch 13, sc 1 in each ch starting from second (12 sts) fig 2] 3 times. Foundation of three inner petals made.
Then [make 17 chs and sc 1 in each st from second (16 sts) see fig 3] 4 times. Foundation of
Fig 5

four outer petals made. See fig 4.
R2: I first make big petal.
Insert wire in this round in each petal. Insert wire in a stitch, ch 1, [ (sc 1 in 3 sts, hdc 1 in 4 sts, dc 1 in 3 sts, dc 2 in next, dc 1 in next, hdc 1 in next, sc 1 in 2 sts) (15 sts worked out), then in a corner st make, (sc1, hdc 1, ch2 picot). See fig 5.
Now on other side again work 15 sts as above only in reverse order. That is (sc 1 in 2 sts, hdc1 in next,
Fig 6
Fig 7
dc1 in next, dc2 in next, dc1 in 3 sts, hdc 1 in 4 sts, sc 1 in 3 sts).
See fig 6.
Join by sl st in the middle part (not in any st). Ch1, then other petal.
Similarly work remaining three big petals. See fig 7.
Now for small petal work as follows,
(sc 1 in 4 sts, hdc 1 in 3 sts, dc 1 in 2 sts, hdc 1 in next, sc 1 in next) (11 sts worked out), then at corner st make (sc1, hdc1, ch2-
Fig 8

Fig 9
picot),. Then work on other side of the petal (sc 1 in next, hdc 1 in next, dc 1 in 2 sts, hdc 1 in 3 sts, sc 1 in 4 sts), sl st in  middle, ch 1 then other petal. Make two more petals similarly. See fig 8.
R3: working form small petal to big, ch1, sc 1 in each 2 sts of each petal, (14 sts). Fig 9.
R4: Now we are working from big petal to small. ch1, sc 1 in 10 st. Join green yarn ch3, dc 1 in remaining 3 sts. Fig 10.
Fig 10

Fig 11

Now wrap small petals, keeping green stem in hand as in fig 11.
Then other big petals around but above the green stem. Fig 12.
Fig 12.


I want to say thanks to Natagor Finlayson for inspiring me.
https://www.youtube.com/watch?v=3dmeZopLE_c&vl=bg

The following video with English subtitles may help you.

ETC: Enjoy the Creativity.

Crochet Doily with Beautiful 3 D Border, Thalposh, Mandalam

  Hello friends, In the last post I have posted one table mat with same type of border but then many of my friends requested me to make roun...