Wednesday, December 26, 2018


Pre-wedding Lunch: (Kelwan)
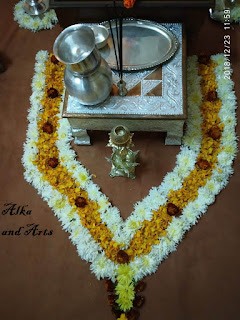
1. Flower Decoration around the lunch plate
In India, marriage is said to be union of two individuals for the life to pursue dharma, arth and kama. Dharma means to follow human duties together, arth means to earn together and store it properly in a positive way and kama means to satisfy each others physical desires.  Such a all over deep meaning is there. So marriage is a religious and festive occasion.

The celebration and rituals differ from state to state. In Maharashtra also marriage is full of rituals, colours, music, decorations and enjoyments. There are so many events in marriage ceremony.

Kelwan is one of the tradition followed on both sides bride and groom. Close relatives or family friends invite the bride / groom and her / his family for lunch or dinner.

When I think about this tradition, why it is? what is it's purpose? I think......,

The purpose of that may be that marriage is a big event to be celebrated along with relatives and friends. In old days there was no event managers or contract systems, so family persons particularly father / mother used to be very engaged and had extra exertion  during that period. So family friends and relatives invite them so that they could enjoy good lunch or dinner (which should not be neglected in that busy period)

Secondly the bride was supposed to go in some other city or join with the new family so Kelwan is organised so that they can have some chat with the girl  in a free atmosphere. Of course the menu of lunch / dinner would be favourite to her / him. The decoration should also be pleasant so that the family should be refreshed after that lunch or dinner.

Fig 2
The point behind such a long write up is, my sister's daughter is going to get married on 1st Jan 2019. I invite the family for lunch called "Kelwan", you may call it pre-wedding lunch. My niece and my sister like flowers of course every one likes but their love about flower is extra ordinary. So I decided to make some flower decoration in Kelwan and here it is Fig 1. No need to say that along with this decoration there is delicious lunch with five sweets.

Some more photos and close up of this decoration is below.

Fig 3

Fig 4
Fig 5
Fig 6


Fig 7


ETC: Enjoy the Creativity.

Tuesday, December 18, 2018

Hexagonal Rainbow Table Mat
Fig 1

Friends,

This week I made this hexagonal rainbow table-mat. Again this is one of the way to use the left over yarns. I always like rainbow's seven colours. They stand for the seven characteristics of life as I wrote in my post,

Those beautiful flowers look more beautiful with that rainbow coloured base.

This is very simple to do. I made seven hexagons with three rounds in each and then join them. 
For details I have that hexagon in figure 2.

You can use these hexagons in various different ways. For example make baby blanket, make hexagonal door mat with twine (thread made by Katha tree).


Happy Christmas to all. 


Fig 2

Fig 3.
ETC = Enjoy the Creativity.

Friday, December 14, 2018

 Superb Stole:
Hi friends,
When I saw the design namely "The traveling Leaves",  in a book at my daughter's home, I was tremendously impressed. The three dimensional effect of the design (see fig 3) was very beautiful. It is true that the design is difficult to knit, in the sense that the pattern is of 24 rows. So every time you have to see and then knit. But any way I wanted to use it some where. When I decided to knit a stole for my daughter in law, I remember this design.
Unfortunately I don't remember the name of the book and author. If any one knows it, he/she may please inform it to me so that I can say a big thanks for such a beautiful design to the author.

Material: Vardhaman knitting yarn 4 ply 300 gm, Knitting needles UK 6 no, Crochet hook 3 mm., Card board 10" length, Tapestry needle

Gauge: 20 stitches and 24 rows make 4"x 4"

Final size: 21' x 72"

Instructions: Using No 6 needle CO 100 sts. Work 10 rows of Garter st.
Fig 2
Fig 3


The pattern is of 22 stitches. Hence I CO 100 = 6+22+22+22+22+6
Work first and last 6 stitches of the stole always in garter stitches.
In order that there should not be any mistake in the pattern which is of 24 rows, I have placed markers after (6+22=)28 sts,  (28+22=)50 sts and (50+22)=72 sts. So that at last there will remain 28 sts (22 of pattern and 6 for border).
Knit this way according to pattern till the length is approximately 70 inches and the pattern is finished means 24 rows are worked out. 
Lastly work garter stitch for 10 rows and then bind off all stitches lightly.
Now make tassels with 10" card board. Wrap four strand as in fig 4. Remove the threads from card board. Make them double so that the length of those 8 strands is 5" as in fig 5. Use markers and fix the positions of tassels as in fig 6. By crochet hook knot the tassel as in fig 7.

Fig 4
Fig 5
Fig 6 
Fig 7

The crochet border is made by half double crochet. The videos of how to make half double crochet and the tassels are here though they are in my mother tongue but there are English subtitles.

Here is about Tassels.


ETC : Enjoy the Creativity.

Saturday, December 8, 2018

Crochet Baby Sweater 16

Crochet Baby Sweater
Fig 1

Hello friends,
This is my new creation last week. Full sleeves, round neck and front open crochet baby sweater. This is top down pattern. No doubt it is very simple to make and beginners can make it.Viewers on my You tube channel "Kalopasak" requested for that. 
For this sweater I used two contrast colours, 4 ply Vardhaman knitting yarn and 3 mm crochet hook. 


Fig 2
Pattern: 45 chains. See fig 1.
R 1: Sc 1 on each ch starting from second chain. (44 sts), fig 2.
R 2: Ch 3, turn dc1 in each of next 2 sts, 2 dc in next st, (dc1 in each of next 3 sts, 2 dc in next st) repeat till end.
R 3: Ch 3 turn, dc1 in each of next 3 sts, 2 dc in next st, (dc1 in each of next 4 sts, 2 dc in next st) repeat till end.

Fig 3
 R 4: Ch 3 turn, dc1 in each of next 4 sts, 2 dc in next st, (dc1 in each of next 5 sts, 2 dc in next st) repeat till end.
R 5: Ch 3 turn, dc1 in each of next 5 sts, 2 dc in next st, (dc1 in each of next 6 sts, 2 dc in next st) repeat till end.
R 6: Ch 3 turn, dc1 in each of next 6 sts, 2 dc in next st, (dc1 in each of next 7 sts, 2 dc in next st) repeat till end.

R 7: Ch 3 turn, dc1 in each of next 7 sts, 2 dc in next st, (dc1 in each of next 8 sts, 2 dc in next st) repeat till end.

Fig 4

 R 8: Ch 3 turn , dc1 in each of next 8 sts, 2 dc in next st, (dc1 in each   of next 9 sts, 2 dc in next st) repeat till end. See fig 3
R 9: Ch 3 turn, dc 1 in each of next 16 sts, ch 3, skip 26 sts, dc1 in next 35 sts, ch 3, skip 26 sts, dc1 in next 17 sts. See fig 4
R 10: Ch 3 turn, dc 1 in each st and on each under arm chains created in the previous row. (Total 75 sts)
R 11  to R 24: Ch 3 turn, dc 1 on each st.

Sleeves: Join yarn at the middle  chains of 3 underarm chs created in R 9.
R 1: Ch 3, dc 2 in 2 sts, dc 3 in previous row dc gap, then dc 1 on each of 26 sts left for the sleeves in row 9, then dc 3 in previous row dc gap, then dc 1 on each of 2 sts (Total sts 37). Join with the third ch of the starting 3 chains, by slip st.
Fig 5
R 2: Ch 3 turn, dc 1 on each st.
R 3 and R 4 as R 2.
R 5:  Ch 3 turn, 2dctog, dc1 in each st till last 2 st then 2dctog. (Total sts 35)
R 6 to R 9: Ch 3 turn, dc 1 on each st.
R 10: As R 5. (Total sts 33)
R 11 to R 16: As R 2.

Button Band: Join yarn at the lower corner of right front.
R 1: Pick up sts and make half double crochet
R 2: ch 2 turn hdc on each st
R 3: As R2.
Fig 6
Neck Band: Make 2 more hdc in the same st, then make 1 hdc on each st around the neck.
Button Hole Band: 2 more hdc on the corner st
R 1: Pick up sts from left side and make 1 hdc.
Place markers where you want to make button holes. Fig 6
R 2: Ch 2 turn, (hdc on each st till the marker, ch 2 skip 2 sts and hdc in the third st, ) repeat three more times.
Border: Again 2 hdc in corner st and hdc 1 on each st similarly 2hdc in corner st. Binf off.

If you want you can make hdc border for sleeves also. Finally it's ready as in fig 1.
ETC: Enjoy the Creativity.

Doily

Friends,  Here is the beautiful pattern of Doily. Actally I made it as one of the Dinner set Plate Decor. The following video shows other th...