Hello friends,
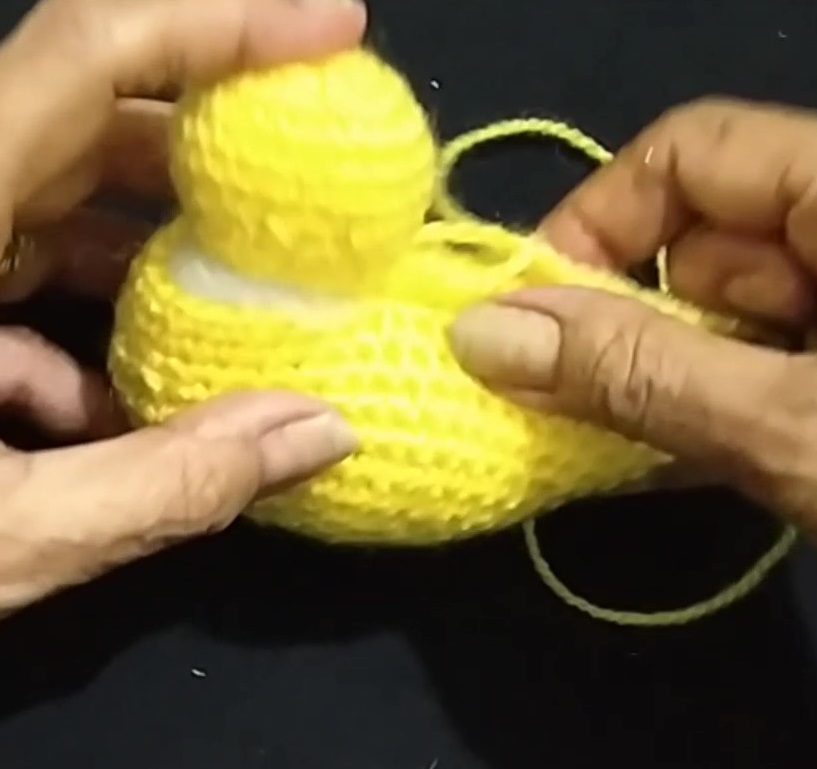
Last fifteen days I could not post much because I was busy in following the lovely orders of my grand son and grand daughter. First as a sample I made small pink duckling. It looked good then for my channel I made the video of Mother duck and two ducklings in yellow colour (as in fig 1), but my grand daughter (just 2 and half years old) liked pink duckling more and she wanted that set. So I again complete pink set of duck and ducklings (see fig 2). Now these duck families are just waiting that when their lovely friends (my grandson and grand daughter) will come and play with them.
You can make these mother duck and ducklings to gift some one or as a beautiful hand made home decor.
Patteren: Mother duck:Body:
R1: In a magic loop make ch1, sc8, cl. (8 sts)
R2: ch1, sc2 in each st, cl (16 sts)
R3: ch1, (sc1, sc2 in next) 8 times, cl (24 sts)
R4: ch1, (sc1 in 2 sts, sc2 in next) 8 times, cl (32 sts)
R5: ch1, (sc 1 in 3 sts, sc2 in next) 8 times, cl (40 sts)
R6: R7 and R8: ch1, sc 1 in each st, cl (40)
R9: ch1, sc 2 in first 2 sts, sc 1 in each st till last two sts, sc2 in each of the last 2 sts, cl (44 sts)
R10: ch1, sc 1 in 16 sts, (2sctog) twice, sc 1 in 4 sts, (2sctog) twice, sc 1 in 16 sts, cl,(40 sts)
Make 2sctog as shown, taking only front loops of two sts and not through the complete st.
R11, R12 and R13: ch1, sc 1 in each st, cl (40 sts). BO fold and sew 12 sts together unworked 8 sts on both side. Stuff the fiber.
Head:
R1: In a a magic loop make ch1, sc8, cl (8 sts)
R2: ch1, sc2 in each st, cl (16 sts)
R3: ch1, (sc1, sc2 in next) 8 times, cl (24 sts)
R4, R5, R6: ch1, sc 1 in each st, cl (24 sts)
R7: ch1, (sc1, 2sctog) 8 times, cl, (16 sts)
R8 and R9: ch1, sc 1 on each st, cl
BO with 10” yarn end. Add fiber in head and sew head with the body, 16 sts each.
Beak:
For beak we use pink yarn.
See the duck from head side and mark 5 middle sts,
R1: sl st in these 5 sts,
R2: ch1 turn, sc1, hdc1, dc1, hdc1, sc1,
R3: ch1 turn, sc1 in 2 sts, hdc1, sc1 in 2 sts, cl
Now work similarly for lower part of beak. Once the beak made it will look as,
Wing: R1: ch 13, sc 1 in each st starting from second. (12 sts)
R2: ch1, sl st in second st, sc 1 there and in each st, (11 sts)
R3: ch1 turn, sc 1 in 10 sts only (10)
R4: ch1, sl st in second st, sc 1 there and in each st (9)
Repeat these 2 rows till there are 12 sts, BO. Sew them properly.
Glue or sew eyes as small beads.
Duckling:Body:
R1: In a magic loop make ch1, sc8, cl. (8 sts)
R2: ch1, sc2 in each st, cl (16 sts)
R3: ch1, (sc1, sc2 in next) 8 times, cl (24 sts)
R4 and R%: ch1, sc 1 in each st, cl (24)
R6: ch1, sc2 in first st, sc1 in 22 sts, sc2 in last st, cl. (26)
R7: ch1, sc 1 in 10 sts, 2sctog next, sc1 in 2 sts, 2sctog next, sc 1 in last 10 sts, cl. (24)
R8 and R9: ch1, sc 1 in each st, cl (24)
Fold and Sew till 5 sts remained unsewed on both sides.
Head: In a magic loop make ch1, sc7, cl
R2: sc2 in each st, cl (14)
R3: ch1, sc 1 in each st
R4: same as R3.
R5: ch1, (sc1 in 1 st, 2sctog next) 4 times, sc 1 in last 2 sts, cl (10)
R6: R7: ch1, sc 1 in each st, cl.
Sew this (10 sts) with body as that of Mother duck.
Beak: R1: Choose middle 3 sts on face and make sl st 3.
R2: sc 1, hdc 1, sc1, BO
Wing of ducklings: R1: In a magic loop, ch1, sc 5, cl
R2 of left wing: sc2 in first st, sc1 next, (sc1, hdc1, ch1, sc1 in hdc st, sc1) all in next st, sc1 in next sc2 in last, cl.
R2 of right wing: sc2, sc1, (sc1, ch1, sc1 in sc st, hdc1, sc1) in next sc1 in next, sc2 in last, cl.
Sew both wings properly.
Sew small beads as eyes or I have glued small bindi in place of eyes.
Make one more small duckling.
The cute and beautiful Mother duck and ducklings are ready.
The following video with English subtitles may help you.
ETC: Enjoy the Creativity.
Hello friends,
Last week, I made this poncho for daughter of my sister. This is her favorite colour and hence I ordered it online due to this lockdown situation.
Actually I want 4 ply but in this colour it is little bit thin. So the outcome is very nice as it's weight is 350 gm only.
We use Ganga Glowing Star yarn and 3.5 mm hook.
Chs 120, (approximately 24") place marker at the middle ch 60 chs on each side of marker, make a ring by sl st in first ch.
R1: ch3, dc 1 in each ch, cl.
R2: (leaf 1, ch4, leaf 1) in the same st, [ch4, skip 4 sts, (leaf 1, ch4, leaf 1)(we call this shell of leaves) in next] rep this till end , cl.
There will be 24 shells of leaves.
Leaf means: 4 tr tog in same st.
Note that first incomplete tr means ch3.
4trtog means: make 4 incomplete tr, (there are 5 sts on hook), YO pass through 4 sts, YO pass through remaining 2 sts.
Incomplete tr means: YO twice insert, YO get 1 st out, there are 4 sts, YO pass through 2 of them, (3 sts on hook), YO pass through 2 sts, (2 sts on hook), this is one incomplete tr.
Place 2 markers in ch4-space, in between two leaves so that 11 shells will be on both sides of marker.
R3: Repeat as round 2 till marker. At marker make 2 shells that is 4 leaves. (leaf, ch4, leaf, ch4, leaf, ch4, leaf) in the same ch4-sp. Again shell on shell till marker at marker work (leaf, ch4, leaf, ch4, leaf, ch4, leaf) in ch4-sp. Again leaves shell on each shell. At second marker’s ch4-sp work (leaf, ch4, leaf, ch4, leaf, ch4, leaf) in ch4-sp, cl.
R4: [shell on shell, at corner there are three ch4-spaces, make (shell , ch4)in each ch4-space, place marker at the middle shell] twice, cl.
R5: [shell on shell, at marker make (shell, ch4, shell)] twice, cl
Repeat rounds 4 and 5 till the required height. We make height 19”.
This increased portion will be on back and front side.
Neck Band:
R1: Join yarn at some st, count so that middle st in front side should be front post double crochet and go on making (fpdc1, bpdc1) till 2 sts to front centre. Make incomplete fpdc1, skip next st of bpdc, incomplete dc 1 in next, skip 1 bpdc, fpdc 1 in next, there are 4 sts on hook, YO and pass through all. For remaining sts, make (1bpdc, 1 fpdc) till back centre. Decrease similarly on back side also, again (fpdc1, bpdc1) till end, cl. (8 sts decreased)
In next round we have only decreased sts in front side and back side we simply work as (fpdc1, bpdc1).
Total 12 sts decreased. There are 108 chs, which are needed for neck.
Tassels: On cardboard of 5.5” wrap 5 times and make tassels. Attach them on each ch4-sp in between the leaves shell.
See fig 1.
Tassels attached to cord: Take double strands,
R1: In a magic loop make ch3, dc 15, cl. Make one more.
In continuation of one of the round of 16 dcs, make chs 200 for the length 50”. Pass the cord around the first row of neck band, attach another circle of 16dc. Sew big beads at the cetre of both rounds on both sides.
Here we make bigger tassel with 15 times wrap and attach them in the same way.
Poncho is ready here.
If you want to make same poncho for small girls then,
For one year girl, make starting chs to measure 15"
For 3 years girl, make starting chs to measure 17"
For 3-10 years, make starting chs to measure 19"
For 10-18 years, make starting chs to measure 21" and
for ladies make starting chs to measure 22"-25".
The following video with English subtitles may help you.
ETC: Enjoy the Creativity.
Hi,
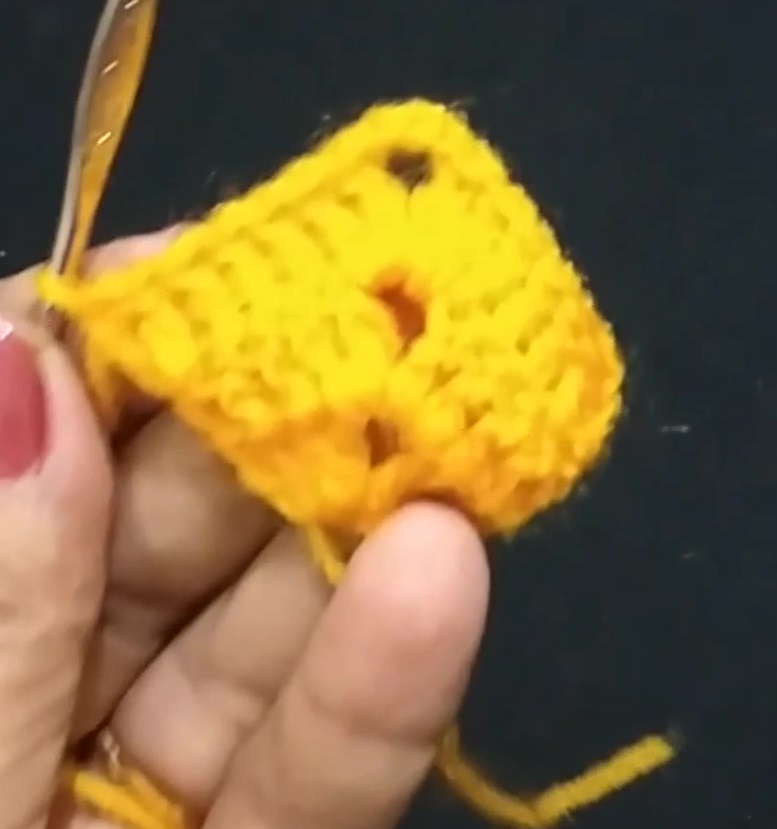
Here is my new creation: Card Pouch. Coin Bag or Small Purse. This is very useful and every one can use it. Elders can use it for keeping cards (Debit card, Credit card etc), young girls can use it as a coin bag or make bigger one as per the required size. Colours can be used as per the person using it, means if you are making this as a card holder for gents then use male favorite colours blue, grey, black, cream etc and don't put that belt. You can gift it for small girl on her birthday.
Here is the pattern,
I used three colours Pink, Green and White yarn in 4 ply and 3.5 mm crochet hook.
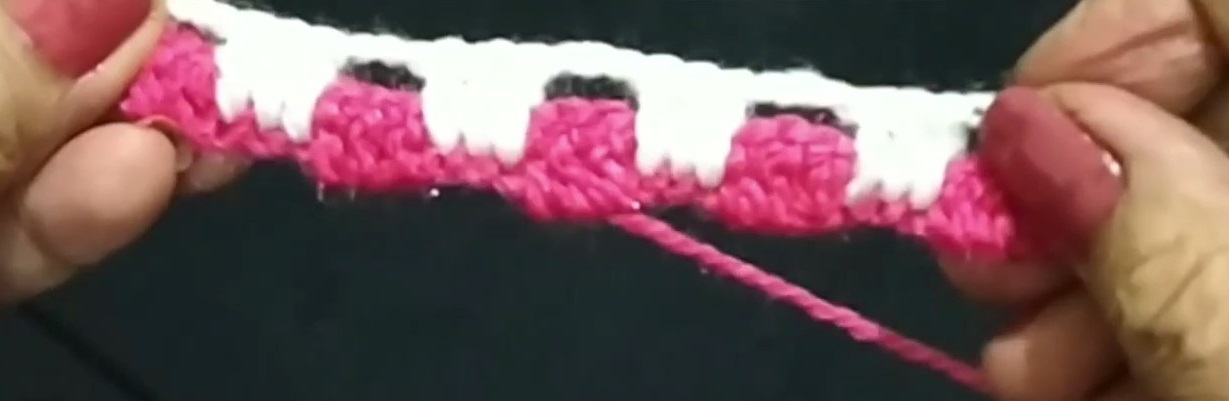
For this type of interlock we need multiple of 6 plus 3 sts.
Start with Pink yarn, make 24+3= 27 chs.
R1:ch2 turn and make dc 1 in 4th and 5th chs, [ch3, skip 3 sts, make dc1 in next 3 sts] repeat till end.
R2: Join white, sc 1 in first st, ch2, [ dc 1 in 3 chains (one row below), ch3] rep till end.
R3: Join green, ch3, [dc 1 in 3 sts below one row, ch3] rep,
Pink yarn end is on the same side, so start next row with pink,
Repeat these two rows with the yarn colour which will be already on that side, till the required height (double that of required width).
Last row with pink (because first is pink).
Last row: sc1 in 3 dc-sts, hdc 1 in next 3 sts one row below.
From wrong side sew the sides after folding. Also sew press buttons.
Belt: The belt is simply made by breaded stitch with 6 threads in one pannel.
Tassel: Make one tassel if it is for ladies.
The following video with English subtitles may help you.
ETC: Enjoy the CReativity.
Hello friends, This time I make one table runner and this is my first table runner I ever made. It's simple puff design will definitely attract you.
Pattern:
I used Vardhamaan Brilon yarn and 1.75 mm hook. Its thin yarn.
Length 36”+ tassels 12” from both sides.
Note that first dc is always ch3.
Pattern: Make ch4,
R1: (dc2, ch3, dc3) in first ch. (After row 1 we have dc 3, ch3 space, dc3)
R2: dc3, shell in ch3-sp, dc 3. (After row 2 we have dc5, ch3, dc 5.
Shell means (dc2, ch3, dc2) in ch3-sp.
R3: dc5, shell, dc 5. (After row 3 we have dc7, ch3, dc7)
R4: dc7, shell, dc7. (After row 4 we have dc9, ch3, dc9)
R5: dc9, shell, dc9. (After this row we have dc11, ch3, dc11)
Repeat this till row 12. After row 12 we have dc25, ch3, dc 25.
In next row we shall work along three sides of this square,
R13: (puff1, ch2, puff1) in first st, ch1, [skip 5 sts, (puff1, ch2, puff1) in next st, ch1] 3 times, dc 1 in next st, shell in ch3-sp, dc 1 in first st, ch1, [skip 5 sts, (puff1, ch2, puff1) in next st, ch1] 3 times, skip 5 sts, (puff1, ch2, puff 1) in last st.
Note Puff means: (YO insert in a st, YO get 2 long sts) 3 times, YO pass through all 7 sts, ch1 to fix it.
Call (puff1, ch2, puff1) as puff shell.
R14: [puff shell on puff shell of previous row, ch1] 4 times, dc3, shell on shell, dc 3, ch1, [puff shell on puff shell] 4 times.
R15: Both puff-side portion as it is, dc 1 on each dc-st, shell in ch3-sp, dc 1 in each dc-st.
Repeat this with increasing number of dcs at middle part, first 3, then 5, then 7 and so on till there are dc25. That is till row 24.
See the close up look.
Then bind off and join yarn at puff-shell side.
Repeat row 13 to 24 till the required length of table runner. I made length 36”.
Make 3 beaded lines with (puff1, bead 1) as long as you wish. Attach them to the ends.
Join tassel with 7 beads at centre, with 5 beads at 5dc-sts apart on both sides.
Beautiful table runner is ready.
The following video with English subtitles may help you.
ETC: Enjoy the Creativity.
Hello friends,
Yes I know that there is a long gap since I posted previous post. You know, some times what happens that we are so busy in creativity, one after one new ideas strike in mind and before forgetting it we want to execute it and in that period we don't want to write the pattern and all because we are actually enjoying the creativity a lots. This is, what happened with me in last 8-10 days.
So here I am giving a pattern of one of the doily I made in this week.
Pattern:
Make a ring of ch10
R1: dc18 in this ring, cl (18 sts)
Note that first dc is always ch3.
R2: dc 2 in each st, cl (36 sts)
R3: (dc2 in one st, dc 1 in next st) 18 times, cl (54 sts)
R4: (dc2 in one st, dc1, in next 2 sts) 18 times, cl (72 sts)
R5: (dc1, ch1) 72 times, cl (72 ch1-sp)
R6: (dc1 on dc-st, ch1) 72 times, cl
R7: same as R6.
Now we shall make leaves on rounds 5,6 and 7. So join green yarn at some dc of last round.
R8: (3dctog there, also 3dctog on dc down two rounds, means dc of round 5, but here after 3 incomplete dcs YO and pass through only 3 sts and not 4 sts, then again YO and pass through remaining two sts, join by sl st to the dc of 6th round after skipping one row line. Then sl st in the next row dc of 7th round) repeat till the round complete. BO after last pair of leaves. See the following photos for details
R9: dc 1 in each dc-st, dc 1 in ch1-sp, till end, cl (144 sts)
R10: dc 1 in each st, cl
R11: and R12 same as R10.
R13: (dc1, ch1) 144 times, cl
R14: same as R13.
R15: Same as R8 only with the changes that instead of skipping one row line we skip two line and then make new pair of leaves. That is,
Join green yarn in any dc of last round. (3dctog there, also 3dctog on dc down two rounds, means dc of round 12, but here after 3 incomplete dcs YO and pass through only 3 sts and not 4 sts, then again YO and pass through remaining two sts, join by sl st to the dc of 13th round then make one long stitch sl st in next middle dc, after skipping one row line make new pair of leaves) repeat till the round complete. BO after last pair of leaves. BO.
See the difference between round 8 and this round, how the space is kept in between two pair of leaves in this round.
The beautiful doily will be ready as in figure 1.
The back side of the doily will be seen as below.
The following video with English subtitles may help you.
ETC: Enjoy the Creativity.