Knitted Socks with Thumb
Hello friends,
This time I made knitted socks with thumb because I always prefer sock with thumb so that I can wear them on slippers also.
This pattern is very old and traditional pattern. My friend Rajani shown these to me and I made it for my auti. So first of all I have to take measurements as length of foot and as shown in fig 2.
Here length is 9" and the round measurement is 8.7".
So cast on (CO) number of sts whose length will be 8" or 8.2".
I have to CO 55 sts. Fig 3.
The wool I used is 4 ply and some what thin also, needles UK 10 number or 3.25 MM.
We have to work in Stockinette st except first and last 6 sts. They would be always worked in Garter st.
R1: (WS): K6, P43, K6
R2: (RS): K all.
Repeat rows 1 and 2 till the length of the piece is length 9" - length of thumb 2"= 7".
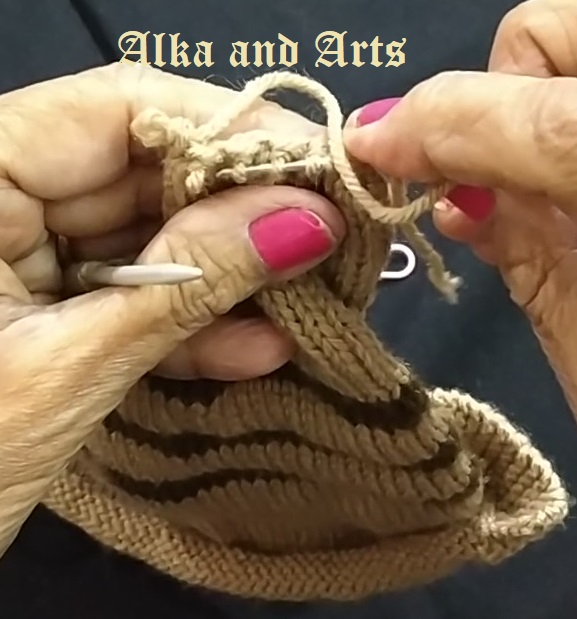
This part you may work out in a single color or you may make strips as I have shown here. Totally I have to make 34 ridges (68 rows) For dark color strips, after 17 ridges 2 ridges (or 4 rows) of dark, 6 ridges of original colour, again 4 rows of dark, 6 rows of original colour, last dark strip and then knit till total rows are 68. Fig 4.
After this we have to divide these stitches in two parts. One (smaller) for thumb and other part for remaining fingers.
Hence after 35 sts we place a marker. Fig 5. Work only these35 sts in Stockinette st for 12 rows.
Work 12 rows in Stockinette st then next row:
K3tog 6 times, K2tog (7 sts).
Pass tapestry needle through these 7 sts and bind off. Fig 6.
Then sew the thumb portion and other part also for four fingers.
Fig 7. Also sew from right side till two dark strips see fig 8
Then sew the back part as in fig 9. While making other sock be careful that how to divide in two parts so that two thumbs should be close to each other. As in fig 10. We check and decide that which side is proper for thumb and then place marker. Repeat the above process. Sock on right leg as in fig 8. Two socks are ready as in fig 1.
 |
| Fig 1 |
This time I made knitted socks with thumb because I always prefer sock with thumb so that I can wear them on slippers also.
This pattern is very old and traditional pattern. My friend Rajani shown these to me and I made it for my auti. So first of all I have to take measurements as length of foot and as shown in fig 2.
Here length is 9" and the round measurement is 8.7".
So cast on (CO) number of sts whose length will be 8" or 8.2".
I have to CO 55 sts. Fig 3.
The wool I used is 4 ply and some what thin also, needles UK 10 number or 3.25 MM.
We have to work in Stockinette st except first and last 6 sts. They would be always worked in Garter st.
 |
| Fig 2 |
 |
| Fig 3 |
R2: (RS): K all.
Repeat rows 1 and 2 till the length of the piece is length 9" - length of thumb 2"= 7".
This part you may work out in a single color or you may make strips as I have shown here. Totally I have to make 34 ridges (68 rows) For dark color strips, after 17 ridges 2 ridges (or 4 rows) of dark, 6 ridges of original colour, again 4 rows of dark, 6 rows of original colour, last dark strip and then knit till total rows are 68. Fig 4.
After this we have to divide these stitches in two parts. One (smaller) for thumb and other part for remaining fingers.
 |
| Fig 4 |
 |
| Fig 5 |
 |
| Fig 6 |
Next row (RS): K3tog 11 times, then K2tog. (12 sts)
Pass these 12 sts through tapestry needle and bind off.
 |
| Fig 7 |
Then join the yarn to other side for working 20 sts.
 |
| Fig 8 |
K3tog 6 times, K2tog (7 sts).
Pass tapestry needle through these 7 sts and bind off. Fig 6.
Then sew the thumb portion and other part also for four fingers.
Fig 7. Also sew from right side till two dark strips see fig 8
 |
| Fig 9 |
 |
| Fig 10 |
Then sew the back part as in fig 9. While making other sock be careful that how to divide in two parts so that two thumbs should be close to each other. As in fig 10. We check and decide that which side is proper for thumb and then place marker. Repeat the above process. Sock on right leg as in fig 8. Two socks are ready as in fig 1.
The following video may help you to make socks.
ETC: Enjoy the Creativity.


No comments:
Post a Comment