Crochet Ladies Jacket
Hi friends,
This is my new creation for me😀. The design on this jacket is little changed version of the design given by,
https://www.youtube.com/watch?v=0XOst4WmVpU&t=971s
When I saw this pattern I loved it and I thought of using it somewhere and here I changed it little bit and used it. I have also made matching booties with this which I will post lateron.
For this jacket I used Baby Bee yarn from Hobby Lobby. I love to make any thing with this yarn, it is such a wonderful yarn thin and smooth. Also I use 3.5 mm crochet hook.
R2: (WS) (Foundation row) ch 3, dc 1 in next 3 sts, [ch 2, skip 2 sts, sc 1 in next st, ch 1, skip 2 sts, (dc1, ch1) 3 times in next st, skip 2 sts, sc 1 in next, ch 2, skip 2 sts, dc 1 in next 4 sts] repeat till end, fig 7.
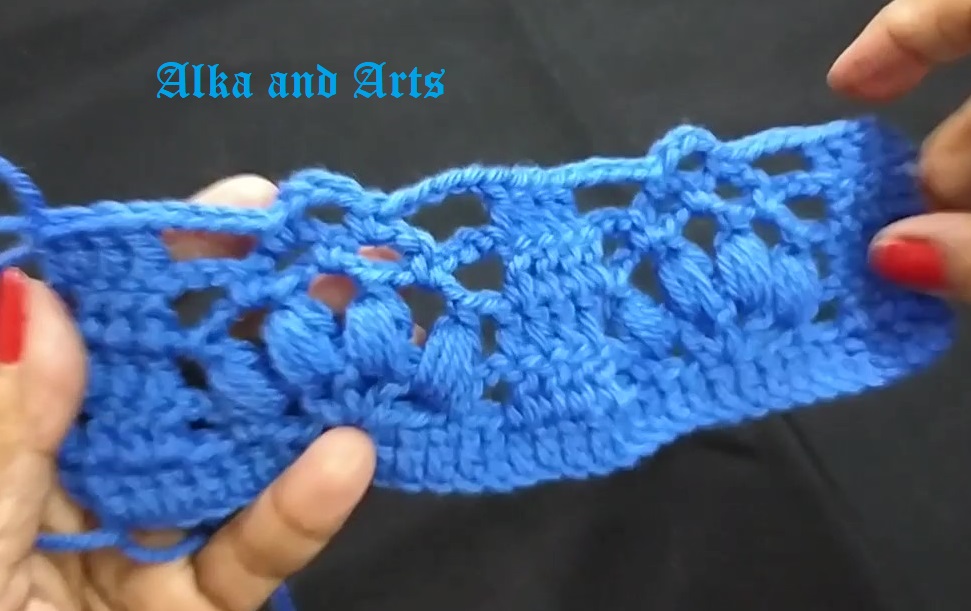
R3: ch 3, dc 1 in 3 sts, [ch 1, (puff 1 in next gap, ch 3) 4 times, ch 1, dc 1 in 4 dcs of previous row] repeat till end.
ch 1 fix it, fig 8
R4:ch 3, dc 1 in 3 sts, (ch 3, sc 1 in next gap) 3 times, ch 3, dc 1 in each of the 4 dcs of previous row, fig 9.
 |
| Fig 1 |
This is my new creation for me😀. The design on this jacket is little changed version of the design given by,
https://www.youtube.com/watch?v=0XOst4WmVpU&t=971s
When I saw this pattern I loved it and I thought of using it somewhere and here I changed it little bit and used it. I have also made matching booties with this which I will post lateron.
For this jacket I used Baby Bee yarn from Hobby Lobby. I love to make any thing with this yarn, it is such a wonderful yarn thin and smooth. Also I use 3.5 mm crochet hook.
Measurements: Height 23”, Width 17”
Pattern:
 |
| Fig 2 |
 |
| Fig 3 |
 |
| Fig 4 |
Border: Ch 12
R1: sc 1 in each st from second st till last st (11 sts), ch 1 turn, fig 2
R2: sc 1 in back loop of each of the 10 st, sc 1 normally (not in back loop) in last st. (11 sts). After row 3 as in fig 3.
Repeat row 2 till the length becomes 34”. Fig 4. Then bind off.
 |
| Fig 5 |
Ch 3, and make double crochet in each st, one in gap, one on vertical line. Fig 5Total we have 154 sts. We want multiple of 15 plus 4 sts, so adjust sts if necessary.
Sample of the Pattern: For sample we start with 34 + 3 chs.
R1: (RS)dc 1 in each ch starting from 4th ch. Fig 6.
 |
| Fig 6 |
 |
| Fig 7 |
 |
| Fig 8 |
 |
| Fig 9 |
Puff: (YO insert hook in st, YO get 2 long sts) 4 times, there are 9 sts on hook, YO and pass through 8 sts, YO pass through remaining 2 sts,
 |
| Fig 10 |
 |
| Fig 11 |
R4:ch 3, dc 1 in 3 sts, (ch 3, sc 1 in next gap) 3 times, ch 3, dc 1 in each of the 4 dcs of previous row, fig 9.
R5:ch 3, dc 1 in 3 sts, [ch 4, skip first gap, sc 1 in next gap, ch 3, sc 1 in next gap, ch 4, dc 4] repeat. Fig 10
R6: ch 3, dc 1 in 3 sts, [ ch 2, sc 1 in ch 4-gap, ch 1, (dc1, ch1) 3 times in ch3-gap, sc 1 in ch4-gap, ch 2, dc 4] repeat …This is just like our Foundation row above. Fig 11.
Remaining part of the jacket in next post.
ETC: Enjoy the Creativity.
Now repeat rows 3 to 6 as much as the length required. Here
we make 16”.
Then work till marker for arm hole and then work all dcs on
the puffs at under arm place (there will be 11 dcs as under arm, 2 dcs in each
gap and 1 dc on each puff edge). The next part again as per pattern till the
second under arm position, here also we work 11 dcs then remaining part again
as it is.
Next row as per pattern only at both underarms position
(instead of 11 dcs) work 5dcs, 2 dctog, 4 dcs, remaining again as it is.
In further work we shall not work these 10 sts under arm.
The following video may help you.Remaining part of the jacket in next post.
ETC: Enjoy the Creativity.


No comments:
Post a Comment