Beautiful Baby Jacket
 |
| Fig 1 |
After making a crochet cap, I thought about a jacket and as there was time limit, again I decided to make a simple design.
I tried to make the design so simple that even beginners can make it. I can say that the technique of crochet boot making, inspired me. See my post,
https://alkaandart.blogspot.com/search?q=cute+crochet+booties
This jacket was started from bottom.
Sweater Pattern: Make 95 chains.
R 1: dc on each chain starting from 4th ch from the hook. Thus 92 dcs. Ch 3 turn,
R 2: Make dc on each of 91 sts ( 91 dcs + 1dc of starting 3 chs. Total 92 sts).
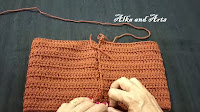
Repeat these two rows till the length is 6.5". Thus we get the rectangular shaped, see fig 2.
 |
| Fig 2 |
 |
| Fig 3 |
92= 23 for right front + 46 for back + 23 for left front.
See fig 3, 4 and 5.
 |
| Fig 4 |
 |
| Fig 5 |
For armhole 6 sts are left unworked 3 -3 from front and 3 from back of that rectangle in fig 3..
Right front:
Row 1: Ch 3, dc on each of next 19 sts ( including first dc as 3 chains total sts 20). ch 3 turn,
Row 2: dc on each st.till last 2 sts, 2 dc tog. (Neck decrease). Ch 3 turn,
Row 3: dc on each stitch till last 2 sts, 2 dc tog. (Here arm hole decrease is complete 3 sts left unworked +1 decreased just now =4) Ch 3 turn,
Row 4: dc on each st.till last 2 sts, 2 dc tog. (Neck decrease). Ch 3 turn,
Row 5: dc on each st.
Repeat rows 4 and 5 till 13 sts remain for shoulder.
Repeat row 5 till the total length is 12" / 13".
Count 20 sts for left front and place marker. See fig 6
 |
| Fig 6 |
Back: Work ch 3 (this is our first dc) then dc in each of next 37 sts., on the last 2 sts work 2dc tog, (arm hole decrease) (Total 39 dc). Ch 3 turn.
Next row: dc on each of next 36 sts, on the last 2 sts 2dctog. (armhole decrease of other side. ( now total 38 sts)
Now work double crochet on each st till the height is 12"/ 13". Note that first dc will be always ch 3.
Bind off.
Left front:
Skipping 6 sts from the back join the yarn where the marker is placed.
R 1: Ch 3 then 1 dc on each of the 19 sts. Ch 3, turn
R 2: 17 dc on next 17 sts, 2dc tog in the last 2 sts. (Armhole 4 decrease completed). 19 sts. Ch 3 turn,
R 3: 1 dc on each of the next 16 sts. next 2 dc tog. (1 decrease of neck line). Ch 3 turn,
R 4: dc on each st. Ch 3 turn
Repeat rows 3 and 4 till 13 sts remain for the shoulder.
Repeat row 4 till the height is 12" / 13". Bind off.
 |
| Fig 7 |
 |
| Fig 8 |
Here we want to make puff border as we have done for the cap in my previous post,
https://alkaandart.blogspot.com/search?q=crochet+baby+cap
So join the contrast coloured yarn on some back side stitch and work puff stitch and join each puff in the third st, by skipping 2 sts. It will look some thing like fig 9.
 |
| Fig 9 |
 |
| Fig 10 |
Now it remains to make 2 pom-pom with both colours and join by 25 chains as in fig 1.
You can also refer this video with English subtitles.
Finally my set was looking as in fig 11.
 |
| Fig 11 |
Happy crocheting.


Lovely set.
ReplyDeleteThanks Jane. Your comment is always booster for me.
DeleteImpressive baby jacket. Jacket Back Digitizing Good job.
ReplyDelete