Hello friends,
This is the second jewellery item I made for the Haldi ceremony. There are several designs and variety in necklace.I made this simple one.
I used yellow 4 ply yarn and 1.75mm and 0.5 mm crochet hooks. 0.5 mm crochet hook is used only for threading beads. The length of this necklace is 12: and weight along with beads is 23 gm.
Pattern: Ch3, [make the stitch long, (YO insert hook in first ch, YO get 2 long sts out) 5 times, see fig 2, there are 11 sts on the hook, YO and pass through 10 sts, YO and pass through remaining 2 sts, thread 1 bead using 0.5 mm hook, ch1 and fix the bead, see fig 3, ch2] puff made. Repeat this till there are 19 puffs.
Also make one more line of 25 puffs. Fig 4.
Now we make 4 flowers using puff stitch.
Pattern: Make a ring of ch4.
R1: (Ch1, sc1) as first hdc, (ch1, hdc 1 in a ring) 5 times, join by sl st in first sc st.
R2: sl st in ch1-space, [ch3, (YO insert in ch1-gap, YO get 2 long sts) 5 times, YO pass through 10 sts, YO pass through remaining 2 sts, see fig 5, ch3, sl st in the base-ch1-sp. sl st in next ch1-sp] repeat 6 times, lastly get the st on back side and bind off.
Sew a big bead at the centre as in fig 6.
Lastly assemble as in fig 1, thread big beads at the top on both sides. Then make cord of 6"-7" at lastly again thread a bead.
A beautiful necklace is ready.
The following video with English subtitles may help you.
ETC: Enjoy the Creativity.
This is the third item I made in Haldi Ceremony of Indian marriage. These are Kangan, hand accessory. Kangan is the most common and favourite jewellery of Indian women or girls. Again there is large number of variaty in Kangan. It's a type of Bracelet. They are made of Gold, Silver, glass,
In Maharashtrian traditional jewellery there are 4 types of Kangans, Bangadya, Patalya, Tode and Goth. See fig 2.
I used same yellow 4 ply yarn, crochet hook 1.75 mm and 0.5 mm for threading beads. I also used buttons as a hook to fit it to the hand.
Patterns:ch7+3,
R1:thread one bead, (YO insert hook in 4th ch from starting, YO get hook out with 2 long sts) 3 times, there are 7 sts on hook, YO pass through all sts, ch1 and fix the puff, ch1, another puff in same ch, thread one bead, dc 1 in last ch. Fig 2.
R2: ch3, thread bead, shell in ch1-sp of previous row, (shell means puff1, ch1, puff1 in same space), thread one bead, dc 1 on the st next to the bead of previous row. Fig 3.
Repeat R2 till there are 17 shells, then work last row without beads. Fig 4.
Length of this strip is 8". You can change this length as per your requirment.
Lastly I sew a button at one end, where as first shell os other end works as buttonhole to fit in hand. Fig 5.
The following video with English subtitles may help you in making these Kangan.
ETC: Enjoy the Creativity.
Indian weddings are festival type celebrations. It is full of rituals, extensive decorations, music, dance and enjoyments of various types. There are several small and big events pre and post marriage. Indian people spend sufficient amount of money, energy and time on this occassion. For details please visit,
the most important. It is also known as Holy bath, Pithi ceremony, Ubtan, Mandha or Tel Baan (Tel van) in various states of India. This is mostly done on a day before wedding or on the same morning before wedding. Paste of Termeric, Sandlewood power, Oil and Rose water is applied to both bride and groom both. Both wear yellow dresses bride wears yellow floral jewellery. Ceremony is accomplished by music, dance and happy atmosphere. The significance is:
1. Haldi (Termeric) gives fair glow to the body.
2. It is supposed to be auspicious.
3. Some people thought that it protects newly
Fig 3
Fig 4
married couple from the evil eye.
4. Yellow colour is supposed to be prosperous for new couple.
5. Haldi is antiseptic and does purification of body.
6. Helps to drive away premarriage jitters.
Fig 5
Fig 6
7. Haldi is salso supposed to be symbol of blessings.
Such a lovely ceremony is Haldi function.
The floral jewellery purchased for Haldi function cost generally Rs. 2000/- to 3000/-
At the same time being floral it naturally dried in 2-3 hours. So here I
Fig 7
suggest "Crochet Jewellery for Haldi Ceremony" which is fantastic alternative to floral. Because they are ever lasting, we can use it after marriage also in various functions. Necklace, earrings and Kangan can be used in any function. Bindi can be converted to simple necklace, Waki can be wear as necklace. Kamarpatta can be used for decorating purpose.
The whole set I have made is shown in fig 2. and it consists of 1. Veni / Gajara, 2. Necklace, 3. Bindi, 4. Vaki, 5. Earrings, 6. Kangan and 7. Kamar patta.
Here is our first jewellery among them, that is Veni / Gajara. This is the hair accessory, generally used in two forms loosely thread flowers as in fig 7 and tightly thread flowers as in fig 1.
Yellow yarn will be the default yarn in Haldi function jewellery set. I used 4 ply yarn.
Pattern: Make chains 64+1 by green yarn.
R1: With green make [sc 1 in 4 sts, join yellow colour, ch3, dc 4 in next ch, take the hook out and insert in the third ch, pass the working loop (st) through this third ch. ch2, again remove hook insert it in the base st from front side (see fig 3) and get the loop out, pass green yarn through this pull tightly, one bud made] repeat this all over the row. After 3 buds it will look as in fig 4.
Once the row is finished it will be as in fig 5, you may use this itself as a accessory but for wedding ceremony it will be delicate so we work out other side also.
R2: After sc 1 in last 3 sts, sc 2 in corner st, sc 1 in 5 sts on other side (so that new bud will be in between two buds on other side) [make a bud as in previous row, sc 1 in 4 sts] rep till end. If you keep it loose, it will be as in fig 7 and if you arrange it as in fig 1, it will be like Veni.
Hello friends,
Doily making is always a fun. Here is the new doily I made. The yarn used is Vardhamaan 4 ply yarns in three colours and 3.5 mm crochet hook. Pattern: Central Flower:
R1: In a magic loop make ch 2, hdc 16, cl by sl st in first hdc, fig 2.
R2: ch 7, (tr 1 in next st, ch 3) repeat, cl, (16 windows formed). Fig 3.
R3: ch 4, tr8 in ch 3 space, tr 9 in left side tr, join by sc 1 in corresponding st in round 1 of hdc, (tr 9 on right side trof previous round, tr 9 on ch 3 gap, tr 9 on right side tr of previous round, join by sc 1 in corresponding st in round 1 of hdc) 7 times, tr 9 on remaining tron right side, cl by sl st in first tr that is 4th ch made in this round, fig 4 and 5.
Central flower made. There are 5 unworked ch3-gaps on the back side, seen clearly. Join white yarn with one of such unworked ch3-gap on back side.
Fig 2
Fig 3
Fig 4
R1 with white yarn: ch 3, dc 4 in same ch3-gap, (ch 5, dc 5 in next ch3-gap) repeat, cl, fig 6.
R2: ch 2, in complete dc in next 4 sts, YO and pass through all sts fix it by ch 1 (that is 5dctog made), [ch 3, shell in next ch 5 gap, (shell means dc 2, ch 3, dc 2 in ch 5-gap), ch 3, 5dctog] repeat till end, cl. Fig 7.
Fig 5
Fig 6
R3:ch 4, skip first dc, dc 1 on next st, shell in ch 3 gap of shell in previous round, [dc 1 in next st, skip last dc stitch, ch 3, incomplete dc 1 before and incomplete dc 1 after the 5dctog stitch of previous round YO and pass through all the three sts (that is 2dctog made), ch 3] rep, cl by incomplete dc before joint (means 2dctog of previous round).
R4: incomplete dc after joint, [ch
Fig 7
3, skip first dc of previous round, dc 1 on each st till ch2-sp, shell in that ch2-sp, dc 1 on each st, skip last dc stitch of previous round, ch 3, 2dctog at joint] rep, cl as above round.
I made further rounds as round 4, every time number of sts arount shell increases. This will be continued till there are 8 dc sts on both sides of ch3-space of shell. Fig 8.
Fig 8
Fig 9
Green Border: Join green yarn in between ( means not at any cornerup or corner down).
Ch 3, dc 1 in each st except at the top ch 3 st of shell where we have to make 4 dcs and the lower corner of joint where we make 3dctog.
Fig 10
Small Flowers:Ring of ch 5.
R2: ch 5, [(dc 1, ch 2, dc 1) in next st, ch 2] rep, cl. Five Vs formed.
R3: ch 3, dc 4 in ch2-gap, dc 5 on right dc of V, sc 1 in base st, [dc 5 on right part dc of V, dc 5 on ch 2 sp, dc 5 on left partdc of V, sc 1 in base st] rep, lastly dc 5 on right part dc of V, sl st, cl.
I made such 8 flowers . Then sew big pearl at the centre of each joining their petals.
Sew one at each corner as shown in fig 1.
The beautiful doily is here.
The following video with English subtitles may help you.
Hello friends,
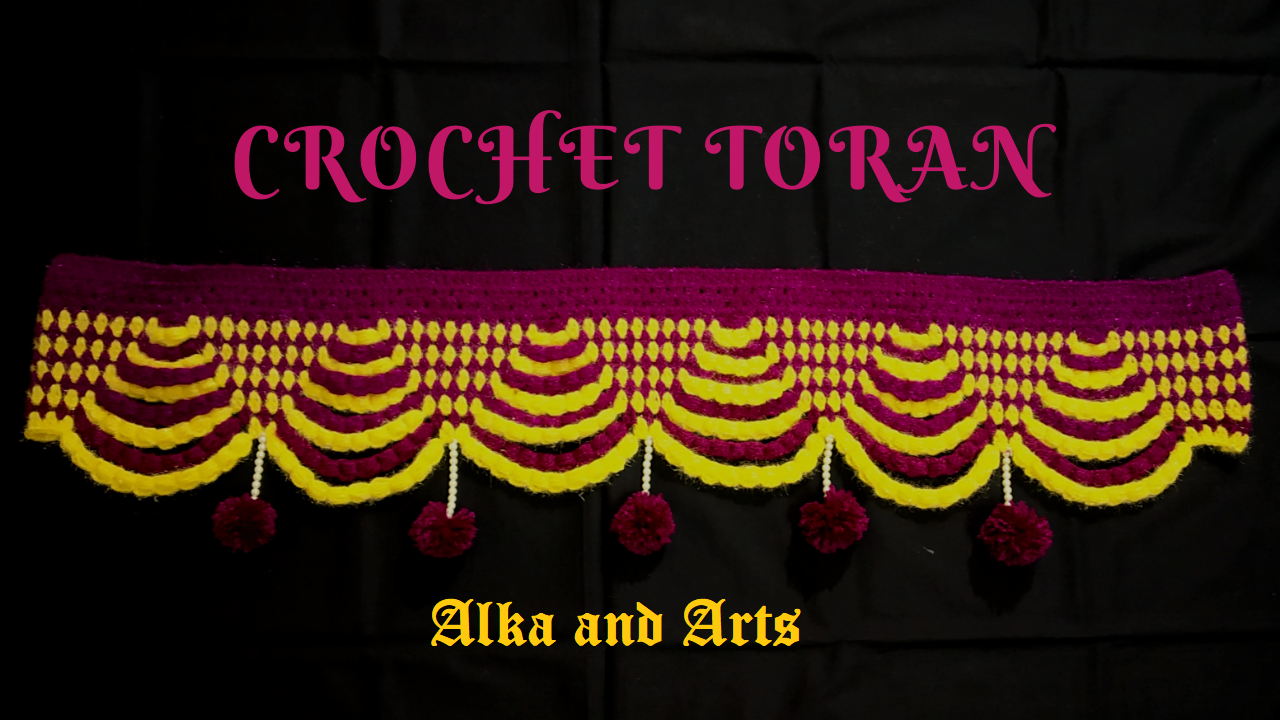
Since I run the Youtube channel, I observed one thing that most of the subscribers of my youtube channel are interested in making door hangings and doily. The reason may be that if they make sweater or cap any thing like that then there is a question of fitting and if it does not fits well then all time and all the hard work is waste. Instead if one makes doily or door hanging then there is no such problem. So I understand that I have to make more door hangings and doilies. Hence I made this one which is in two colours and looks beautiful.
As per my door measurement, I made chs with length 40". They are 161, adding 3 R1: dc 1 in each st starting from 4th ch. (162 sts) R2: ch3 turn, dc 1 in each st starting from second. (162 sts) R3: ch3, dc 1 in first gap, (skip 2 sts, dc 2 in next gap) repeat till end, (79 gaps formed) For the design, we require multiple of 11 windows, that is 77 is OK. That means we have 2 windows extra, hence we always leave first and last window as usual. Note that we don't write this in every row but we have to make dc 2 in the first and last gap which we don't mention while writting each row.
R4: dc2 in each of 11 gaps, (means 10 windows worked) puff
1 in the stitch, (means make long 2 sts as if to work dc 4 times, so there are 9 sts on hook, YO and pass through all 9 sts - puff formed). Thus it is 11 windows design.Fig 2.
R5: Join yellow colour, (dc 2 in 10 gaps, puffs 2) repeat till end. Fig 3. Make one row in each colour. R6: (dc 2 in 9 gaps, puffs 3) rep
Hello friends,
C2C technique in crochet is very interesting. This is oblique way of making things straight 😇.
In my video channel I have demonstrated, how to make square by C2C and how to make rectangle by C2C technique? The technique is generally used to make baby blankets. How to make Square by C2C technique: https://youtu.be/l5uuHmgEkNY
How to make reactangle by C2C technique: https://youtu.be/NrHalqGemCU
Here is the central portion of the baby blanket, I have made. It is so cute that you can also use it as a wall frame in kids room.
In this technique only three type of stitches are used, chains, double crochet (dc) and slip stitch (sl st). ch3, dc 3 makes one small square and
Fig 2
Fig 3
It is 22 sq x 26 sq, Row – R. Start from left corner of the
picture.
First select the crossed picture then draw oblique lines on that from one corner as in fig 3. Count and write the colours of each corner as in fig 3,4.
Fig 4
Fig 5
Note: Background colour Yellow – Y, Mustered color – M, White – W, Brown – B, Black
R1 to R11 all Y.
R12: 3Y, 5M, 4Y. (12sq)R13: 3Y, 7M, 3Y. (13 sq)
R14: 2Y, 1W, 8M, 3Y. (14 sq)
R15: 3Y, 9M, 2W, 1Y.
R16: 1Y, 4W, 5M, 1Y, 2M, 1B, 2Y.
R17: 3Y, 1 B, 1W, 1M,1Y, 5M, 3W, 2Y.
R18: 2Y, 3W, 4M, 2Y, 1M, 1W, 1B, 1W, 1B, 2Y.
R19: 3Y, 1B, 3W, 1M, 2Y, 4M, 2W, 3Y.
R20: 5Y, 2W, 5Y, 3W, 1B, 1M, 3Y.
R21: 4Y, 1M, 3W, 1M, 6Y, 1M, 5Y
R22: 6Y, 2M, 4Y, 1M, 3W, 2M, 4Y (22 sq)
R23: 4Y, 2M, 2W, 2M, 2Y, 4M, 6Y (22 sq)
R24: 7Y, 1M, 3W, 2Y, 1M, 2W, 2M, 4Y (22sq)
R25: 4Y, 5M, 1Y, 4W, 1M, 7Y (22 sq)
R26: 8Y, 1M, 5W, 3M, 5Y, (22 sq)
R27: 6Y, 1M, 1B, 2W, 1 black, 1W, 2M, 7Y (21 sq)
R28: 6Y, 3M, 3W, 1M, 7Y (20sq)
R29: 6Y, 1W, 7M, 5Y (19sq)
R30: 4Y, 7M, 1W, 6Y (18sq)
R31: 5Y, 2W, 4M, 1Y, 1M, 1 B, 3Y (17sq)
R32: 5Y, 4M, 2W, 5Y (16 sq)
R33: 4Y, 1W, 1 black, 1W, 3M, 5Y (15sq)
R34: 5Y, 3M, 2W, 4Y (14sq)
R35: 3Y, 3W, 2M,5Y (13 sq)
R36: 5Y, 2M, 2W, 3Y (12 sq)
R37: 2Y, 1M, 1W, 3 M, 4Y (11sq)
R38: 3Y, 4M, 1W, 2Y (10sq)
R39: 1Y, 2M, 2Y, 1M, 3Y (9sq)
R40: 2Y, 1B, 5Y (8sq)
R41: 7Y.
R42: 6Y.
R43: 5Y.
R44:
4Y.
R45: 3Y.
R46: 2Y.
R47: 1Y.
The following video may help you.
Hi,
In this second part we shall see, how to make this sun hat for size 1-1.5 years. The design of the hat is choosen matching to the dress shown in part 1. That is design of shell-shell. Also the same flower is sewed to the hat also.
I used same wool as in baby dress and 3.5 mm crochet hook.
Size: Circumference 18", height 6".
Pattern: R1: In a magic loop make ch3, dc 11, close by sl st in third ch. (12 sts). Fig 1.
Here after always our first dc will be of ch3 and closing will be by sl st in third ch.
R2: On each dc make dc 1 in stitch and FPdc 1 on that dc. (24 sts). See FPdc in fig 3, 4.
Fig 2
Fig 3
Fig 4
Fig 5
Fig 6
R3: On each FPdc make FPdc 1 and on each dc make dc 2, cl (36 sts). Fig 5
R4: On each FPdc make FPdc 1, on two dcs in between 2 FPdc make 3 dc (dc on each dc st and dc 1 in between), cl, (48 sts)
R5: (FPdc on FPdc and dc1, dc2, dc 1) repeat, cl, (60 sts). Fig 6.
Measure the diameter of the piece, if it is 6" then it's OK
Fig 7
Fig 8
otherwise make one more round.
R6: (FPdc on FPdc, dc 1 on 2 sts, dc 1 in between, dc 1 on two sts) rep, cl, (72 sts) Fig 7.
R7: Sl st till we reach third dc out of middle 5 dcs. [In third st make shell 1 (means dc3, ch1, dc3, note that first dc means ch3), FPdc on FPdc] repeat till end, cl. Fig 9.
Then repeat this 7th round till the height is 6". Fig 10.
Fig 9
Fig 10
Now we make BRIM.
R1: [FPdc 1 on FPdc, ch3, sc 1 in ch1-gap of shell, ch3] repeat till end, cl.
R2: [ (After shell make first front post dc as front post sc, ch2) FPdc 1 on FPdc, hdc 3 in ch3-sp, hdc 3 in next ch3-sp] rep, cl
R3: [FPdc 1 on FPdc, in both hdc 3 place make 4 hdc, means one extra hdc in a initial gap] rep till end, cl
Fig 11
Fig 12
Means in row 3, two hdc increased in every shell, thus 24 sts increased.
In R4: FPdc on FPdc and 5 hdcs in place of both 4 hdc gaps.
Thus go on increasing till the length of brim is 1.5".
See fig 13.
Fig 13
Here I have to make 5 increasing rounds, that is, till there are hdc7 in both gaps
If you want broad brim or if you are making sunhat for elders them make brim 2" or 2.5" as per your choice.
Also for elders instead of 6" diameter as in fig 7, make it 7". For kids 8-10 years make 6.5" to 6.7". Border: Join white yarn and make hdc 1 in each st without making FPdc and without increasing sts.
Then make flower as that of baby dress and sew it as in fig 1.
The most beautiful Sun Hat is ready.
The following video may help you to make this, it has English subtitles.



 R4: dc2 in each of 11 gaps, (means 10 windows worked) puff
 1 in the stitch, (means make long 2 sts as if to work dc 4 times, so there are 9 sts on hook, YO and pass through all 9 sts - puff formed). Thus it is 11 windows design.Fig 2.


