Bird House Wall Hanging
Hi,
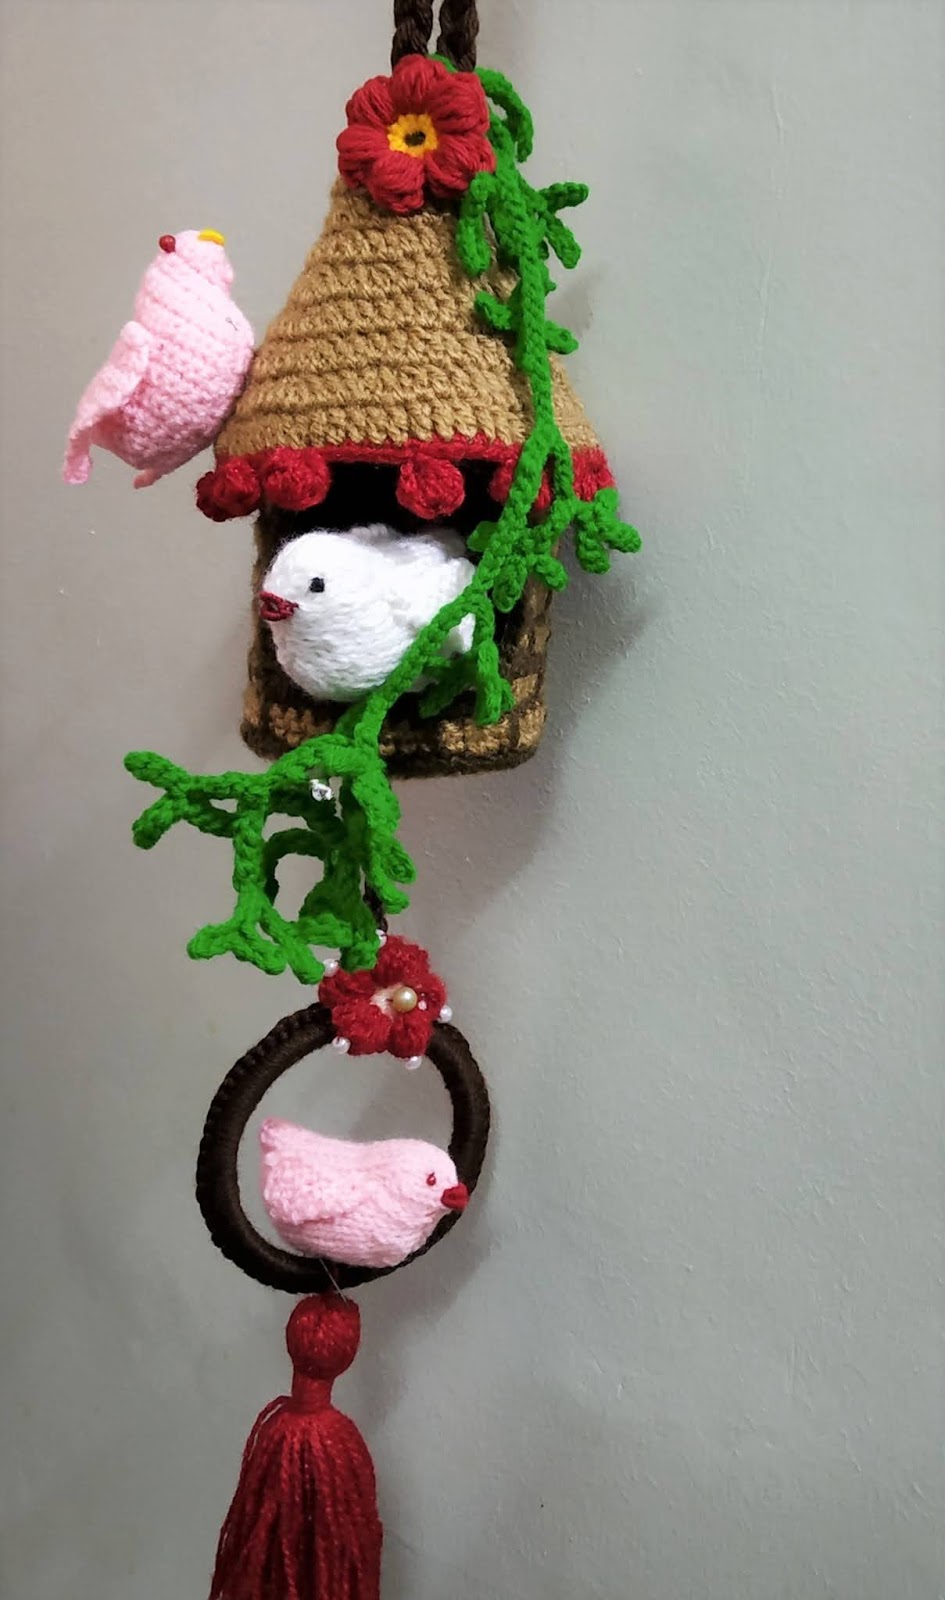
This is very new show piece I made recently, "A beautiful Bird House Wall Hanging".
You may wonder to hear that inspiration behind this design is my grand-daughter. While video chat with her she showed me the bird house of paper, she made. See fig 3, and it's WOW!!!! At once the idea click in my mind that let us make such crochet show piece. So this is the result.
It is 2 ft long and looks very pretty.
These crochet birds I have already made and I posted it here,
https://alkaandart.blogspot.com/search?q=crochet+bird
Then for these birds I have also made a tree with round constructionaround it's base.
https://alkaandart.blogspot.com/search?q=birds+on+tree
But now being a rainy season, I think that there should be one house for these birds same as my grand daughter made.
PATTERN: All yarns are Vardhamaan, 4 ply. Colours used Wooden colour, brown, red, green. Needle 3.5 mm
I took an old invitation card and cut it of 10"x5" size, fig 3. With dark brown yarn, make chains having length 10". I have to make 41+1 chs.
R1: sc 1 in each st starting
from second ch from hook.
R2: with wooden colour ch1 turn, sc 1 in each st
R3: same as R2.
R4: with dark brown, ch1 turn, sc 1, (sc 1 in the st corresponding to next st but from the lowest brown row, sc 1 in 3 next sts) rep.
After this work only 15 sts.
R5: R6: same as row 2 and 3.
R7: sc 1 in 3 sts, (sc 1 in the st corresponding to next st but from the lowest brown row, (this st should be the middle of previous three brown scs) sc 1 in 3 next sts) rep.
Repeat rows 2 to 7 only for these 15 sts, till the height becomes 5". As in fig 4.
Now skip the 11 sts in 4th row and join yarn in next st. There are 15 sts to end. Work these 15 sts again in the same manner as right part. Fig 5.
With dark colour make dc 1 in each of the 15 sts then make 11 chs and again sc 1 on each st of other part.
Then with wooden colour make sc 1 in each of the 41 sts. See fig 6.
Make R3 and 4 in all 41 sts
Cut the card board for making door, stepple it in round. See fig 7.
Wrap the piece we just made around it properly (considering the door gap) and sew it by tapestry needle.
Then make border on all 4 sides of door making round shape at upper corners as shown in fig 8.
Border: ch 2, hdc 1 in each st, at lower corner skip corner st at both ends. At the time of upper corners skip 2 sts on both sides of edge st and make 4 dcs in corner st.Now it will look as in fig 9.
Then make base by simpleround as in fig 10. With fabric fevicol stik it to a cardboard round of same size.
Now for the roof make a cone with 4" height and covering the house part properly, stepple it.
Now we make a roof cover.
Make chs of length sufficien to cover the lowest part of cone. I made 59 chs and join them by sl st to form a ring as in fig 12.
Always first dc means ch3. R1: Make more ch 3 and then dc 1 in each st from forth st, cl. (60 sts)
R2: (dc1in 4 sts, 2dctog next) rep, cl (50 sts)
R3: (dc1in 3 sts, 2dctog next) rep, cl (40 sts). Fig 13.
R4: dc 1 in each st, cl (40 sts)
R5: (dc1in 2 sts, 2dctog next) rep, cl (30 sts)
R6: (dc1in 1 st, 2dctog next) rep, cl (20 sts)
R7: dc 1 in each st (20 sts)
R8: (2dctog) rep, cl (10 sts) as in fig 14.
R9: 10 dctog, BO.
Then make a border of bubble st with red yarn, as I have made it to the baby sweater with 3D leaves yoke, link,
https://alkaandart.blogspot.com/search?q=3D+leaves+yoke
Now take a plastic ring as in fig 16, wrap it by sc with brown colour as in fig 17.
Now make chains with 3 or 4 threads at a time to tie this wall hanging. Keep it's length as much as you want. See fig 18.
Then make two puff fllowers with red colour as refereds in my post,
https://alkaandart.blogspot.com/search?q=flower+fever
Also the green tree part, I have already explained in my post,
https://alkaandart.blogspot.com/search?q=plate+decor+puff+flower
Lastly make a long, big tessal with red yarn.
Finally assemble it as to make like fig 1.
Wow!!! a beautiful wall hanging is here!!!!
The following video may help you.
 |
| Fig 1 |
 |
| Fig 2 |
This is very new show piece I made recently, "A beautiful Bird House Wall Hanging".
You may wonder to hear that inspiration behind this design is my grand-daughter. While video chat with her she showed me the bird house of paper, she made. See fig 3, and it's WOW!!!! At once the idea click in my mind that let us make such crochet show piece. So this is the result.
It is 2 ft long and looks very pretty.
These crochet birds I have already made and I posted it here,
 |
| Fig 3 |
Then for these birds I have also made a tree with round constructionaround it's base.
https://alkaandart.blogspot.com/search?q=birds+on+tree
But now being a rainy season, I think that there should be one house for these birds same as my grand daughter made.
PATTERN: All yarns are Vardhamaan, 4 ply. Colours used Wooden colour, brown, red, green. Needle 3.5 mm
I took an old invitation card and cut it of 10"x5" size, fig 3. With dark brown yarn, make chains having length 10". I have to make 41+1 chs.
 |
| Fig 4 |
 |
| Fig 5 |
 |
| Fig 6 |
 |
| Fig 7 |
 |
| Fig 8 |
 |
| Fig 9 |
R2: with wooden colour ch1 turn, sc 1 in each st
R3: same as R2.
R4: with dark brown, ch1 turn, sc 1, (sc 1 in the st corresponding to next st but from the lowest brown row, sc 1 in 3 next sts) rep.
After this work only 15 sts.
R5: R6: same as row 2 and 3.
R7: sc 1 in 3 sts, (sc 1 in the st corresponding to next st but from the lowest brown row, (this st should be the middle of previous three brown scs) sc 1 in 3 next sts) rep.
Repeat rows 2 to 7 only for these 15 sts, till the height becomes 5". As in fig 4.
Now skip the 11 sts in 4th row and join yarn in next st. There are 15 sts to end. Work these 15 sts again in the same manner as right part. Fig 5.
With dark colour make dc 1 in each of the 15 sts then make 11 chs and again sc 1 on each st of other part.
Then with wooden colour make sc 1 in each of the 41 sts. See fig 6.
Make R3 and 4 in all 41 sts
 |
| Fig 10 |
 |
| Fig 11 |
Wrap the piece we just made around it properly (considering the door gap) and sew it by tapestry needle.
Then make border on all 4 sides of door making round shape at upper corners as shown in fig 8.
Border: ch 2, hdc 1 in each st, at lower corner skip corner st at both ends. At the time of upper corners skip 2 sts on both sides of edge st and make 4 dcs in corner st.Now it will look as in fig 9.
 |
| Fig 12 |
 |
| Fig 13 |
Now for the roof make a cone with 4" height and covering the house part properly, stepple it.
Now we make a roof cover.
Make chs of length sufficien to cover the lowest part of cone. I made 59 chs and join them by sl st to form a ring as in fig 12.
 |
| Fig 14 |
 |
| Fig 15 |
R2: (dc1in 4 sts, 2dctog next) rep, cl (50 sts)
R3: (dc1in 3 sts, 2dctog next) rep, cl (40 sts). Fig 13.
R4: dc 1 in each st, cl (40 sts)
R5: (dc1in 2 sts, 2dctog next) rep, cl (30 sts)
R6: (dc1in 1 st, 2dctog next) rep, cl (20 sts)
 |
| Fig 16 |
 |
| Fig 17 |
R8: (2dctog) rep, cl (10 sts) as in fig 14.
R9: 10 dctog, BO.
Then make a border of bubble st with red yarn, as I have made it to the baby sweater with 3D leaves yoke, link,
https://alkaandart.blogspot.com/search?q=3D+leaves+yoke
Now take a plastic ring as in fig 16, wrap it by sc with brown colour as in fig 17.
 |
| Fig 19 |
 |
| Fig 19 |
Now make chains with 3 or 4 threads at a time to tie this wall hanging. Keep it's length as much as you want. See fig 18.
Then make two puff fllowers with red colour as refereds in my post,
https://alkaandart.blogspot.com/search?q=flower+fever
Also the green tree part, I have already explained in my post,
https://alkaandart.blogspot.com/search?q=plate+decor+puff+flower
Lastly make a long, big tessal with red yarn.
Finally assemble it as to make like fig 1.
Wow!!! a beautiful wall hanging is here!!!!
The following video may help you.


