Wednesday, April 8, 2020

Finger Puppet: Elephant (Specially for Kids in "Stay at Home" Period)
Fig 1
In this finger puppet series, here I made ELY, Elephant. See fig 1. Ofcourse Ely is very famous among kids.
Because I don't have gray color yarn, I use blue and white 4 ply yarns, 2.5 mm hook, beads, fiber, tapestry needle, embroidery needle and scissor.
Pattern: 
R1: In a magic loop make ch 1, sc 6, close by sl st in first sc. (6 sts)
R2: ch1, sc 2 in each st, cl, (12 sts). Fig 2.
R3: ch1, (sc 2, sc1 in 3 sts) repeat till end, cl, (15 sts)
R4: Make ear: (ch 1, sc 1 in next 2 sts, turn, ch 1, sc 2 in each st, (4sts),
ch 1 turn, sc 1 in the first and last sts, hdc 1 in middle two sts), bind off. Fig 3.
Fig 2

Fig 3


Join at the st next to ear, see arrow in fig 3, sc 1 in 5 sts, make another ear, BO. Fig 4.
There are 5 sts in between these two ears and 1 st near both ears, thus work next 6 rows on these 7 sts where R5 is,
R5: sc 1 in each st, (7 sts) ch 1 turn,
R6 to R10 same. Fig 5.
R11: Join the yarn with front side st passing behind the ear, work sc 1 in each st on front 
Fig 4

Fig 5
side, again join with the back side st, passing behind the ear and thus make a round of 14 sts. See fig 6.
R12: ch 1, sc 1 in each st, cl (14 sts)
R13 to R19 same as R12.
Trunk: Mke crochet i-cord 1.5". Fig 7.
Teeth: Join white yarn on one side of trunk and make ch 4, sl st 3 from second ch.
Make one more tooth on other side of trunk.
Fig 6

Fig 7

Sew this piece of trunk and teeth on the face in the middle.
Sew the open sides behind the ears.
Fill fiber in the face only.
Ely is ready to fit in finger.

Fig 9
ETC: Enjoy the Creativity.
The following video may help you.


Monday, April 6, 2020

Finger Puppet: Dogy (Specially for Kids in "Stay at Home" Period)
Fig 1
Hello friends,
All over the world the fear of Corona is increasing. Most of the countries declared "Lock Down", schools are closed, no one can go out, the atmosphere is really very depressing. Children are really getting boar in home, so I made these dogies for those children.
Material: 4 ply yarn (any left over)crochet hook 2.5 mm, 2 beads for eyes, embroidery thread, tapestry needle, needle, scissor and little fiber.
The lion which I posted in previous post is made in two pieces and then they are sewed together but this dogy is made in one piece.

Fig 2

Fig 3
Pattern: In a magic loop make ch 1, sc 8, cl by sl st in first sc (8 sts)
R2: ch 1, sc 2 in first 3 sts, make ear (ch5, from second ch make sl st 1, sc 1, hdc 1, dc 1), sc 2 in each of the next 3 sts, make another ear, sc 2 in each of the remaining sts (16 sts), cl. See fig 2 and 3.
R3: ch 1, sc 1 in each st, cl, (16 sts)
R4 and R5 same as R3. Fig 4.
R6: ch 1,(2sctog) till end, cl, (8
Fig 4

Fig 5
sts).
R7: ch 1, sc 2 in each of next 3 sts, sc 1 in next 2 sts, sc 2 in each of the last 3 sts, cl (14 sts).
R8: ch 1, sc 1 in each st, cl (14 sts)
R9, R10 and R11 same as R8. See fig 5.
R12: In this round we make tail and feet of dogy.
ch 1, sc 1 in next 3 sts, make tail, (ch 3, sl st in second and first), fig 6, sc 1 in next 5 sts, make
Fig 6

Fig 7

foot, (ch2, sc 1 and hdc 1 in second chain), sc 1 in next 3 sts, make other foot, sc 1 in last 3 sts, cl. (14 sts) See fig 7.
R13: ch1, sc 1 in each st, cl (14 sts).
Fill fiber only in face part.

Sew two beads in place of eyes and tie one belt of some contrast color.
Fig 8


The following video may help you to make this,
ETC: Enjoy the Creativity.

Thursday, April 2, 2020

Finger Puppet: Lion (Specially for Kids in "Stay at Home" Period)
Now a days the whole world is worried by Corona virus and various steps are followed for preventing. "Stay at Home" is one of that. Our respectable prime minister ordered Lock Down which is very essential for us. So we are at home since 10-15 days. Elders pass their time any way but children get boared in this period. They missed their friends, school etc
So this week I made these 5 finger puppet for them. So that,
1. At least kids can pass their 2-3 days in playing with them.
2. Parents can tell stories with the help of these puppets which would be more lively.
3. Parents can ask kids to compose a story with the help of these characters.
and parents can use them in many more different ways. They can gift these puppets to some other kids.
First I make Lion, the king of forest..... as in fig 2.
Fig 2

Part 3
 Material: 4ply yarn, 2.5 mm hook, 2 small bead for eyes, brown embroidery yarn and small amount of fiber.
Make a ring of ch 14. Fig 3.
R1: sc 1 in each st from second till end, (13 sts)
R2: ch 1 turn, sc 1 in each st (13 sts)
Repeat this row 6 more times. Fig 4
Then sl st in next 3 sts so that the joint line should be on
Fig 4
Fig 5
back.ch 1 turn,
Last row: sc 1 in first st, then hdc 1, dc 3, hdc 1, sc1, bind off.
Fig 5.
Now face of lion:
R1: In a magic loop. ch 1, sc 6, close by sl st in first sc.(6sts),  ch 1,
R2: sc 2 in first st, make first ear here, [ch 3, dc 1 in base st (near first ch out of these 3 chs), ch 3 join by sl st in base st] ear made, sc 2 in next st, another ear, sc 2 in each of the remaining sts, cl.
Fig 6

Fig 7
(12 sts). See fig 6,7 and 8.
R3: ch 1, sc 1 in each st, when you reach ear, hold it by thumb in front and make ch 1 behind it (for both ears). (14 sts)
R4, R5 same as,
ch 1, sc 1 in each st, close, (14 sts). Fig 9.
R6: (2sctog) repeat till end, cl.(7 sts), Fill fiber, fig 10, 11.
R7: (2sctog) repeat, sc 1 in last st. (4 sts).
Fig 8
Fig 9
Fig 10

Fig 11
Fig 12
Fig 13


Sewed beads for eyes and then embroidery of mouth. Then make moustache by double thread in tapestry needle. Fig 12.
Then sewed upper part with the finger base as shown in fig 13.
The following video may help you to make this.


ETC: Enjoy the Creativity.


Tuesday, March 17, 2020

One More Plate Decor
Fig 1
Hi,
This time I made one more plate decor. This looks beautiful as in fig 1.
I use Vardhamaan 4 ply wool and 3.5 mm crochet hook.
Pattern:
Considering the circumference of plate, see fig 2, make chains so that they should be multiple of 3 plus 1. So we make 177 chains.
R1: Make ch 8 and dc 1 in ninth ch from hook, 9ch3, skip 2 sts, dc 1 in next) repeat till end ch 3 turn, fig 3
R2: ch 3, dc 3 in first window (gap), (ch 3, skip 1 window, dc4 in next window) repeat till end, ch 3 turn, (last window has 4 dcs)

Fig 2

Fig 3
R3: ch 3 more, dc 4 in next empty window, (ch3, skip one window of previous 4dcs and dc 4 in next window) repeat till end. Ch 3 turn, see fig 4.

R4: ch3, dc 3 in first window, ch 3, dc 4 in next window, ch 5, [dcs 4 in next window, (ch
Fig 4
Fig 5
3, dc 4 in open gap) 2 times, ch 5] repeat this till end. Fig 5

R5: ch 3, [(tr 1, ch 1) 9 times in ch5-gap, dc 4 in nrext gap, ch 3, dc 4 in next gap] repeat till end, fig 6.

R6: ch3, dc 3 in first gap, [ch
Fig 6
Fig 7
2, (tr 1, ch 2 in between two trebles of previous row) 8 times, ch 2, dc 4 in next gap] repeat till end, see fig 7

R7: ch 3 turn, [(sc 2 in first gap between two trebles of previous row, ch3-picot) 8 times, sc 2 in gap, ch3-picot, sc 2 on 2 dcs of previous row, ch 3 picot on last dc] repeat till end.
We finally get a beautiful plate decor as in fig 1.
The following video may help you to make this.

ETC: Enjoy the Creativity.

Saturday, March 7, 2020

Tea-coaster / Cover of Container: Rukhawat Item for Indian Wedding
Fig 1
Hello friends,
This weak I made these wedding items for wedding of my friends's daughter. These are cover of containers. In India such containers filled by jam jellies etc, are generally presented to daughter in her wedding as they are useful for their new life. This is called rukhawat. For details of rekhawat, you may read my post,
https://alkaandart.blogspot.com/search?q=nostalgic+experience

Later on the daughter may use them as tea coaster by laminating them. Fig 2.
Generally tea coasters are seen to be hexagonal that's why I made them penatagonal, fig 3, because we want some thing new, different. You may made more pieces and join them to form big doily as in fig 4.
Fig 2

Fig 3

Fig 4
Pattern: R1: In a magic loop make ch 3, dc 7, close by sl st in third ch. (8 sts)
R2: ch 5, (dc 1 in next st, ch 2) repeat till end, close. (we have 8 dcs, 8 ch two gaps).

R3: ch3, (dc 4 in ch 2-gap, dc 1 on previous dc) repeat till end, close. Fig 5.
Fig 5
Fig 6
Fig 7

R4: ch 3, dc 1 on next 2 sts, (ch2, skip 1 st, dc 1 on each of the 3 dcs of previous round) repeat till end, ch 2 , close. Fig 6.

R5: Slip st 3 and shift to first gap, ch3, dc 3 in gap, ch 4, sc 1 in next gap, ch 4, (dc 4 in next gap, ch 4, sc 1 in next gap, ch 4) repeat till end, close. Fig 7.

R6: ch 3, dc 2 in each of the next 3 dcs, ch 5, sc 1 on previous sc, ch 5, (dc 1 on first dc, dc 2 on each of the next 3 dcs of previous round, ch 5, sc 1, ch 5) repeat till end, close. Fig 8.

R7: ch 1, [sc1 on next st, hdc 1 on next, dc1 on next, (tr1, ch3-picot, tr1) all in next st, dc1, hdc 1, sc1, ch 6, sc 1 on previous sc, ch 6] repeat till end, close. Fig 9.


Fig 8

Fig 9
If you are making as cover container then make cord of 75 chs to tie it to the bottle lead as shown in fig 1.


The following video may help you to make this.


ETC: Enjoy the Creativity


Wednesday, March 4, 2020

Knitted Socks with Thumb
Fig 1
Hello friends,
This time I made knitted socks with thumb because I always prefer sock with thumb so that I can wear them on slippers also.
This pattern is very old and traditional pattern. My friend Rajani shown these to me and I made it for my auti. So first of all I have to take measurements as length of foot and as shown in fig 2.
Here length is 9" and the round measurement is 8.7".
So cast on (CO) number of sts whose length will be 8" or 8.2".
I have to CO 55 sts. Fig 3.
The wool I used is 4 ply and some what thin also, needles UK 10 number or 3.25 MM.
We have to work in Stockinette st except first and last 6 sts. They would be always worked in Garter st.

Fig 2
Fig 3
 R1: (WS): K6, P43, K6
R2: (RS): K all.
Repeat rows 1 and 2 till the length of the piece is length 9" - length of thumb 2"= 7".
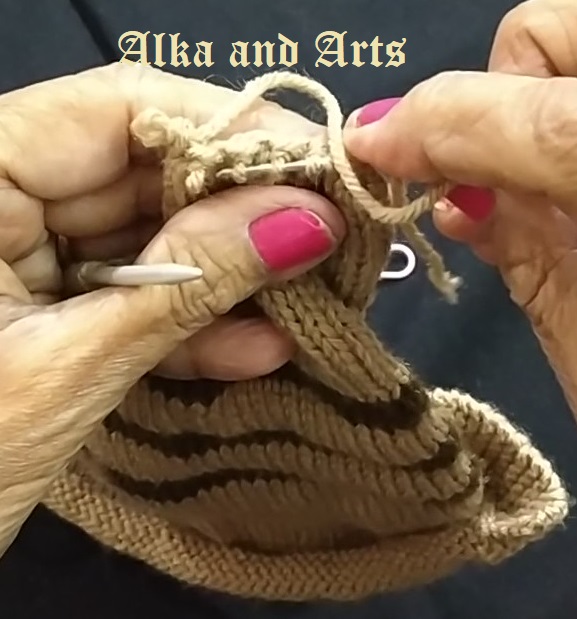
This part you may work out in a single color or you may make strips as I have shown here. Totally I have to make 34 ridges (68 rows) For dark color strips, after 17 ridges 2 ridges (or 4 rows) of dark, 6 ridges of original colour, again 4 rows of dark, 6 rows of original colour, last dark strip and then knit till total rows are 68. Fig 4.

After this we have to divide these stitches in two parts. One (smaller) for thumb and other part for remaining fingers.
Fig 4
Fig 5

Fig 6
Hence after 35 sts we place a marker. Fig 5. Work only these35 sts in Stockinette st for 12 rows.
Next row (RS): K3tog 11 times, then K2tog. (12 sts)
Pass these 12 sts through tapestry needle and bind off. 

Fig 7


Then join the yarn to other side for working 20 sts.

Fig 8
Work 12 rows in Stockinette st then next row:
K3tog 6 times, K2tog (7 sts).
Pass tapestry needle through these 7 sts and bind off. Fig 6.

Then sew the thumb portion and other part also for four fingers.
Fig 7. Also sew from right side till two dark strips see fig 8

Fig 9
Fig 10

Then sew the back part as in fig 9. While making other sock be careful that how to divide in two parts so that two thumbs should be close to each other. As in fig 10. We check and decide that which side is proper for thumb and then place marker. Repeat the above process. Sock on right leg as in fig 8. Two socks are ready as in fig 1.


The following video may help you to make socks.
ETC: Enjoy the Creativity.

Simple and Beautiful 3D Crochet Lotus, Home Decor, Diwali Special Showpiece

Hi everyone, This Lotus is very beautiful and simple to make. I also made it's Hanging Showpiece. For Diwali decoration it is very beaut...