Wednesday, November 6, 2019

Knitted Baby Frock 22

Knitted Beautiful Baby Frock
Fig 1
Hello friends,
After so many days I knitted the frock and comes out very beautiful. The small embroidery on it adds to it's beauty. It is top down and the yoke itself is very unique.
The pattern is here,
I used 4 ply yarn and UK no 10 or 3.25 mm knitting needle.
CO 79 stitches (st),
R1 to R6: All knit, increase 1 st on back side in row 6. In R 3 make one button hole by YOK2tog and then with equal distance.
Note: For the simple beautiful edge, while working each row, slip first st and purl last st through out the frock.
R7: (WS) Increase Row:(This increase row is worked twice after 16 rows again but each time on wrong side.) sl 1, K6, [Yarn Over (YO) Knit (K) 2] repeat till 7 sts remain, K6, P1. (114 sts)
R8: Sl 1, K6, ( K1, P2) repeat till 8 sts remain, K1, K6, P1. (Bold K1 is from yoke and not from button band hence written separatly, moreover due to this K1 the design on both sides of button band and buttonhole band comes to be symmetrical).
R9: Sl 1, K6, ( P1, K2) repeat till 8 sts remain, P1, K6, P1.
R10 to R15 repeat rows R8 and R9, then
R16: as R8. See fig 2.
Fig 2

Fig 3

Repeat these rows R1 to R16 for rows R17 to R32.
In between R23 comes to be increase row as R7 and here 51 sts are increased, hence now sts will be 114+51= 165, But this is odd number and we
 have to repeat R1 to R16 again  so while working first six knit rows increase 1 st in last row. Now sts are 166
R33 to R48: Repeat R1 to R16, R39 will be increase row (as R7) and then we will have 166+77=243 sts.
R49 to 54: All K. Fig 3
Now divide all stitches in 5 parts as follows,
243= 38 front part+ 50 sleeve+ 67 back part+ 50 sleeve+ 38 another front.
Work 38 + 67+38=143stitches together, also cast on 4 new sts under both arms, hence totaly we work on 143+8=151 sts. Also place 50 sts of both sleeves seperately on scrap yarn or on stitch holder.
R55: Sl 1, K6, (YO, K1) repeat till last 7 sts then YO K6, P1. (280 sts). Fig 4.
After yoke it's height is 6.5".

Fig 4
Fig 5
Then work in simple stockinette stitch till the height from the beginning is 14.5". Then work 10 rows of Garter stitch as a border.
Total length = 15.5"
See fig 5
Then place 50 sts of sleeve on the needle,cast on 4 more sts for under arm. Place marker in between these 4 increased sts. Work these 54 sts in stockinette st till the sleeve length is 14" Meanwhile decrease 1 st on both side of marker after every 1" till there are 38 sts for wrist. Then work 10 rows in Garter st. Similarly finish other sleeve.
Fig 6

Now you may have any embroidery on this part, cartoon or any thing. I worked simple flowers in three colours with 2 green small leaves and it looks marvellous. See fig 6. Then pass the satin ribbon through the holes in the row 55 and make a bow so that the frock can be adjusted in fitting for waist.
Also sew beautiful buttons at the place of button holes.
The very beautiful frock with embroidery is ready which I made for my grand daughter.
The following video may help you.

ETC: Enjoy the Creativity.


Tuesday, October 29, 2019

Crochet Baby Jacket 21

Crochet Jacket With 3D Leaves Design
Fig 1
Hallo, 
3-D crochet is very fasinating, I made one small purse with 3D crochet rose but it is very different method. 
Link of that rose bag - post,
What traditionally crocheters call 3D crochet is quite different, actually it is all the game of Front Post double crochet (FPdc) and Back Post double crochet (BPdc). Then I saw the bag with 3D leaves design and I like it very much, it's link,
It was amazing. For my viewers on Youtube I made simple version of that, first straight leaves and tried it on a jacket and cap. So that both methods will be clear to and fro and in round. Jacket I worked to and fro and cap in round.
My first try is here fig 1.
Since I am not going to make leaves on back side because it may be uncomfortable for the baby. So back side consists of double crochet only. Now if I would have made this design with all the three parts working together then level would be disturbed as FPdc/BPdc and normal dc have not same height, that is why I decided to make three separate parts.
This design needs multiple og 8+ 1 chains. So I started front part with 33 chains. With 4 ply yarn of Vardhaman this becomes 12.5" wide and with 13" height which will fit to 1-2 years baby. If you want to make larger size, you may have a front with 33+8 that is 41 chs and in that case there will be 5 leaves or you may start with 41+8 that is 49 chs.
Fig 2

Fig 3
Fig 4
Front part:
Chain (ch) 33+3=36
Row 1: double crochet (dc) 1 in each ch starting from 4th ch. (33 stitches (st))
R2: ch 2, (1 FPdc, 1 BPdc) repeat till last 2 ch, 1 FPdc, hdc 1 in last st, ch 2 turn,
R3: (1 BPdc, 1 FPdc) repeat till last st, hdc 1 in last, ch 2 turn
R4: Same as R2
R5: Same as R3, last ch 3 turn,
R6: dc 1 in each st, ch 2 turn, see fig 2.
R7: Right side:  [BPdc 1 in each of the next 3 dcs, (FPdc 1, ch 1, FPdc 1) all on next dc, BPdc 1 in each of the next 3 dcs, FPdc 1 on next dc] repeat till 8 sts remain, BPdc 1 in each of the next 3 dcs, (FPdc 1, ch 1, FPdc 1) all on next dc, BPdc 1 in each of the next 3 dcs, hdc 1 in the last st. Ch 2 turn,
R8: Wrong side:  [*FPdc 1 in each of the next 3 dcs, BPdc 1, then in ch-1 gap make (dc 1,ch 1, dc 1), BPdc 1, FPdc 1 in each of the next 3 dcs*, BPdc 1 on next dc] repeat. Lastly work from * to * and hdc 1 in last st. Ch 2 turn, see fig 3.
R9: [* BPdc 1 in each of the next 3 dcs, FPdc 1 in next 2 dcs, then in ch-1 gap make (dc 1,ch 1, dc 1), FPdc 1 in next 2 dcs, BPdc 1 in each of the next 3 dcs*, FPdc 1 on next dc] repeat. Lastly work from * to * and hdc 1 in last st. Ch 2 turn, fig 4. 
Fig 5

Fig 6
R10: [* FPdc 1 in each of the next 3 dcs, BPdc 1 in next 3 dcs, then in ch-1 gap make (dc 1,ch 1, dc 1), BPdc 1 in next 3 dcs, FPdc 1 in each of the next 3 dcs*, BPdc 1 on next dc] repeat. Lastly work from * to * and hdc 1 in last st. Ch 2 turn,
R11: [* BPdc 1 in each of the next 3 dcs, 2FPdctog,  FPdc 1 in next  4 dcs (skipping ch 1 gap), 2FPdctog,  BPdc 1 in next 3 dcs*, FPdc 1 on next dc] repeat. Lastly work from * to * and hdc 1 in last st. Ch 2 turn,
R12: [* FPdc 1 in each of the next 3 dcs, 2BPdctog,  BPdc 1 in next  2 dcs, 2BPdctog,  FPdc 1 in next 3 dcs*, BPdc 1 on next dc] repeat. Lastly work from * to * and hdc 1 in last st. Ch 2 turn. See how it looked on wrong side Fig 5 .
R13: [* BPdc 1 in each of the next 3 dcs, 2FPdctog,  2FPdctog,  BPdc 1 in next 3 dcs*, FPdc 1 on next dc] repeat. Lastly work from * to * and hdc 1 in last st. Ch 2 turn,
R14: [* FPdc 1 in each of the next 3 dcs, 2BPdctog,  FPdc 1 in next 3 dcs*, BPdc 1 on next dc] repeat. Lastly work from * to * and hdc 1 in last st. Ch 2 turn, see fig 6 leaves complete.
R15: [BPdc 1 in next 7 dcs, FPdc 1 in next] repeat lastly BPdc 1 in 7 sts and hdc in last st. ch 3 turn,
Fig 7

Fig 8

Fig 9

Fig 10
R16: [BPdc 1 in next 3 dcs, skip one st of edge of leaf, BPdc 1 in 3 dcs,  FPdc 1 in next] repeat lastly BPdc 1 in 7 sts and hdc in last st. ch 3 turn, (29 sts) fig 7.


R17: dc 1 on each st. (29sts)
Repeat row 16 till the height from the first row becomes 7”.
Fig 8. After that decrease for arm hole,
Next R1: slip st (Sl St) 1 in next 4 sts, ch 3, dc 1 in each st from next, 2dctog in last 2 sts, ch 2 turn,
Next R2: 2dctog, dc 1 in each st, in last 2 sts 2dctog, ch 3 turn,
Next R3: dc 1 in each st from next st, 2dctog at last, ch 2
Next R4: 2dctog, dc 1 in each st till end,
Repeat above rows 3 and 4 till the height is 12.5” from the beginning and sts for shoulder are 15. Fig 9.
Make another front part. Remembering the armhole cut of 3 sts and 1 exactly on opposite side of this part. See fig 10.
Fig 11

Fig 12

Fig 13

Fig 14
Back Part:
Ch 60, make dc 1 on each ch starting from 4th ch.(57 sts)
Work R2 to R6 same as that of front part. Border made.
Repeat row 6 of all dcs till the height of the back is 7”,fig 11
In the next two rows, decrease  3 sts on both sides for arm hole. (after these two rows 51 sts)
In the next two rows decrease 1 st again for armhole shaping (sts after these two rows 49)
Work dc 1 in each st till the height is 12.5” from the starting.
Sew 15 sts with the 15 sts of the shoulders of two  front parts. There are 19 sts remaining for the back neck. Fig 12.
Also sew the two sides.
Then with different colour or with the same, make simple border of fan st, (6 dcs in a st, join by sc).
Also make a Leaf design pom-pom as follows
Leaf: Ch 4, dc 3 in first ch, ch 3 turn
R2: dc 1 in same st, dc 1 in each of the next 2 sts, dc 2 in last st, ch 3 turn (6sts). Fig 13.
R3: (2dctog) three times, (3 sts).
R4: Incomplete dc in each st, YO and pass through all sts. Fig 14.

Make attached chains of 6-8 inches and bind it with the button band, where the decrease on neck started. Similarly make one more and sew it to other side.
After completing, hide yarn ends, then it looked beautiful as in fig 1.
The following video may help you for R1 to R14, next part of the video will be soon published and it's link will be shared here.

ETC: Enjoy the Creativity.

Tuesday, October 22, 2019

Conch / Shell / Shankh in Prayer (Puja) Place
Fig 1
It is supposed that Conch is brother of Laxmi, (wife of Shri Vishnu) who represents Opulence and opulence will be in your family if Conch is there in your puja ghar. Secondly playing conch is a good exercise to lungs.

Also along with Conch there is Ghanti places in every prayer place (puja ghar). The purpose is that when the bell is rung  the vibrations created makes the small creatures to go away from that place and make the atmosphere more pure. It is also said that you call God through that bell sound. See fig 2.


Fig 2
Fig 3

One of my Youtube subscriber asked me that Can we make crochet Ghanti? So I made it and then I tried for shankh or Conch. It was some what difficult than bell but finally I can make the perfect shape. See fig 1. Then I also make Adani, stand for Conch. It is simple tortoise shape. See fig 3.  Only the middle portion is not convex type but it is concave type shape.
Pattern:
Start with ch 5.
Row 1: sc 1 from second st. (4sts), ch 1 turn,
R2: As in R1
R3: sc 1 from second st. (4sts), ch 3 turn,
R4: dc 2 in first and last st, dc 1 in middle sts (6 sts), ch 3 turn
R5: dc 2 in each st, (12 sts), ch 3 turn
R6: As R5, (24 sts),
R7: dc 2 in each of 6 sts, dc 1 in all middle till last 6 sts, dc 2 in each of the last 6 sts. (36 sts), ch 2 turn,
R8: hdc 2 in the first st, (hdc 1 in next 2sts, hdc 2 in the next st) repeat (48 sts)
Join with 8th stitch at other end. Ch 2,
R9: (2hdctog) repeat till end, hdc in last st (21 sts), ch 2 turn,
R10: Work on back loop. (hdc 1 in each of next two sts, hdc 2 in next) repeat (28 sts) ch 2 turn,
R11: In normal stitch, hdc 1 in each st (28 sts) ch 2turn,
R12: Work on back loop. (2hdctog) repeat, (14 sts), ch 2 turn
R13: Work in normal st, hdc 1 in each st (14 sts) ch 2 turn,
R14: Work on back loop (2hdctog) repeat (7 sts), ch 1 turn
R15: sc 1 in each st.
Thread by tapestry needle and close.
Fill little bit fiber.
Stand For Conch: (Adani)
Ring of 18 chains.
R1: Ch 5-picot, (sc 1 in each of the next 3 sts, ch 3-picot) twice, sc 1 in next 3 sts, ch 3, slip st in 2nd and 3rd st from hook., (sc 1 in each of the next 3 sts, ch 3-picot) twice, joinby sl st.
R2: On the chain side work, ch 2 and hdc 1 in each st (18 sts) join by sl st, ch1,
R3: (sc 1 in next st, 2sctog) repeat (12 sts), close, ch 2
R4: (2hdctog) repeat, (6 sts). Cut yarn and pass tapestry needle through all sts and BO.
The following video may help you in making this conch and it's stand.

ETC: Enjoy the Creativity.

Monday, October 21, 2019

Baby Booties with Tapestry Crochet Design:
Hello friends,

This week I made this crochet baby booties with tapestry crochet. I agree that tapestry crochet on straight work is not as good as fair isle knitting. I tried tapestry crochet to and fro and then in round (circular crocheting) and found that in round it looks more perfect. See fig 2. Still in straight also it is not that bad, left in fig 2. So I decided to make baby booties for 1 to 1.5 year baby with tapestry crochet.

For this I select Red Heart yarn and 4.25 mm crochet hook. First measure the length and width of the foot. Here length is 4.5" and width is 5" including height as shown in fig 3, 4 and 5.
Now this yarn is also available in India and it's link is,
https://www.amazon.com/s?k=Red+Heart+super+saver+yarn

Fig 2
The pattern is very simple and given below,
Pattern: If length is 4.5" make chains whose length will be double of this that is 9".
I have to make 40 chs.
R1: sc1 on each st from second (39 sts), ch 1 turn.
R2: sc 1 in each st (39 sts), ch 1 turn.
R3 and R4 as R2.
R5: Join white yarn, sc 1 with red in each of 7 sts, (sc 1 in next st with white, sc 1 in each of next 3 sts with red) 6 times, sc 1 with white, sc 1 in remaining 7 sts. (39 sts) ch 1 turn.

Fig 3
Fig 4

Fig 5


R6: sc 1 with red in each of 6 sts, (sc 1 in next 3 st with white, sc 1 in next st with red) 6 times, sc 1 in each of the next 3 sts, sc 1 in remaining 6 sts. (39 sts) ch 1 turn
R7: As R5
R8, R9, R10: As R2
Measure the length, it should be half of the width 5", nearly it is 2.6", see fig 6.
R11: Slip st in each of the next 7 sts, ch 4, skip 1 st, dc 1 in next, (ch 1, skip 1 st, dc 1 in next) repeat till 7 sts remain, ch 1 turn,
R12: sc 1 on first st, sc 1 in ch1-gap, (sc 1 on last dc, sc 1 in gap) repeat till end, ch 1 turn
R13: sc 1 in each st. BO. See fig 7.


Fig 6
Fig 7
 Fold and sew neatly. See fig 8

Make a cord of chains with red color, pass it through the dc gaps formed.
Make one more shoe like this.
Make two white flowers and sew them on the top of the shoes.

Fig 8


Fig 9
Flower: Magic loop of ch 1 sc 5, sl st in first sc, close
Petal: ch 3, dc 3 in same sc, ch 3 join by sl st in the same loop, sl st in next sc, repeat for second petal.
Make magic loop with red yarn, ch 1 sc 6, join by sl st in first sc, close. Attach this at the centre of the white flower and sew the flower to the front part of the booties as in fig 9.
The following video may help you.

ETC: Enjoy the Creativity.

Saturday, October 19, 2019

Diwali Special: Diwali Lamp 3 (Panati 3)
Fig 1
Hi,
I made one more type of crochet Diwali Lamp. About Diwali lamp please see my post,
https://alkaandart.blogspot.com/search?q=Diwali+lamp+1
on 15th Oct 2019.

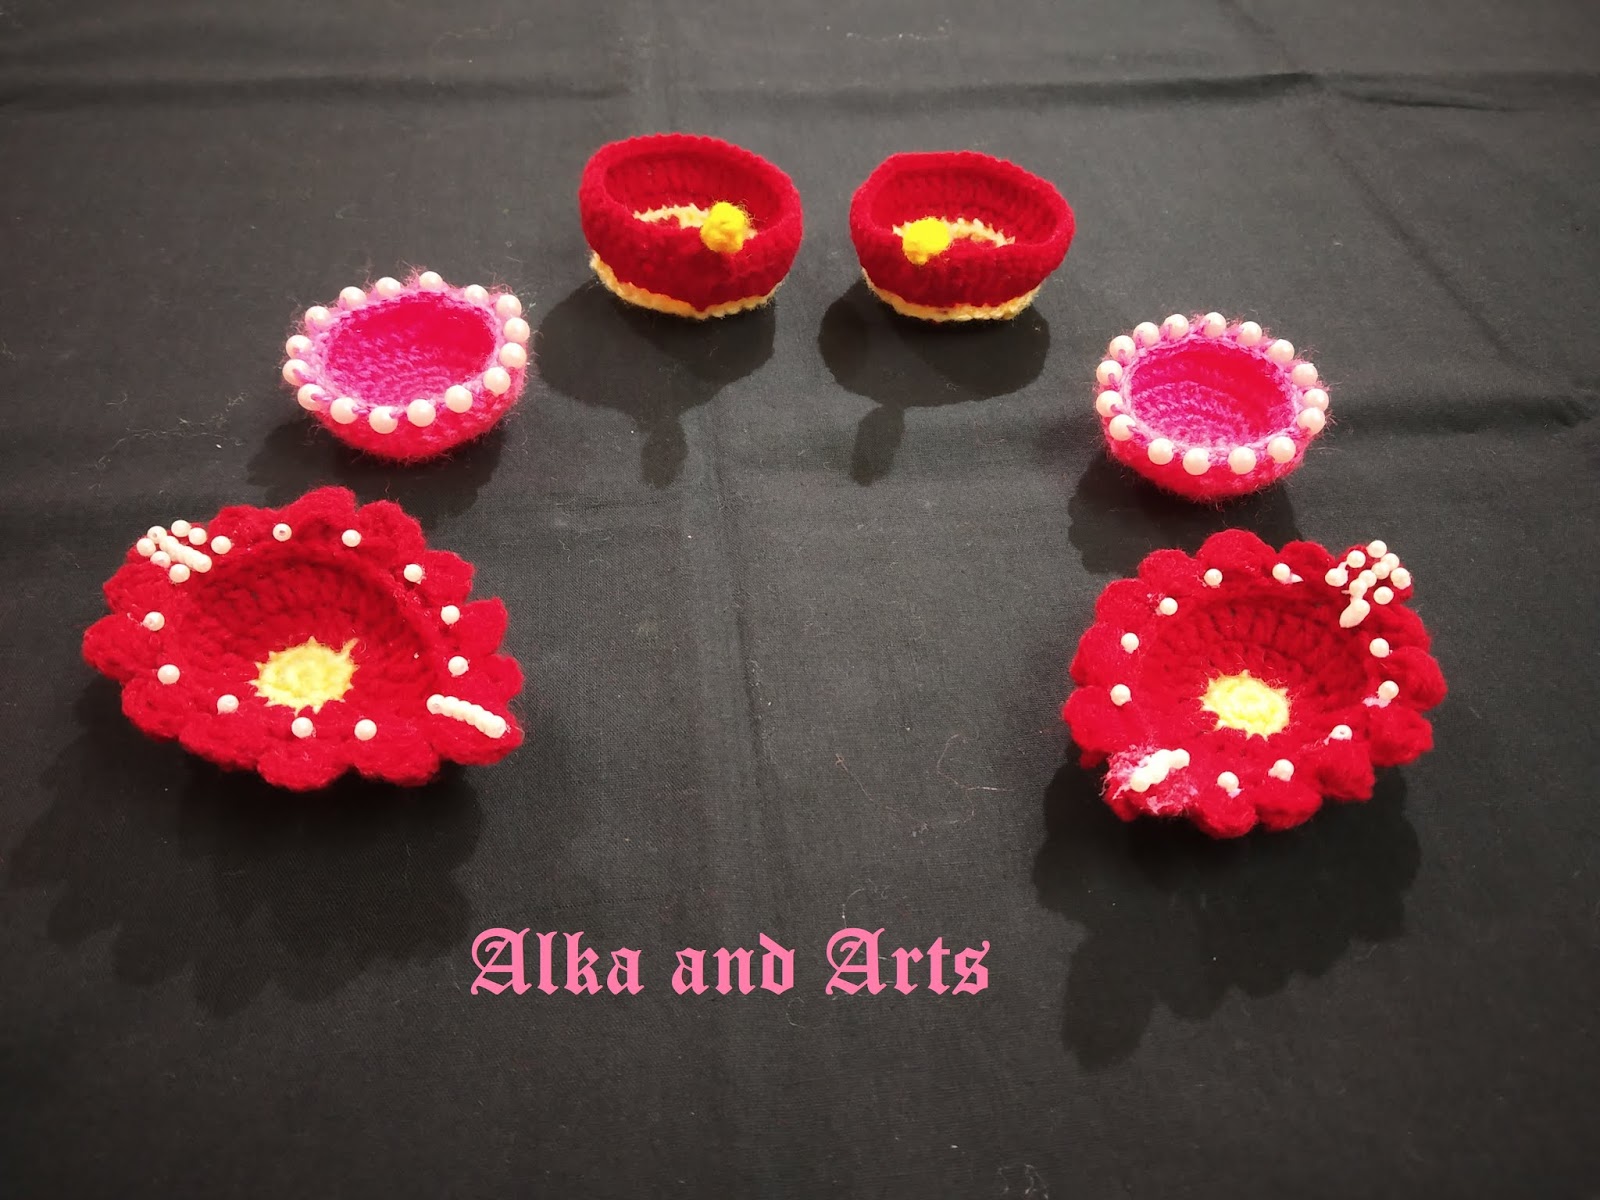
The shape of this lamp is different, leaf shape with puff border and hence it looks very beautiful.

This lamp also I made with 4 ply wool and 2.5 mm crochet hook.
Pattern: R1: With yellow yarn, make a magic loop with ch 1, sc 6, close by sl st with the first sc st. (6 sts)
R2: Ch 1, sc 2 in each st close (12 sts)
R3: Ch 3, dc 2 in the same st, (dc 1 in next, dc 2 in next) repeat till end, close, (18 sts)
R4: Ch 4, treble 2 in next st, tr 1 in next, (dc 2 in next, dc 1 in next st) repeat till 2 stitches to end, tr 1 in next, tr 2 in next, tr 1 and double tr 1 in the first st of ch 4, close. (26 sts)
R5: Ch 4, tr 1 in next st, dc 1 in next, (hdc (half double crochet) 2 in next st, hdc 1 in each of the next 4 sts) repeat till last 3 sts to end, hdc 2 in next, dc 1 in next, tr 1 in next, tr 1 in ch 4's starting st. Close (31 sts) See fig 2.
Fig 2

Fig 3

R6: Join yarn at the centre of opposite side, as in fig 3, (ch 3, dc 3 in the same stitch, ch 3 join by sl st in the same st) with back loop work puff that is, [sc 1 in next st, ch 2, (YO and insert hook in the same st, YO get two long stitches out) two more times, YO pass through all 7 sts, ch 1 and fix it, skip 1 st, join the puff with next st by sl st] repeat 5 more times. BO with 1 feet yarn behind.
Join yarn with the opposite side. Now we are working on wrong side so instead of back loop we have to work in front loop so that it will look as if to work in back loop, from front side.
Work same type of 6 puffs as on other side. BO.
With that 1 ft yarn work work ch 3 and 3 incomplete tr in next 3 sts, YO and pass through all of them. BO.
Diwali lamp is ready. Now if you want you can decorate it by pasting small beads around the puffs as shown.

The following video may help you.

ETC: Enjoy the Creativity.

Thursday, October 17, 2019

Diwali Special: Diwali Lamp 2 (Panati 2)
Fig 1

Hi,
This is second type of crochet Diwali Lamp, I made. About Diwali lamp please see my post,
https://alkaandart.blogspot.com/search?q=Diwali+lamp+1
on 15th Oct 2019.
Special thing about this lamp is, it has wick and oil also 😇.

I made it in 4 ply wool with 2.5 mm crochet hook.
Pattern: With yellow yarn,
R1: In magic loop chain (ch) 1, single crochet (sc) 6, close by slip stitch (sl st) in the first sc.
Fig 2

Fig 3
R2: Ch 1, sc 2 in each stitch (st), close. (12 sts)
R3: Join red yarn,
(sc in that st, ch 2, double crochet (dc) 2 in same st, ch 3 join by sl st in the same st, sc 1 in the next st) repeat five more times, close.  Six petals flower is seen. See fig 2.
R 4: With yellow yarn, Ch 4, treble (tr) 1 in yellow st of round two, (sc 1 in each of the

Fig 4

Fig 5
next 3 sts at the top of the red petal, tr 2 in yellow st) repeat
till all petals worked out. (30 sts) See fig 3.
R5: With red yarn work half double crochet (hdc) in back loop of each st. close. (30 sts)
R6: Ch 3 dc2 in same st, (dc 1 in each of the next 4 sts, dc 2 in next) repeat till end. close (36 sts).
R7: Ch 1, sc 1 in each st till last 3 sts remain, (incomplete dc 1, incomplete tr 1, incomplete dc 1) in last 3 sts, yarn over (YO) and pass through all of them, BO. Hide the ends.

Stand: On back side, over the 4th round work ch 1 and then sc 1 in each st with yellow yarn.

Then I make this lamp lightened, for that make flame with yellow yarn,
Flame: Ch 3, incomplete 3 dc in first ch, YO and pass through all of them. Sew at the edge point.
Wick: Join white yarn at the end of the flame and make 20 chains. BO. See fig 4.
Lastly to show oil I use transparent plastic paper and cut small circle as in fig 5 and place it on the edge from inside. as in fig 1.

Hope you like this Diwali lamp.

This video may help you,

ETC: Enjoy the Creativity.

Wednesday, October 16, 2019

Diwali Special: Diwali Lamp 1 (Panati 1)
Fig 1
Hello friends,
A big festival in India is about to come in just 10 days. Every one is busy in preparing for this five days festival. This is my small effort for Diwali decoration. Because Diwali / Dipawali means line of lamps, so it is festival of light. Traditionally such lamps, called Panati, are lightened on five days over the festival. Those Panatis are made by mud on wheel and then dried. Light is lighten with the help of cotton wick and oil, see fig 3. In old days only simple panaties were available in market, see fig 2.  But now a days there are many decorative shapes in Panati as in fig 4.


Fig 2

Fig 3
About Diwali: Five classic elements in the Universe are Earth (Pruthvi), Water (Jal), Fire (Tej), Air (Wayu),  and Eather (Aakash), please for details read,
https://en.wikipedia.org/wiki/Classical_element


Fig 4
In India these five classic elements are said to be Panchmahabhute (five big energies or Powers). Diwali is the festival which is celebrated with one of these energies that is Fire or light and these are the small Diwali lamp lightened by wick and oil.
Hence for Diwali decoration I crocheted these lamps in fig 1. There are three types of lamps. Pink one is shapewise very simple. See fig 5. Here I am sharing the pattern for the same.
Fig 5

I use 4 ply wool and 2.5 mm hook, work little bit tightly
Pattern: 
R1: With pink colour make ch 1 and 6 sc in a magic loop, close by slip st in first st.
R2: Ch 1, sc 2 in each st, close by sl st (12 sts)
R3: Ch 1, sc 2 in same st, (sc 1 in next, sc 2 in next) repeat till end, close by sl st. (18 sts)
R4: Ch 1, hdc 2 in the same st, (1 hdc in next 2 sts, hdc 2 in next) repeat till end, close (24 sts)

Fig 6

R5: Ch 1, sc 2 in same st, (1sc in next 3 sts, sc 2 in next) repeat till end, close (30 sts)
R6: Ch 3, dc 2 in same st, (1dc in next 9 sts, dc 2 in next) repeat till end, close (33 sts)
R7: Ch1, hdc 1 in same st, (hdc 1 with bead, hdc 1 in next) repeat till end, close.

As a stand I worked hdc in each st on the back side of round four. See fig 6.


Hope that you like this. One by one I will also share other two lamps made for Diwali.

For details you can see the following video,

ETC Enjoy the Creativity.

Simple and Beautiful 3D Crochet Lotus, Home Decor, Diwali Special Showpiece

Hi everyone, This Lotus is very beautiful and simple to make. I also made it's Hanging Showpiece. For Diwali decoration it is very beaut...