Friday, June 29, 2018

Tatting Jewelry:
Fig 1
Hi friends,
 In Indian marriage ceremony there is one very important ritual part known as "Saptpadi" (sapt = seven and padi = steps). In this ritual, tying the knots with each other bride and groom revolve round the sacred fire seven times and and take seven vows of marriage. For details please see,
http://www.culturalindia.net/weddings/wedding-traditions/seven-vows.html

At the time of marriage of my son in 2010, I decided to give seven different types of necklaces in seven different colours (Fig 2) at the time of Saptpadi.
Fig 2
Out of these seven types of necklaces, one was tatted necklace and earring which I made for my daughter in law (Fig 1). That was the first time I search for the tatted jewelry. Today I could not find the link of that tatted jewelry set, only I found the earrings here,
http://funwithtatting.blogspot.in/2012/02/motif-25-carnival-earrings.html

In 2015 when I went to USA, I purchased these beads (Fig 3) but I didn't have tatting thread with me. So after returning, I tried to make one earrings using those beads, matching thread was already with me. I knew that after so much gap, its finishing didn't come up to the mark. Any way the earrings were ready and they are in Fig 4.
Fig 3

Fig 4


The design of the earrings is similar to,
https://www.pinterest.com/pin/413979390734594153/
with little changes.


Monday, June 25, 2018

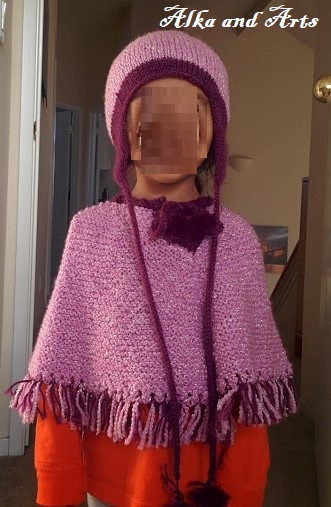
Knitted Baby Poncho 13

Pretty Poncho:
Fig 1
Hi friends,

In 2011, when I went to USA  for the delivery of my daughter,  I took hand made 3-4 small sweaters, one crochet frock, baby blanket etc with me. I lived there 3 months. After the delivery I used to get some free time. In the cupboard of my daughter, I saw this wool waiting for being knitted ( My daughter also knits, crochet and tat etc). I asked her whether I could use it? Of course she permitted. Then as sweaters, frock have done already but poncho was not made so I decided to make poncho.


Poncho: I searched for the poncho pattern and I got this,
https://lifestyle.howstuffworks.com/crafts/knitting/easy-baby-knitting-patterns6.htm                
Fig 2


Yarn used in the link was multicoloured but I have single coloured yarn so I used contrast colour border and two tassels at neck and then mixed colour fringes to the bottom edging. She wore this poncho till she was 4 years old.


First time I made I-card for this poncho and I liked it so much that later on I used it so many times.

Cap: The cap should look matching with poncho, so I decided to use two colours in the pattern I found on net,
https://heyjulie.wordpress.com/2006/06/27/basic-earflap-hat/

I-cord: For i-cord I used the following link,
https://www.youtube.com/watch?v=iJ0s_2TBwCQ

Pom-Pom: I generally made pom pom by the old iron ring as shown in fig 3, which I have at Amravati. So I made this pom-pom simply on hands.
Fig 3

I have recently started you tube channel "Kalopasak" in Marathi with subtitles in English.
So this video is from the you tube channel Kalopasak, which explains how to make pom-pom.


Recently when I was video chatting with her, what I saw!!! she wore that poncho as a skirt. 😛. (Colour change due to video chat screen)

This use of poncho, I never knew 😜.

Fig 4

Fig 5
Happy knitting.

Saturday, June 23, 2018

Tatted Earrings:
Fig 1
Hi friends,
Earrings is a  jewellery for ear. In India, ears of all girls and boys, particularly Hindus are pierced and that is one of the religious rite.

Earrings are very special jewellery type which girls like to wear most. In my twenties that is in 1974-75 simple rings were our usual earrings (fig 2).  Jhumar or Big rings with pearls attached to the bottom cord of that ring, used to be the most fashionable and functional earring as in fig 3.

Once I insisted for such big rings to my mother and she made them for me but my grand mother didn't like such big earrings and I have fearful regard for her. So I never wore those earrings. But I still loved them.


But we all sisters became habituate with only tops as earring.

Fig 2
Fig 3


Fig 4


But still I like big earrings though I never wore such. So I also like to tat such big earrings and now a days it's also a latest fashion to wear big earring.

So I made these earrings in the last week. Earrings in fig 1, are with little bit variation of the earring in,


by Roberta creazioni. Thank you very much for this pattern.

Thread used is Anchor Number 20 and beads are shown in fig 5.
Fig 5
For stringing bead crochet needle 0.5 mm is used.
Fig 6
Fig 7 shows how the bead is inserted in the thread with the help of crochet hook.
Fig 7
Happy tatting.


Wednesday, June 13, 2018

Knitted Fair Isle Cardigan 12

Fair Isle Yoke Designed Sweater:
Fig 1

Hi friends,


When I have decided to make a sweater for my husband's brother's grand daughter, I search for Fair Isle pattern because I have never tried it. Then I like this pattern given by Drop Design
https://www.garnstudio.com/pattern.php?id=7714.
After this I made one more (See fig 1A) in Red Heart wool for my niece. Every one love it very much.
Fig 1A

But the wool referred there is 8 ply so I have to see the gauge. Correspondingly I have to make many changes.
Fig 2

There are 6 colors used in Yoke design where as I have decided to use only 3 colors my favorite lavender, dark shade in that and off white. I also used red color for only one round. I have also dropped some rows from the design of yoke due to size variation.
So it is different variation of that.
Actually she is 5-6 years but quite slim so I am going to CO 84 sts in stead of 88 but on the other side the wool I am using is 4 ply and thin so I have to see my gauge. I saw it and CO 88 sts to start with. The changes in colors which I have made can be seen the above photo and I think it looks marvelous. 
Material: Vardhaman 4 ply wool 150 gm lavender color, dark purple 50 gm and off white 50 gm,  knitting circular needle 4 mm, and 3.5 mm
Fig 3


Final size: Length 20", width 13.5", sleeve length 20".
Let us see how it fits,
Fig 4


Here I have uploaded one video of, how I cast on. In knitting books I have seen various types of CO, starting from long tail CO, cable CO, CO by crochet needle, tubular CO etc
CO with double long tail method
Now see this new method of CO which is same as long tail CO only difference is here we take double yarn for the long tail. So it gives sturdy base for our work.

Here is the video for Fair Isle type colourful work in knitting.


She was so happy to wear this sweater and I am happy seeing her "happy mood".

These videos are from my Marathi You tube channel named, à¤•लोपासक "Kalopasak" means one who worships all forms of arts, that is roughly speaking who loves all forms of arts and try to appreciate them. Though the language of video is Marathi, subtitles are given in English. So I think that there should not be any problem. Please subscribe.


Love knitting.

Saturday, June 2, 2018

One More Shuttle Lace for Hanky:
Fig 1


Fig 2
Hi friends,
Last weekend I tatted this handkerchief lace (Fig 1) for the daughter of my sister. I made this lace previously also, shown in fig 2

Fig 3

Fig 4
Fig 5
Fig 6


First I made a pattern, it is very simple (Fig 3) then I decided to make a lace for hanky.
This is very simple just suitable for beginners.

Material: Coat's thread 20 number, one shuttle, crochet hook for passing thread through the picot scissor.
Tie ball and tread in shuttle together.
*Ring of 8 p, 8 ds close. Reverse,
Chain of 1 ds, 9 p. Join with the first picot of the previous ring*
Repeat from * to * till it covers all the four sides of handkerchief.
Don't cut the thread.
Hem all the four edges of the hanky by same colour.
Now go on stitching this lace to the handkerchief. Be cautious at corner.
If necessary tat further and here the beautiful hanky is ready!!
Fig 7

Happy tatting.

Tuesday, May 22, 2018

Super Summer Top:
Fig 1

Hi friends,
When your son gets married a new relation is developing between you and your daughter in law and that is relation of love, relation of faith. She is just your daughter, then it is natural that you want to knit / crochet some thing for her. You don't know her choice perfectly so you are worrying that whether she would like the sweater I would made for her or not?
But seeing this pattern of crochet top shown in fig 2, I felt in love with that and I was sure that she would definitely like the design.
YES!! she liked it very much.


2 - photo I saw
The link to this top in fig 2 is,


If you click the link and see the pattern, you may think that there are no cords and small tassels. So yes, they are not there. The reason that I made them was,

When I saw this pattern, I was in USA and it was only a week to return India. I asked my daughter in law, Priya to purchase wool of her choice before we depart. She bought biscuit colour, I also liked it. But then there was only 2-3 days to depart and I was not in a mood to start any new item to knit or to crochet. (mothers can understand my feelings of departing). So we took the yarn with us and returned India. After 15-20 days of cleaning and reconnecting with this home I started  this top and completed it. But as Priya was not here I could not see the fitting.  
Any how I managed to send it to her with her mother and she sent me this photo. I was so happy that she liked the top.
Fig 3 
But then in our next trip, she told me that the top does not fit her. It seemed to be loose. (She maintained her well or the yarn get loose) Then I found a solution and I made two cords with tassel at each end, one at neck and other at waist. She was so happy to see that aai had made it well fitted again, see fig 1.
Wow! look then! how beautiful it looks!
She wore it again in our next trip and I felt so happy to see her in my favourite top.
I think that summer is ending now so this time is perfect to post this pattern.
Last but not list I am really thankful to Doris Chan for such a wonderful pattern.

Monday, May 14, 2018

Stunning Shawl:
1.Stunning shawl

Hi friends,
Many times we saw some beautiful items and we wished that we should make it. Same thing happened about this shawl. I saw it in exhibition, I liked it so much that I purchased one pear coloured for my daughter. I thought that I should do it before giving it to her.  But at that time life ran on such a fast track  that I could not do it till I gifted it to her.  But then after two years when I went to USA, I decided to try it and it worked out.
See how stunning it looks when wore on a matching saree.


Gorgeous look
Perfect in height
Material: Wool Vardhaman 4 ply 300 gm, 

Ready size: Diagonal 6.5 ft and height 3.5 ft
In figure 4, you can see small rectangular spaces, first 1, in the next row 3, in next 5 then in the next row 3 spaces, 1 filled then 3 spaces.
For writing convenience we call them windows. 1 window, 3 then 5 windows and so on.
When there are four dcs in that window then we call it close window.
Instructions: Start with ch 4, Close the ring and sl st on four chains.
Row 1: Ch 3 turn, dc 2 in the ring, dc 1 on the next st.
Row 2: Ch 3 turn, dc 2 in the beginning st, dc 1 on the next st, ch 2, skip two dc and dc 3 on  the first dc of the previous row ( first window formed).
fig 3

fig 4


Fig 5, Starting


Row 3: Ch 3 turn, dc 2 in the beginning stitch, ch 2, ch 2, dc 1 on one side dc of the window in the previous row, ch 2, dc 1 on the second side dc of the window formed in the previous row, ch 2, dc 3 in the next st. (3 windows formed).

Row 4: Ch 3 turn, dc 2 in the beginning st, (ch 2, dc 1 on one side of the window in the previous row), repeat 4 times, (5 windows formed), dc 3 in the third chain of the previous row.
Row 5: Ch 3, dc 2 in the beginning st, (ch 2, dc 1 on one side of the window in the previous row), repeat 2 times, dc 1 on the side dc of middle Third) window of the  five windows in the previous row, dc 2 in the third window, dc 1 on the other side of the middle third window of the previous row, (ch 2, dc 1 on one side of the window in the previous row), repeat 2 times, dc 3 in the third ch out of first three ch in the previous row.
Row 6: Ch 3 turn, dc 2 in the beginning st, ( ch 2, dc 1 on one side of the window in the previous row), repeat 2 times, [dc 1 on the side dc of the window, dc 2 in the  window, dc 1 on the side dc of the window], We shall call [this] "make close window". ch 2, dc 1 on one side of the window, [dc 1 on the side dc of the window, dc 2 in the window, dc 1 on the side dc of the window] or make close window, ch 2, dc 1 on one side of the window in the previous row), repeat 2 times, dc 3 in the third st of the starting three sts of the previous row.
Row 7: ch 3 turn, dc 2 in the beginning st, ch 2, close the window on the last open window of the previous row, then make 3 open windows, make 1 close window on the next open window (which is in between two close windows of the previous row), make 3 open windows, make 1 close window on the very first open window of the previous row, ch 2, dc 3 on the third ch of the three chains made at the starting of the previous row.
Row 8: Ch 3 turn, dc 2 on the very beginning st, ch 2, dc 1 in the last open window of the previous row, ch 4, dc 1 on the same space, ch 2, make a close window on the last open window of the previous row, then make 5 consecutive open windows, make next close window, ch 2, dc 1 in the very first open window of the previous row, ch 2, dc 3 on the third ch of the three chains made at the starting of the previous row.
Row 9: ch 3 turn, dc 2 on the very beginning st, ch 4, (dc 1, ch 1 in the chain four gap of the previous row) repeat 5 more times, ch 4, make close window on the last open window out of five open windows of the previous row, make 3 consecutive open windows, make 1 close window on the very first open window out of five, ch 4, (dc 1, ch 1 in the chain four gap of the previous row) repeat 5 more times, ch 4, dc 3 on the third ch of the three chains made at the starting of the previous row.
Row 10: Ch 3 turn, dc 2 on the very beginning st, ch 5, sc 1 in the chain one gap out of five ch one gaps formed in the previous row, (ch 3, sc 1 in the next gap) repeat three more times. Four chain 3 gaps are formed. Ch 5, make one close window on the open windows out of three made in the previous row, make one open window then make one close window, ch 5, sc 1 in the chain one gap out of five ch one gaps formed in the previous row, (ch 3, sc 1 in the next gap) repeat three more times. Four chain 3 gaps are formed. Ch 5, dc 3 on the third ch of the three chains made at the starting of the previous row.
Row 11: Ch 3 turn, dc 2 on the very beginning st, ch 5, sc 1 in the three chain gap formed in the previous row, (ch 3, sc 1 in the next gap) repeat two more times. Three chain 3 gaps are formed. ch 5, make 1 close window on the middle open window of the previous row, ch 5, sc 1 in the three chain gap formed in the previous row, (ch 3, sc 1 in the next gap) repeat two more times. Three chain 3 gaps are formed. ch 5, dc 3 on the third ch of the three chains made at the starting of the previous row.
Row 12: Ch 3 turn, dc 2 on the very beginning st, make 1 open window on the last three dcs, Make 1 close window in the gap of ch 5 (underlined in the previous row), ch 5, sc 1 in the three chain gap formed in the previous row, ch 3, sc 1 in the next gap, Two three chain gaps are formed. Ch 5, make one close window in the five ch gap of the previous row, next make one open window, then again make 1 close window in the five ch gap, ch 5, sc 1 in the three chain gap formed in the previous row, ch 3, sc 1 in the next gap, Two three chain gaps are formed. Ch 5, make 1 close window in five chain gap, make 1 open window on the vary first window of the previous row, dc 3 on the third ch of the three chains made at the starting of the previous row.
Row 13: Ch 3 turn, dc 2 on the very beginning st, make 3 consecutive open windows, make 1 close window in the five ch gap, ch 5 sc in the chain three gap, ch 3, sc in the next chain three gap. One chain three gap is formed. Ch 5 make 1 close window in the five chain gap, make 3 consecutive open windows, make 1 close window in the five ch gap, ch 5 sc in the chain three gap, ch 3, sc in the next chain three gap. One chain three gap is formed. Ch 5, make 1 close window in the five chain gap, make 3 consecutive open windows, dc 3 on the third ch of the three chains made at the starting of the previous row.
Row 14: Ch 3 turn, dc 2 on the very beginning st, make 5 consecutive open windows, make 1 close window in the five ch gap, ch 6, sc 1 in the three chain gap, ch 6, make 1 close window in the five ch gap, make 5 consecutive open windows, make 1 close window in the five ch gap, ch 6, sc 1 in the three chain gap, ch 6, make 1 close window in the five ch gap, make 5 consecutive open windows, dc 3 on the third ch of the three chains made at the starting of the previous row.
Row 15: Ch 3 turn, dc 2 on the very beginning st, (make 3 consecutive open windows, make 1 close window on the next open row of the previous row, make 3 consecutive open windows, make 1 close window in the six chain gap, ch 2, make 1 close window in the six chain gap) repeat once , make 3 consecutive open windows, make 1 close window on the next open row of the previous row, make 3 consecutive open windows, dc 3 on the third ch of the three chains made at the starting of the previous row.


Repeat rows 8 to 15 till the required height is attend. 

Last row: Make hdc (Half double crochet) in every stitch on all the three sides. Bind off.

Tassels: I have taken 10" four strands for each tassel. Hold them together with ends in your hand. Fold the in center and add tassel to the expected place as shown in the next figure,

Fig 6

Add three tassels at the three vertices of the triangle and then with equidistant tie to both sides.


Simple and Beautiful 3D Crochet Lotus, Home Decor, Diwali Special Showpiece

Hi everyone, This Lotus is very beautiful and simple to make. I also made it's Hanging Showpiece. For Diwali decoration it is very beaut...