Blog about all crafts - knitting, crocheting, tatting etc.
Wednesday, October 31, 2018
Baby Bonnet:
Fig 1
Hi friends,
Last week I made this bonnet matching to that T2P2R1 crochet sweater.
The technique is some what like crochet booty. See my post on 3 Sep 2018,
To start with make 67 foundation chains.
R 1: Starting from second ch, sc on each st.
R 2 (WS): Row of Cluster stitch
R 3: Ch 3, dc on each st.
R 4: (WS) Cluster st.
See fig 2.
Fig 4
Fig 5
Repeat R 1 to R 4 till the height is 6" - 6.5". End with
R3 and bind off.
Thus rectangle 13" X 6" is formed. Fig 3.
Now join the yarn at 23rd st from starting.
Work only 22 sts with sc in each st. See fig 4
Repeat this row till the height of this middle extended part is 4.5"- 4.7", (Fig 5) equals to the one third part of the rectangle which we skipped. Bind off. .
Fig 6
Fig 7
Now we have to sew the two parts (One side of the extended part with the skipped 1/3 part of original rectangle we made) as shown in fig 6. Similarly sew another side of extended part with the remaining 22 sts part of original rectangle.
Now we get the shape of bonnet as shown in fig 7
Fig 8
Belt: Join the yarn at one end make 35 chain turn and make sc on each st starting from second. Then make sc on each st of lower portion of the cap (all the three sides), when reach at another end make 35 chains again then turn and sc on each ch starting from second.
Here also as in case of sweater we make ball instead of pom-pom to match the design. See fig 8.
Make two balls as said in sweater and attach them to each belt.
Here is the beautiful set of pink colour is ready for your most beautiful angel. See fig 9.
Fig 9
Happy crocheting.
Saturday, October 20, 2018
T2P2R1 Designed Sweater Completed
Fig 1
Hi friends,
After my last post there was one of the important festival called "Dasara", when younger people used to distribute Bauhinia racemosa leaves, (we call it Aaptyachi paan, my brother told me this name) to show respect towards elder and to seek blessings from them. As usual I drew a rangoli (see fig 2) in my front yard to welcome the young people visiting our home.
Then I started knitting the remaining part. I made second part similar to the first one (see fig 3).
Folded them properly and just see, how it would look? Fig 4.
Then sewed the back part first and then two sides up to armhole. Fig 5.
Fig 3
Fig 4
Fig 5
From back side also it looks great as all slant lines of single crochet forms a beautiful texture design. Fig 6.
Fig 6
Fig 7
Then for tying, I thought that instead of pom-pom, I should make small balls which would be matching to the design. So I made two, see fig 7. Attached them to two sides.
Finally my T2P2R1 designed sweater was completed and it looked like fig 1.
Happy crocheting.
Hi friends, You must be thinking about this strange title of my post. Does it look like a chemical formula of some compound? just like H2O for water or C12H22O11 for suger or you may be thinking that; this ex-mathematics professor might be in a dream of some mathematics problem and she mixed it with sweater. Sorry friends but this is not the case. Last week I saw one You tube published on 27th Sep 2018, namely SAL YELEK YAPIMI with address, https://www.youtube.com/watch?v=dx3SXujhAyk&t=5s
I didn't understand the language but it was a knitted baby dress which I liked very much. When I saw it, I came to know only one thing that the pattern was started from three stitches then by increasing the sts properly a right angled triangle was formed then a parallelogram over it, then a rectangle again parallelogram and lastly triangle. Wow!! I responded spontaneously, what a geometrical design!! Initially I thought that I should knit that sweater, but then crochet sweater in my hand (which I made last week) whisper that No.. no.. don't knit, you should try your own crochet design of this type and YES! I tried...
This is half part if you unfold it then it will be clear, that why the name is T2P2R1. See fig 2,3 and 4.
Fig 2
Fig 3
Fig 4
Once I understood the pattern type, I started with,
R 1: ch 2 and sc 3 in the first ch. ch 1, turn, (3 sts)
R 2: sc 1 in the same st, sc 1 in the next st, sc 2 in the last st, ch 1 turn, ( 5 sts)
R 3: sc 1 in the same st, 1 sc in each of the remaining sts till the last st, sc 2 in the last st, ch 1 turn, (7 sts)
R 4: As R 3 (9 sts)
See fig 5
When I went on increasing 2 sts in each row, after 5-6 rows I saw that the triangle was going to be obtuse and not right angles triangle. In a simple language the corner edges were not perfect perpendicular. So I decided to make one row of only dc ( without increasing) after 4 rows every time.
Repeated this till the lengths of two perpendicular sides were 6". Fig 6. Counted the sts they were 39.
Fig 5
Fig 6
Fig 7
Now I have to make parallelogram on this triangle, so I increase 1 st from one side (by working 2 sc in a same st) and decrease 1 st from other side ( by 2 sc tog) continuously in each row and got the expected shape. See fig 7. Repeated this till the length of smaller side was 7" and that of larger side was 13".
Here I had to wait, because the design in that knitted pattern was bubble st type, first I tried for puff st but it didn't work. Then I tried bubble st, with bubbles one over other but I was not pleased with that also. Then I tried this with one row of sc with bubbles and other row of dc and bubbles not one over other but one in between the two of previous row. See it in fig 8. You may try your different designs here. I worked this rectangle 6" x 8" that means 8" height.
Fig 8
Then again made parallelogram but remember the direction and first decide that on which side sts should be decreased and on which side sts should be decreased.
Lastly worked triangle with those 39 sts, decreasing 2 in each row for 4 rows that is 39 - 37 - 35- 33 after that one row of sc only (no decrease or increase) then again 31-29-27-25, one row or all sc and so on.till one st. remain. Bind off.
This will look as in fig 2.
Second part is yet to make. Hope that it would be completed soon.
Happy crocheting ....
Tuesday, October 9, 2018
Beautiful Baby Jacket
Fig 1
Hi friends,
After making a crochet cap, I thought about a jacket and as there was time limit, again I decided to make a simple design.
Sweater Pattern: Make 95 chains.
R 1: dc on each chain starting from 4th ch from the hook. Thus 92 dcs. Ch 3 turn,
R 2: Make dc on each of 91 sts ( 91 dcs + 1dc of starting 3 chs. Total 92 sts).
Repeat these two rows till the length is 6.5". Thus we get the rectangular shaped, see fig 2.
Fig 2
Fig 3
Then fold the rectangle as shown in fig 3. Thus total 92 sts are divided in three parts
92= 23 for right front + 46 for back + 23 for left front.
See fig 3, 4 and 5.
Fig 4
Fig 5
For armhole 6 sts are left unworked 3 -3 from front and 3 from back of that rectangle in fig 3..
Right front:
Row 1: Ch 3, dc on each of next 19 sts ( including first dc as 3 chains total sts 20). ch 3 turn,
Row 2: dc on each st.till last 2 sts, 2 dc tog. (Neck decrease). Ch 3 turn,
Row 3: dc on each stitch till last 2 sts, 2 dc tog. (Here arm hole decrease is complete 3 sts left unworked +1 decreased just now =4) Ch 3 turn,
Row 4: dc on each st.till last 2 sts, 2 dc tog. (Neck decrease). Ch 3 turn,
Row 5: dc on each st.
Repeat rows 4 and 5 till 13 sts remain for shoulder.
Repeat row 5 till the total length is 12" / 13".
Count 20 sts for left front and place marker. See fig 6
Fig 6
Now going in the same direction as if you are working the first row after the rectangle, join yarn skipping 6 sts for armhole. Keep the direction same so that the design made by the rows of double crochet is not disturbed. Back: Work ch 3 (this is our first dc) then dc in each of next 37 sts., on the last 2 sts work 2dc tog, (arm hole decrease) (Total 39 dc). Ch 3 turn.
Next row: dc on each of next 36 sts, on the last 2 sts 2dctog. (armhole decrease of other side. ( now total 38 sts)
Now work double crochet on each st till the height is 12"/ 13". Note that first dc will be always ch 3.
Bind off. Left front:
Skipping 6 sts from the back join the yarn where the marker is placed.
R 1: Ch 3 then 1 dc on each of the 19 sts. Ch 3, turn
R 2: 17 dc on next 17 sts, 2dc tog in the last 2 sts. (Armhole 4 decrease completed). 19 sts. Ch 3 turn,
R 3: 1 dc on each of the next 16 sts. next 2 dc tog. (1 decrease of neck line). Ch 3 turn,
R 4: dc on each st. Ch 3 turn
Repeat rows 3 and 4 till 13 sts remain for the shoulder.
Repeat row 4 till the height is 12" / 13". Bind off.
Fig 7
Fig 8
Now by tapestry needle sew the shoulders loosely. Now it gets the form as in fig 8.
Here we want to make puff border as we have done for the cap in my previous post, https://alkaandart.blogspot.com/search?q=crochet+baby+cap
So join the contrast coloured yarn on some back side stitch and work puff stitch and join each puff in the third st, by skipping 2 sts. It will look some thing like fig 9.
Fig 9
Fig 10
After completing the border, it will look like fig 10.
Now it remains to make 2 pom-pom with both colours and join by 25 chains as in fig 1.
You can also refer this video with English subtitles.
Finally my set was looking as in fig 11.
Fig 11
Happy crocheting.
Saturday, October 6, 2018
Crochet Baby Cap
Fig 1
Hello friends,
Next week I have to go to my friend's home for the name ceremony( we call this ceremony as Baras) of her grand son. I decide to make a quick jacket and cap as winter will be arriving in a month.
For the cap I chose traditional design with only puff stitch border and a mix colour pom-pom at the top.
So on the last Saturday, I started it. I used here Oswal Winter Special yarn. It was little bit thick so helps to save the time.
Fig 2
R 1: Magic loop of 8 dcs.
R 2: (2 dc in each st) repeat
R 3: (2 dc in one st, 1 dc in next st) repeat
R 4: (2 dc in one st, 2 dc in next st) repeat
The work was just shaping as a cap. (Fig 3)
R 5: (2 dc in one st, 3 dc in next st) repeat
R 6: (2 dc in one st, 4 dc in next st) repeat
R 7: (2 dc in one st, 5 dc in next st) repeat
R 8: (2 dc in one st, 6 dc in next st) repeat
Once I checked that circumference was 16" then I made R 9 to R 16 as dc on each st. (Fig 4)
Fig 3
Fig 4
Fig 5
Once again check the size. Circumference 16" and height 7". See fig 5 and 6.
Fig 6
Fig 7
Fig 8
Finally the contrast colour yarn was joint and puffs were made and connected to the st, skipping 2 stitches, by slip st.
See fig 7 and 8.
I know that this is not a new pattern, rather it is old and traditional pattern but I like it's shape and hence I made it. Only it's border is new and I am going to make one simple and cute jacket matching this cap. That also I have to finish quickly because naming ceremony is waiting for me. Probably that will be my next post.
You can also refer this video with English subtitles.
Happy crocheting.
Monday, October 1, 2018
Fig 1
Flower Fever
Hello Friends,
Once the roses are made (my previous post), I think, I have Flower fever.
Since so many days, rather 5-6 years, this frame is with me. Now I take it out to put a photo of my grandson and grand daughter in this. Broadness of the frame invites me to decorate it some how. Of course I know that once their photo is fixed, no need to decorate it 👧👦. First I think that tatting lace will be good, but it will take time (I will make it later on, I have one more frame like this). Then I remember these Puff flowers, they are so cute and they are in my wish-list. As I said about my Flower fever, it works and I decided to make them.
Bella Coco's flowers I saw again, the link is here,
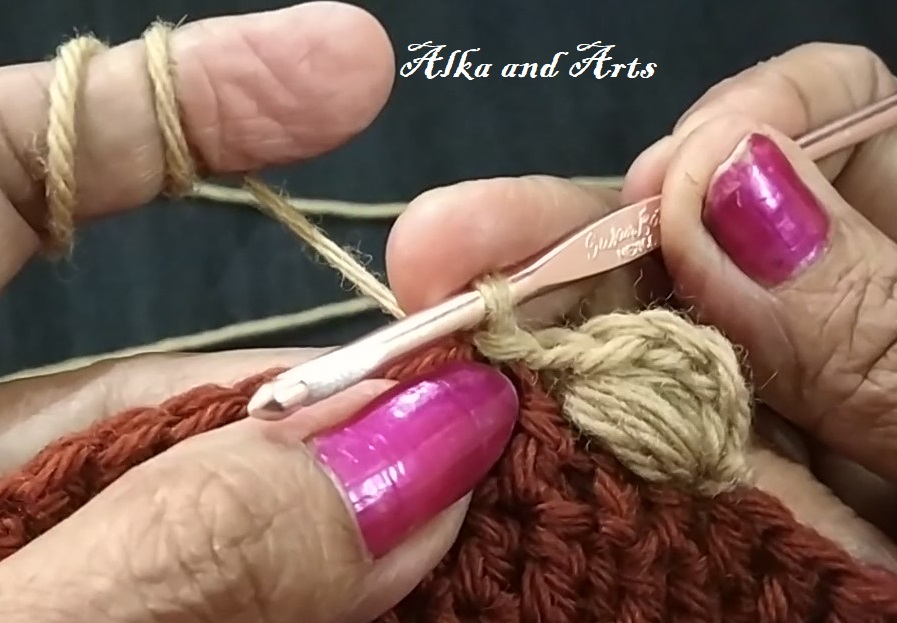
I have thin yarn so I used 3mm hook, some flowers I made with 5 long and loose stitches instead of 4. First I made red flowers with corresponding changes.
Fig 2
Fig 3
But finishing was not up to the mark, first time making was easily seen. Fig 2. So I thought that they were not suitable for frame. Then I attached them with hair clip, thought that small baby might not understand my bad finishing 😅. (Fig 3)
Fig 4
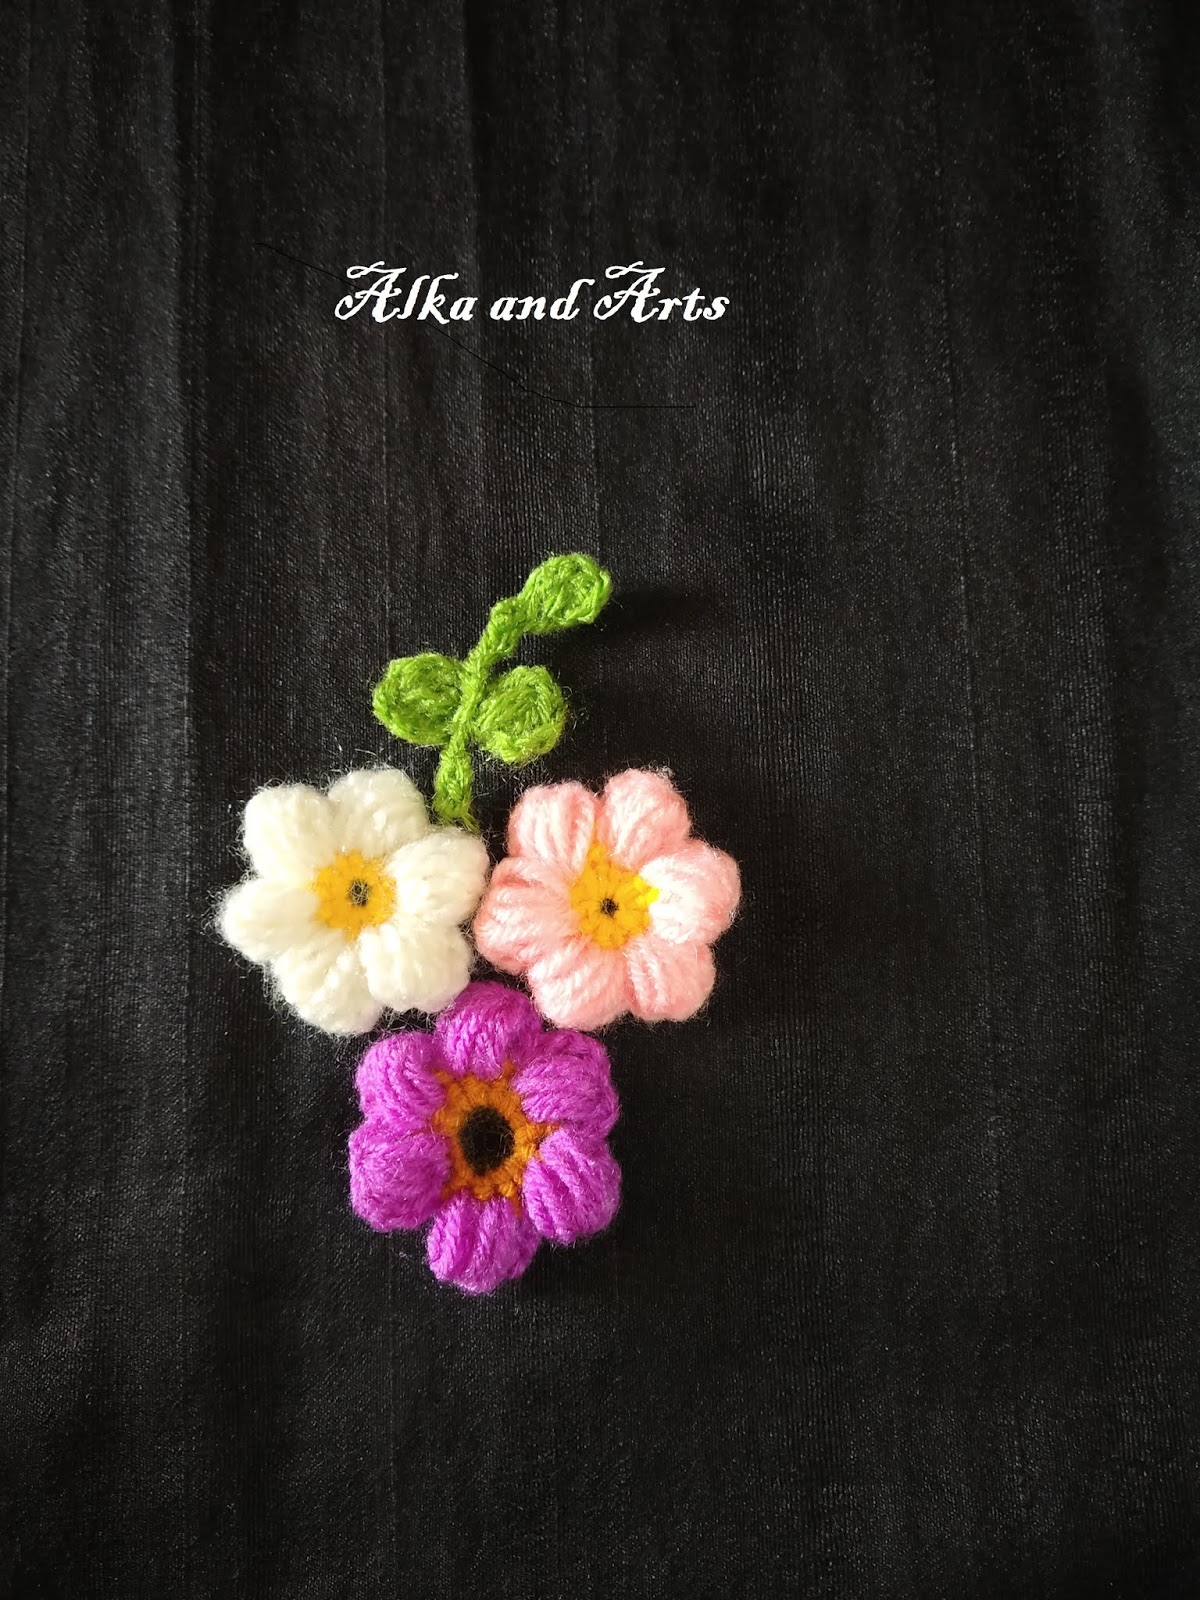
Then made some more flowers carefully and they looked so cute. I also made Puff leaves and wow! I liked this arrangement.(Fig 4)
Still my original intention of decorating that frame was not fulfilled, so I made different arrangements of these flowers on the frame. Please help me that how I should glue them? As in fig 1, 2, 5 or 6?
Fig 5
Fig 6
I will make two more white flowers for hair clips as I, myself don't like red clips. Fig 7.
Fig 7
One more use of these flowers, if you remember I posted about the tradition of drawing RANGOLI around the lunch plate for special invitees, see my posts, https://alkaandart.blogspot.com/search?q=beaded+rangoli
So how the rangoli made by these puff flowers will look? See fig 8.
Fig 8
Following is the video in Marathi but with English subtitles for Puff flower decoration,